How to map variables to frames
You can map PcVue variables to frame items either directly from the variable's properties dialog, or by using the Equipment Mapping dialog.
Mapping a variable to a frame item using the variable's properties dialog
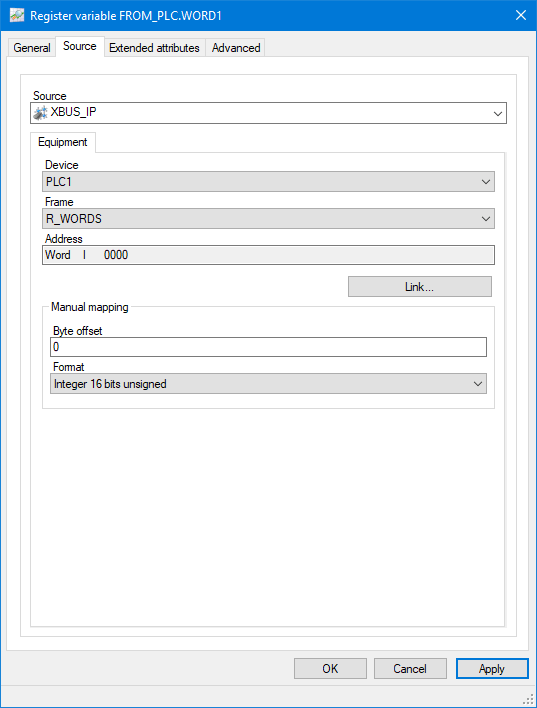
- Display the variable's Source tab.
- In the Application Explorer expand the variables tree and select the variable.
- Select the Properties task. The Variable Properties dialog opens.
- Select the Source tab.
 Show picture
- Select the Network, Device and Frame.
- Using the Source list box, select the network. The network is referenced using the network name that was entered when it was configured in PcVue. Once you have selected the network, the attached devices and frames appear in the dialog.
- Using the Device list box, select the device.
- Using the Frame list box, select the frame.
- Click on the Link... button to open the dialog box where you will be able to select the address in the frame.
- Double click in the right pane on the row corresponding to the address you want to map the variable to in the frame. The Equipment Mapping dialog closes and the chosen device, frame, and offset appear in the variable's Source tab.
- Alternatively, you can define the mapping manually by entering the offset within the frame and data format directly.
- Click OK to confirm the configuration and close the dialog.
Using the Equipment Mapping dialog
The Equipment Mapping dialog is opened from the Application Explorer by selecting a Network under the Equipment node and select the Mapping task. ![]() Show picture
Show picture
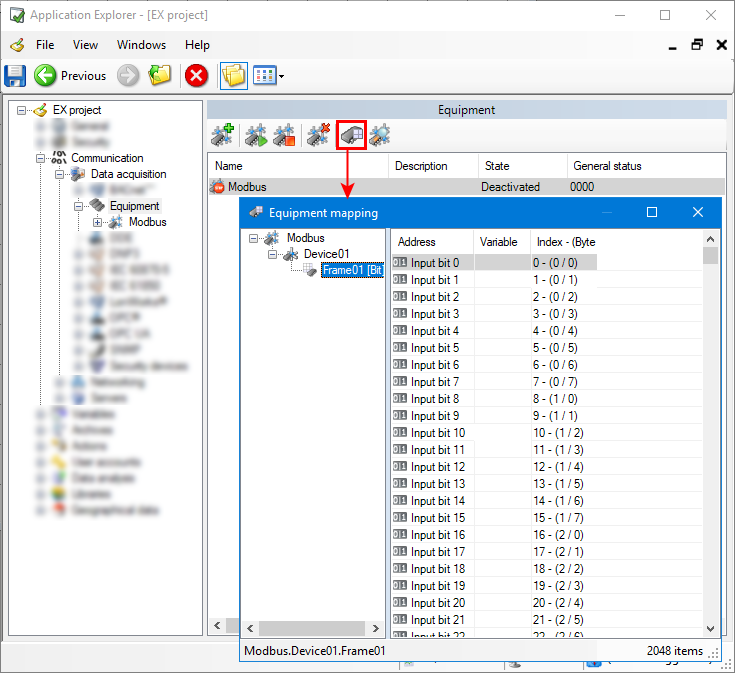
The left pane of the Equipment mapping dialog contains a tree display of the configured networks, devices and frames. When a frame is selected, the right pane contains a list of the items with three columns.
- Address - The reference of each item within the frame.
- Variable - The name of the variable linked to the item in the frame (if any). If [...] is displayed, there are variables mapped on one or more sub-addresses. Select the line to display them in the bottom panel, and see How to map a variable to a sub-item for more information.
- Index - The item reference relative to its frame.
Right clicking on an item in the right pane displays a context menu with the following commands.
- Map new variable - Allows you to automatically create a new variable and link it to the item.
- Map existing variable - Opens the Variable Selector dialog from where a variable can be selected and linked to the item.
- Unmap item - Un-maps (removes the link) between an item and a variable. Only available if a variable is linked to the item.
- Variable properties - Displays the Variable Properties dialog for the linked variable. Only available if a variable is linked to the item.
How to create and map a new variable
- Open the Equipment Mapping dialog.
- Expand the configuration tree in the left pane selecting the network, device and frame that contain the item to which the variable is to be mapped.
- In the right pane, right click on item to which the new variable is to be mapped and, from the context menu, select Map new variable.
- The Create Variable dialog is displayed. The variable type - register, bit or text - will correspond to the frame type. Click OK to automatically create a variable and link it to the item.
- Repeat steps 2 to 4 to create more variables and close the Equipment Mapping dialog when finished.
You can also display the Create Variable dialog by double clicking on an item.
Options available from the Create Variable dialog
The following options are available from the Create Variable dialog. ![]() Show picture
Show picture
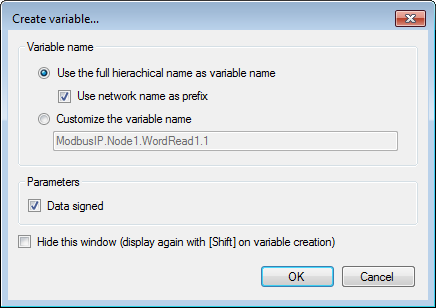
- Use the full hierarchical name as the variable name - Automatically generate the variable name using the device name, frame name and item index.
- Use network name as prefix - Prefix the automatically generated variable name with the network name.
- Customize the variable name - Do not automatically generate the variable name. Instead, you must manually enter the name in the field provided.
- Signed data - The data contained within the item will be configured to use a signed data type (as opposed to an unsigned data having only positive values).
- Hide this window - If selected the dialog is hidden and the variable is generated by selecting Create variable from the context menu with no further action. The dialog can be displayed again by using shift key when selecting Create variable.
How to map an existing variable
- Open the Equipment Mapping dialog.
- Expand the configuration tree in the left pane selecting the network, device and frame that contain the item to which the variable is to be mapped.
- In the right pane, right click on item to which the variable is to be mapped and, from the context menu, select Map existing variable.
- The Select Variable dialog is displayed. Select a variable and click OK to link it to the item. Note that you must select a variable that is not already linked and its type - register, bit or text - must be appropriate for that of the frame.
- Repeat steps 3 to 4 to link more variables and close the Equipment Mapping dialog when finished.
Un-mapping a variable
- Open the Equipment Mapping dialog and select the item from which the variable to be un-mapped.
- From the context menu, select the command Unmap item.
- A dialog will appear asking for confirmation. Click OK to confirm the operation.
How to map a variable to a sub-item
For frames of type Word and Double word, it is possible to map a variable to a sub-item, a byte or bit address in general. ![]() Show picture
Show picture
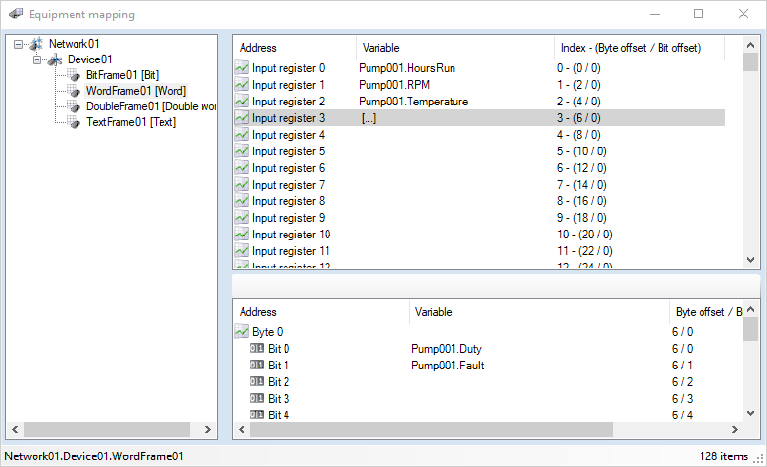
When a frame supporting sub-items is selected, an additional pane appears at the bottom. It displays the available sub-items and variables linked to them. In the above screen-shot there are two bit variables mapped to bit addresses of the byte 0 of a word frame. The mapping process for sub-items is the same as for mapping an item. In the top right pane, the [...] symbol appears in the Variable column for items that have linked sub-items.
Mapping sub-items can be very useful when tuning the communication. Consider the following scenario.
The field device memory table design is such that there is a continuous address range of 64 input registers except one the registers, for example register 32, is used to handle boolean information. Without the use of sub-items, the configuration would have to contain three frames, a register frame from 0 to 31, a bit frame for just register 32, and a register frame from 33 to 63. By using sub-items only a single register frame, from 0 to 63, is required. The bit addresses of the register containing boolean information can be mapped to bit variables using the mapping on the sub-items. Reading one large frame is considerably more efficient than reading three smaller ones as you divide the number of requests and responses by a factor 3.