How to configure Labels
With PcVue, the application designer has the possibility to customize a variety of text strings used in mimics and visible by runtime users. These labels can be bilingual if the application is configured to have runtime text strings in 2 languages.
-
Level labels are associated with each level of these categories: Command levels, Browsing levels, Alarm acknowledge levels, Alarm masking levels, and Alarm maintenance levels. They can be up to 255 characters.
-
Associated labels are configurable sets of strings that are used as representations for a variable's value when it is displayed and / or logged. For example, the value of a bit variable can be represented by the labels STOPPED and RUNNING (instead of values 0 and 1). There are three types of associated labels that can be configured:
-
Bit: Strings representing the values zero and one for each context in which bit associated labels can be used.
-
Alarm: Strings representing each of the possible alarm states, plus user actions associated with alarms.
-
Enumerated: This associated label comprises a list of discrete values and corresponding labels. When an enumeration label is associated with a variable, in those aspects of PcVue HMI that support it, the enumerated labels can be displayed instead of the variable's value. Depending on the intended use of the label, attached to register or text variables, the list of enumeration values can be numbers or strings.
The strings provided by theses labels are displayed in the Application Explorer, mimics, the Web Scheduler to display meaningful labels in place of BACnet Schedule output values, and stored in the archive units. In mimics, the strings from associated labels can be displayed in the alarm and log viewers, by the Text-Label and Send-Bit animations. Any number of bit, alarm and enumerated labels can be configured.
Label type Variable type Application Explorer Mimic animations Web Scheduler Archive units - Alarm & Log viewers Bit Bit Yes Yes No Yes Alarm Alarm Yes Yes No Yes Enumerated Register Yes Yes Yes Not applicable Enumerated Text Yes Yes No Not applicable Labels associated to user actions are also available. They are displayed in a Log Viewer that has been configured to display user actions like login and logout.
-
-
Extended attribute labels are customizable variable extended attribute names. Extended attributes labels are visible in the Application Explorer and can be displayed in the column header of a Grid control for instance. The labels are pre-defined and can be customized by the application developer.
-
Timestamp quality labels are a set of strings that are used when displaying the timestamp quality of variables. They are useful if data timestamps are set at the device level, for example by an OPC Server. The timestamp quality labels appear in the Application Explorer and can be displayed in the Alarm and Log Viewers by using the #x format character. The labels are pre-defined and can be customized by the application developer.
In the dialog boxes used to configure labels, the use of a dimmed italic font indicates that the label is not customized.
Configuring Level labels
Level labels are only an aid to configuration, they are displayed instead a level Id wherever a level appears as a property in a dialog. They do not appear at runtime.
-
Open the Application Explorer and select Labels under the General node.
-
Double-click Level labels in the content pane then a category of levels. There are five categories of levels:
-
Command levels
-
Browsing levels
-
Alarm acknowledge levels
-
Alarm masking levels
-
Alarm maintenance levels
If the project is configured as bilingual, you can use the Ellipsis button adjacent to each field to enter the string for the second language.
-
-
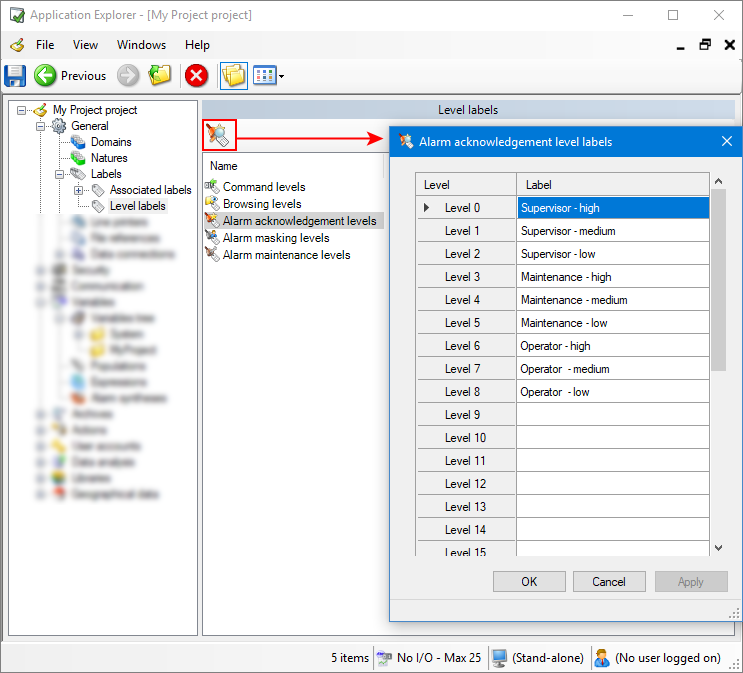
Click on a category then properties button in the toolbar. A dialog box appears.
 Show picture
 -
Enter level labels where appropriate. The labels are displayed as an aid to configuration wherever the level appears as a property in a dialog (instead a level Id). For example the configured labels appear in the drop-down list of Levels property in the Advanced tab of variable configuration.
-
Click Apply to save the changes, then OK to close the dialog box.
Configuring an associated label
There are three types of associated labels that can be configured, Bit, Alarm, and Enumerated. If you do not associate a specific associated label with a bit or alarm variable then strings from a default associated labels set are used. Default labels for bits and alarms exist and can be customized by the application developer.
-
Open the Application Explorer and select Labels under the General node.
-
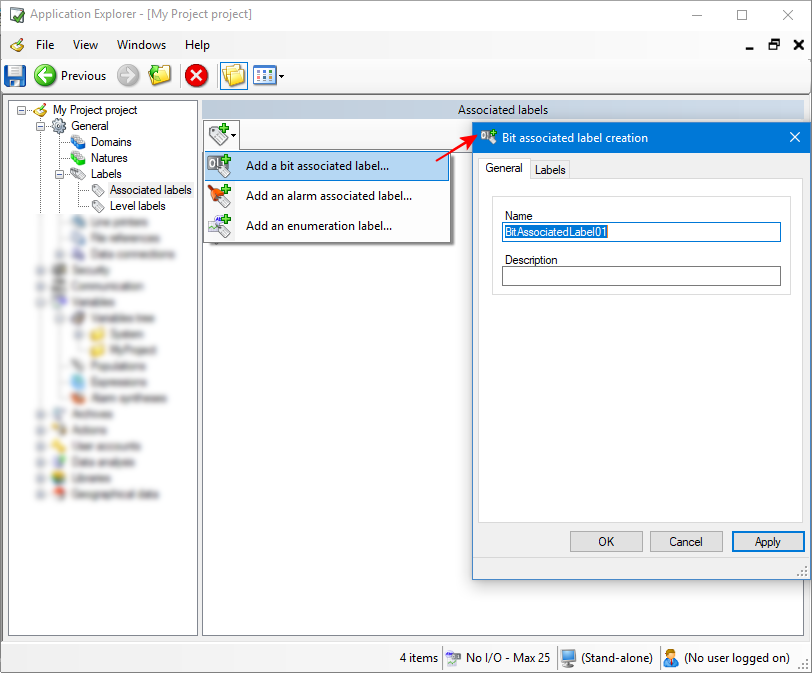
Double-click Associated labels in the content pane then click Add an associated label button in the toolbar and select an associated label type. A dialog box appears.
Show picture -
Enter the name of a new associated label and an optional description. The name is used when attaching the label to a variable.
-
Click Labels tab. The configuration of this part depends on the associated label selected:
(Bit and Alarm associated labels) Enter the text strings. If the project is configured as bilingual, you can use the Ellipsis button adjacent to each field to enter the string for the second language.
With bits associated labels, you can define labels for the following elements:-
Value - Displayed in mimics when using the Text-Label animation. In addition to strings for the zero and one values this label also allows the configuration of a string for display when the bit is invalid (unavailable).
-
Command to - Displayed in the dialog box that is used to confirm the forcing of a bit's state when using a Send-Bit animation.
-
Change to - Recorded in the archive units when a bit variable is configured as logged. Displayed in the log viewer when the recorded data is displayed.
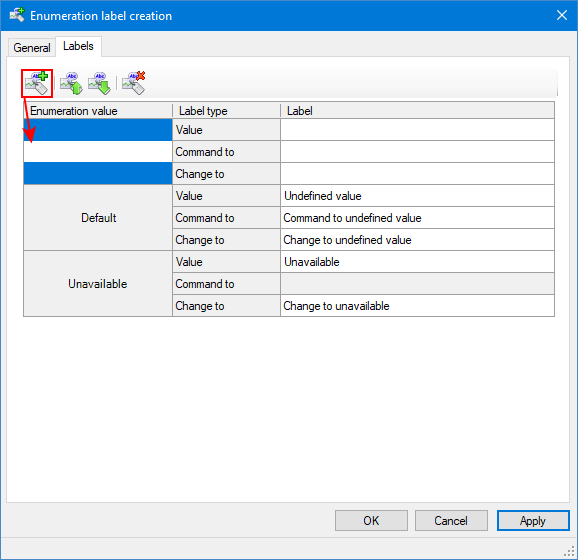
(Enumerated associated labels) Click Add a label Item button, enter an enumeration value and the corresponding text strings. If the project is configured as bilingual, you can use the Ellipsis button adjacent to each field to enter the string for the second language.
Show pictureWith Enumeration associated labels, you can define labels for the following elements:
-
Value - Displayed in mimics when using the Text-Label animation. In addition to strings for values, this label also allows the configuration of a string for display when the variable is invalid (unavailable).
-
Command to - Displayed in the dialog box that is used to confirm the forcing of a variable value when using a Send-Register or Send-Text animations.
-
Change to - Recorded in the archive units when a variable is configured as logged.
The label for Default is used when the variable value is valid but not included in the enumerated list of meaningful discrete values.
-
-
Click Apply to save the changes, then OK to close the dialog box.
Deleting the text of a customized label revert it to its default value.
There is only one set of user action associated labels and the strings it defines are used throughout the project. They are pre-defined and can be customized by the application developer. On saving, the new strings for User actions are displayed immediately for existing and new logs in any Log Viewer that is subsequently displayed.
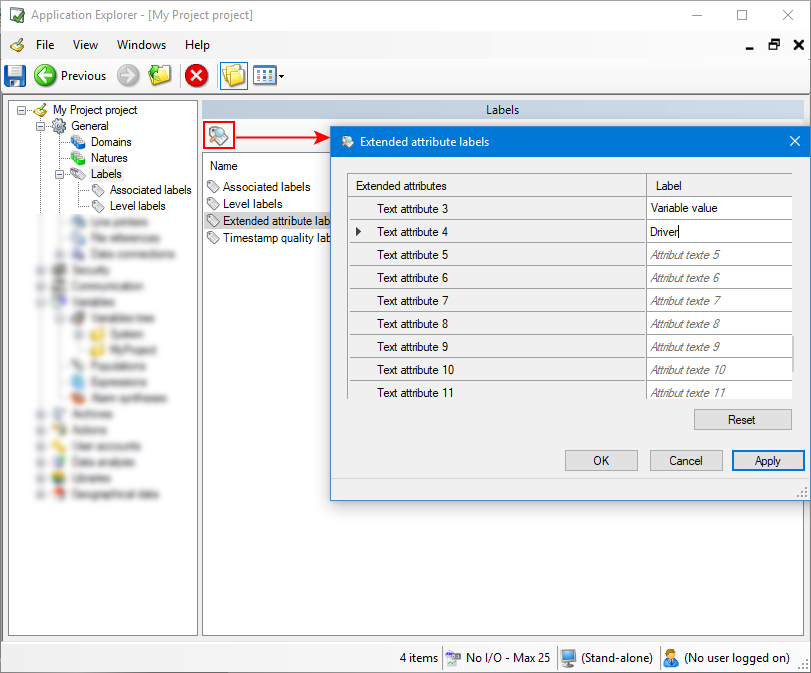
Configuring Extended attribute labels
-
Open the Application Explorer and select Labels under the General node.
-
Select Extended attribute labels and click the Properties button in the toolbar. A dialog box appears.
Show picture -
Enter the text strings. The maximum length of the string is 255 characters and all characters are accepted except the double-quote ("). If the project is configured as bilingual, you can use the Ellipsis button adjacent to each field to enter the string for the second language.
The Reset button discards any change made and set labels to their default value.
-
Click Apply to save the changes, then OK to close the dialog box.
You can use the SCADA Basic instruction LABELS to get information on extended attribute labels.
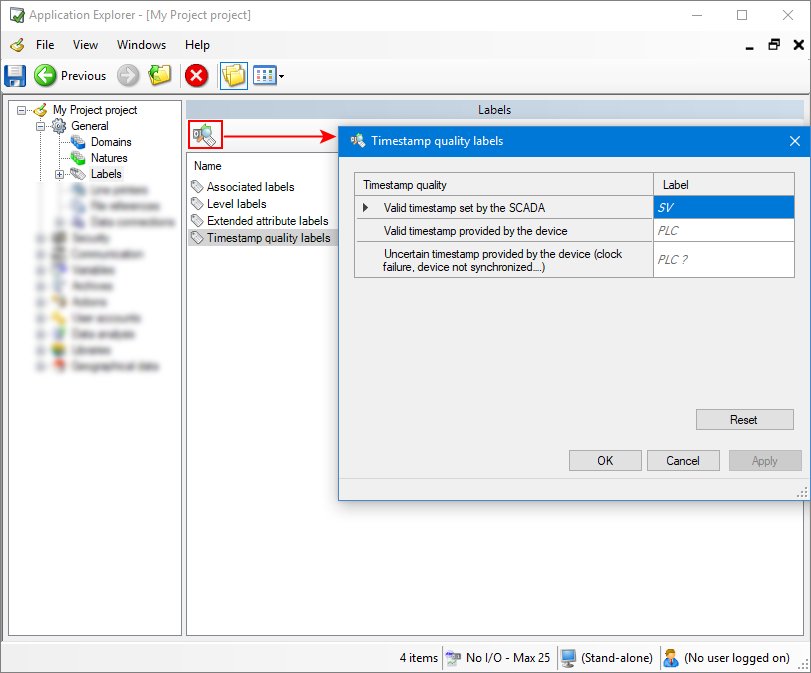
Configuring Timestamp quality labels
-
Open the Application Explorer and select Labels under the General node.
-
Select Timestamp quality labels and click Properties button in the toolbar. A dialog box appears.
Show picture -
Enter the text strings. If the project is configured as bilingual, you can use the Ellipsis button adjacent to each field to enter the string for the second language.
The Reset button discards any change made and set labels to their default value.
-
Click Apply to save the changes, then OK to close the dialog box.