Using the Map Cache Creator
The Map Cache Creator is used to download maps from the Internet and store them locally for use by the Map Control. The advantage of locally cached maps is that the target PC does not need a connection to the Internet to display the maps. The disadvantage is that a complete set of tiles for a map of the entire world requires considerable storage space. However, the Map Cache Creator allows you to select the zoom levels and range of latitude and longitude that the cached map is to cover thereby limiting the number of map tiles and storage space that is required.
The Map Cache Creator takes the form of an executable file (MapCacheCreator.exe) located in PcVue's BIN folder.
The ability to incorporate map data from third party map suppliers into the PcVue software is provided as a convenience.
Content, as well as terms and conditions applying to map data are not within the control and responsibility of PcVue supplier.
Any expressed or implied warranties, including, but not limited to, the implied warranties of merchantability and fitness for a particular purpose are disclaimed.
Map data is subject to copyright notice and license agreement. By downloading map data, you are agreeing to be bound to the selected map data suppliers' Terms and conditions.
The terms and conditions of map data use are available from the applicable map supplier's web site.
How to create a local map using the Map Cache Creator
- Start the Map Cache Creator by running the executable file.
 Show picture
 - Select the Tiles Provider using the drop down list box.
- Select the Cache folder path. The Map Control defaults to PcVue's GIS folder when selecting a local map. It is good practice to create a sub-folder with a name relevant to the specific map cache to be created. For example, Google_UK_1-10. The sub-folder names appear in the Local Map field when configuring the Map Control.
- Select the map view and zoom levels to be cached.
- Zoom (zoom control in the lower right corner) and pan (using click and drag) the map, so that it displays approximately the area that you want the map cache to support.
- Select the precise area by right clicking and dragging in the map view. The resulting shaded area is that which will be cached.
- Select the Zoom Levels that are to be supported by clicking and dragging the double slider control.
- Check that your selection has resulted in a realistic Estimated Database Size. If not, repeat steps a, b & c until it does. Show picture
- Click Start to start the download of the tiles. The Map Cache Creator will start fetching the tiles for each of the zoom levels. During the process, the number of tiles required, and the estimated time to load them, is displayed. The download can be stopped anytime by clicking the Cancel button. The map cache will still be created but only with those tiles downloaded at the time the Cancel button was clicked.
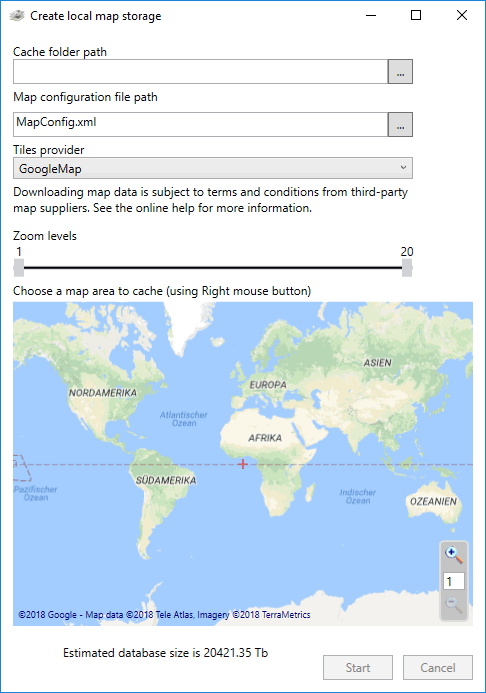

It is essential to be selective with the zoom levels and map area to minimize the size of the cache. As an extreme example, a Google Map with zoom levels 1 to 20 and covering the entire world would require 32000 terra bytes.
The estimated database size is based on an average tile size for a typical road/street navigation map and is given for information only. The actual cache size may be significantly different, lower if the geographical data are scarce (ocean or desert), or higher for a urban area with a great deal of details.