Editing a Schedule Using the Schedule Control
You must use the Save tool to save edits before closing the page or they will be lost.
Schedules can be edited using the Schedule Control only by User's with the correct edit rights. The configuration changes that result from editing a schedule depend on its type (BACnet or built-in) and the page in which the changes are being made.
| Page | Effect on a BACnet device (schedule) | Effect on a built-in Schedule |
| Calendar | Modifies the Exception-Period property of the Schedule object of the BACnet device. | Modifies, creates and/or deletes Exception Periods. |
| Standard week | Modifies the Weekly-Schedule property of the Schedule object of the BACnet device. | Modifies the Standard Week. |
| Special days | Modifies the Exception-Period property of the Schedule object of the BACnet device. | Not available. |
Note that the Schedule Control has many different methods by which the intervals, making up a schedule, can be edited. Many of edit operation are automatically applied to all selected periods (one or several).
The edit toolbar

| Tool | Description |
| Discard and reload | Discard any changes since the last save and reload the saved version. |
| Save | Save the current edits. |
| Save as | Save the current week as the Standard Week. Only available from the Calendar page (and with the correct permissions). |
| Export | Create an image of the schedule in .png format. |
| Add | Add a new interval. The Interval dialog opens to configure the interval. The interval is placed in the selected location on the Schedule Control. See below. |
| Delete | Delete the selected intervals. |
| Edit | Open the Interval dialog for the selected interval. |
| Select all | Select all intervals. |
| Unselect all | Unselect all intervals. |
| Cut | Cut the selected intervals. A copy is put on the clipboard and the intervals are deleted from the schedule. |
| Copy | Copy the selected intervals to the clipboard. |
| Paste | Paste the intervals in the clipboard starting at the selected the location. |
| Duplicate | The selected intervals are duplicated in all rows of the control. |
How to add a new interval
There are two methods to create a new interval.
- Using click and drag.
- Click in the grid (on an empty cell) where the interval is to start and drag the pointer to where the interval is to end.
- On releasing the mouse button, the Interval dialog is opened.
 Show picture
 - Check the interval times are correct.
- If you are working on an enumerated schedule, select the Mode.
- Click OK to confirm the configuration.
- Using the Add tool.
- Click in the grid where the interval is to start and then select the Add tool. The interval dialog opens.
- Configure the interval as above.

How to select/de-select individual intervals
Individual intervals can be selected by clicking with the mouse. Click once to select and again to de-select. A selected interval is indicated with a hatched pattern. Several intervals can be selected concurrently by clicking on them one at a time.
How to select/de-select multiple intervals
The following behaviors are for the Calendar Page. Exact behaviors may differ slightly for the other page types.
There are several methods by which multiple intervals can be selected/de-selected.
- Click in upper-left corner cell - Selects all intervals.
- Click on the day header - Selects all intervals for that day.
- Click on the time header - Selects all intervals that include the selected time.
- Click on multiple intervals (one after the other)
- <Ctrl>-A - Selects all intervals.
Editing intervals using the mouse
There are two actions that can be performed directly on an interval using the mouse.
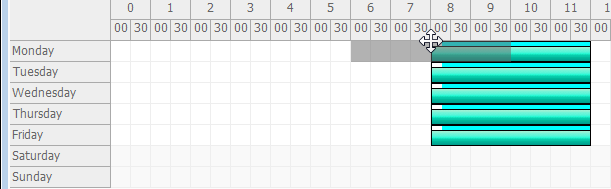
- Drag the interval to a new location.
- Move the mouse over the join between upper and lower bars until the pointer changes to the Move symbol.
- Click and drag the interval to a new location. Show picture
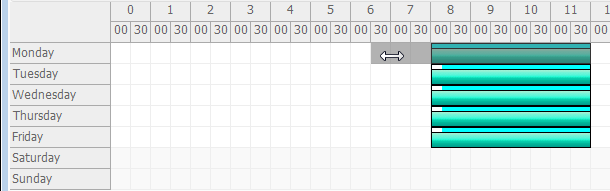
- Drag the start or end time.
- Move the mouse over the start or the end of the interval bar until the pointer changes to the Horizontal Resize symbol.
- Click and drag the start or end time to its new location. Show picture
Editing intervals using the keyboard
The following behaviors are for the Calendar Page. Exact behaviors may differ slightly for the other page types.
The following keystrokes can be used to edit selected intervals.
- <Del> - Delete intervals.
- Left and right arrow keys:
- Move 15 minutes.
- + <Ctrl> Move 5 minutes.
- + <Shift> Move 1 minute.
- Up and down arrow keys - Move one day.
- <Ctrl-C> / <Ctrl-X> / <Ctrl-V> - Copy / Cut / Paste.
- <Esc> Close the Interval dialog.
Other interval editing options
The tools located below the lower left of Schedule Control can be used to select alternative modes of editing when using the mouse to click and drag intervals.
| Icon | Tool | Description |

|
Normal mode | See above. Overlapped intervals are not permitted. |

|
Slip crop overlapping | The overlapping portion of the interval being dragged is deleted. |

|
Slip crop overlapped | The overlapping portion of the interval, over which the interval being dragged, is deleted. |

|
Slip crop delete | The interval that is being overlapped, by the interval that is being dragged, is deleted in its entirety. |

|
Split interval | Clicking on an interval will split it into two intervals at the click position. |
The Interval context menu
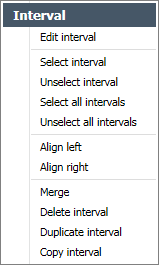
The Interval context menu is displayed when right clicking on a time interval.
- Edit interval - Open the Edit Interval dialog from where the interval can be directly edited.
- Select interval - Select the clicked interval.
- Unselect interval - Unselect the clicked interval.
- Select all intervals - Select all intervals of the displayed week.
- Unselect all intervals - Unselect all intervals of the displayed week.
- Align left - Make the start time of all selected intervals the same. The interval that was right clicked on is taken as the reference. Show picture
- Align right - Make the end time of all selected intervals the same. The interval that was right clicked on is taken as the reference. Show picture
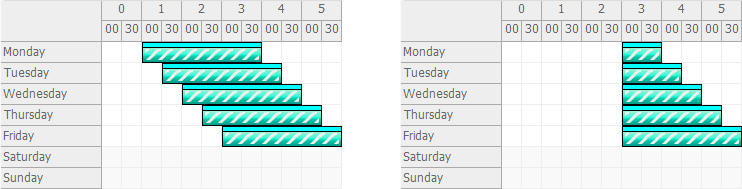
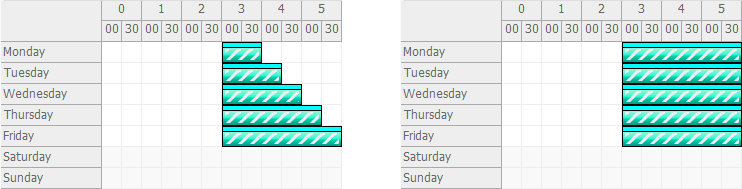
- Merge - Merge the selected intervals. One new interval is created starting at the start time of the oldest interval and ending at the end time of the newest interval. Show picture
- Delete interval - Delete the selected intervals.
- Duplicate interval - The selected intervals are duplicated in all days of the week.
- Copy interval - The selected intervals are copied to the clipboard.

The Time Span context menu
The Time Span context menu is displayed when right clicking on the Schedule Control grid outside of a configured interval.
- Add interval - The Interval dialog opens to configure the interval.
- Paste interval - Paste the intervals from the clipboard, starting at the selected the location.
- Merge selected intervals - Merge the selected intervals. One new interval is created starting at the start time of the oldest interval and ending at the end time of the newest interval.