DNP3 is one of the most reliable communication protocols in the utility and power world. However, for many engineers, it also sounds complex. Setting up a DNP3 connection can feel like diving into configuration files and network parameters.
With PcVue, it doesn’t have to be that way. In this quick guide, we’ll show how to connect your DNP3 device to PcVue in just five minutes and start reading live data without headaches.
Understanding DNP3: The Reliable Language of Utilities
DNP3 (Distributed Network Protocol) is a robust and secure protocol used primarily in power, water, and critical infrastructure to exchange data between remote devices and SCADA systems. It’s designed for reliability, time-stamped events, and operation over unreliable networks, key features for distributed systems.
In simple terms, DNP3 allows your SCADA to talk to remote devices like RTUs, relays, and IEDs with high accuracy and resilience, even in tough conditions.
The only challenge? DNP3 setup can seem intimidating for newcomers. That’s where PcVue’s native DNP3 driver makes life easy so you can focus on your process, not protocol syntax.
Setting Up Your DNP3 Device in PcVue
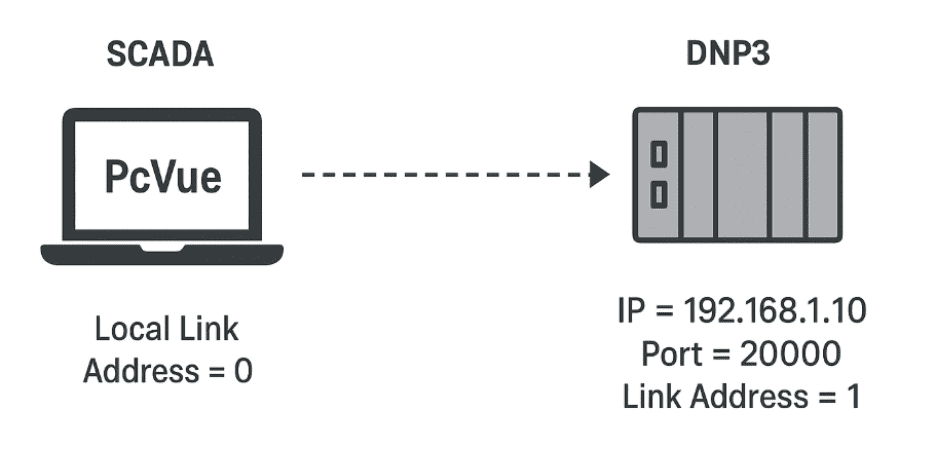
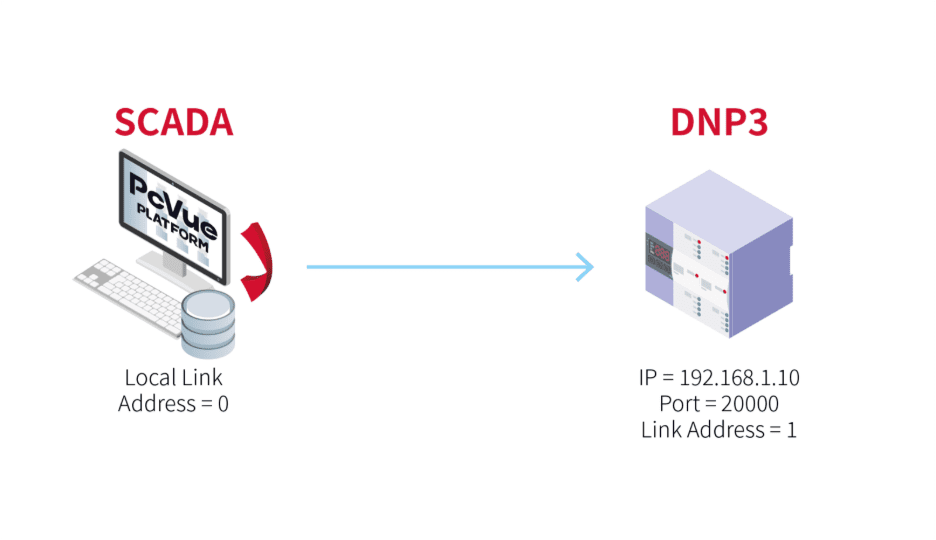
Step 1 – Gather Your Device Information
Before starting PcVue, note a few essential parameters from your device. These are usually all you need for a successful connection:
| Parameter | Example | Description |
| IP Address | 192.168.1.10 | The IP address of your DNP3 device |
| Port | 20000 | Default TCP port for DNP3 communication. |
| Link Address | 1 | The link-layer address of your DNP3 device. |
| Local Link Address | 0 | The link-layer address used by PcVue (the client/master). |
💡 Tip: These are typically available in the device’s communication menu or technical datasheet.
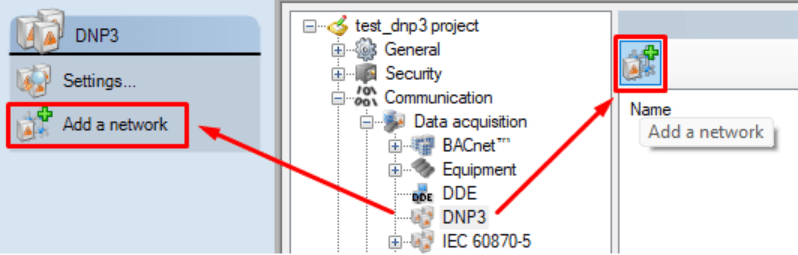
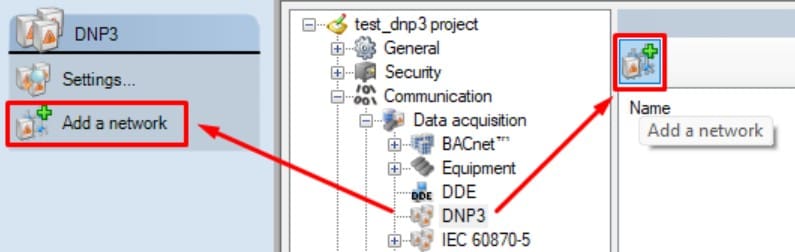
Step 2 – Create a DNP3 Network
In PcVue, communication is organized using Network objects. Networks group DNP3 devices and define the communication context, which is especially helpful when you have multiple stations or distributed architectures.
To add a DNP3 Network:
- Open the Application Explorer.
- Expand Communication → Data acquisition → DNP3.
- Click the Add a Network button and give the new network a clear name (for example, “DNP3_Network”).
- Keep default settings unless you’re implementing multistation setups.
The Network is your communication backbone. Once created, add DNP3 Device objects underneath it. If you only run a single PcVue station, no extra configuration in the Network is normally required.
Step 3 – Configure the DNP3 Device
Once your Network is created, the next step is to add the actual DNP3 Device. This represents your field equipment.
- In the Application Explorer, navigate into the newly created DNP3 Network.
- Click the Add a Device button.
- In the General tab:
- Enter the device’s IP Address.
- Enter the Link Address (the address of the remote DNP3 device).
- In the Advanced tab:
- Confirm the Port number (default: 20000).
- Set the Local Link Address (the address used by PcVue as the DNP3 client/master).
Once you’ve entered these parameters, save your configuration.
If everything is correct, PcVue will automatically attempt to connect. Within seconds, you should see the state change to “Connected” in the State column.
💡 Tip: At this stage, you don’t need to map any variables seeing “Connected” confirms your communication setup is working.

Step 4 – Verify and Troubleshoot Communication
Once your DNP3 Device is configured, PcVue will automatically try to connect.
If the setup is correct, you’ll see the State column display “Connected.”
If it shows “Disconnected,” here are a few quick ways to check what’s going on:
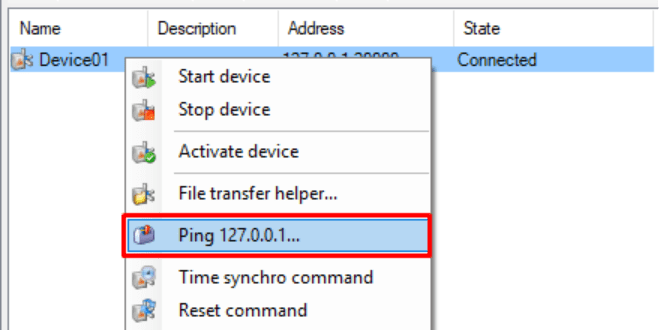
- Ping the device:
- Right-click the DNP3 Device in the Application Explorer.
- Select “Ping XXX.XXX.XXX.XXX” to verify that the device responds on the configured IP address.
If the ping fails, check your network cabling, firewall, or IP configuration.
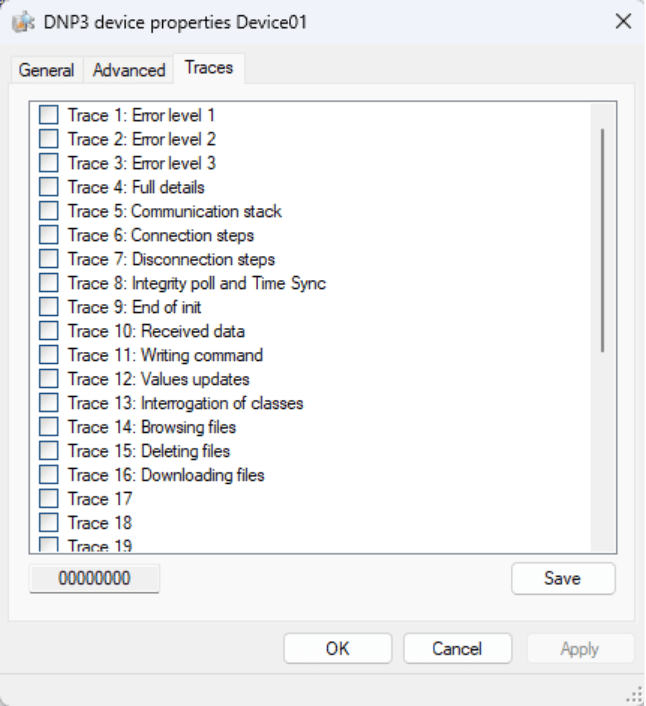
- View the Traces tab:
- Open the Traces tab in the Device configuration.
- Enable traces to generate detailed communication logs in the Event Viewer.
This helps identify connection issues such as mismatched link addresses or unreachable ports.
Usually, if the parameters in the General and Advanced tabs are correct, you’ll get a Connected state within seconds.
No further setup or variable mapping is required to confirm that your DNP3 communication is working.
Step 5 – Explore Your Data with Mapping
Once your device shows Connected, you’ve successfully established communication, congratulations!
The next step is to start visualizing or using your field data inside PcVue.
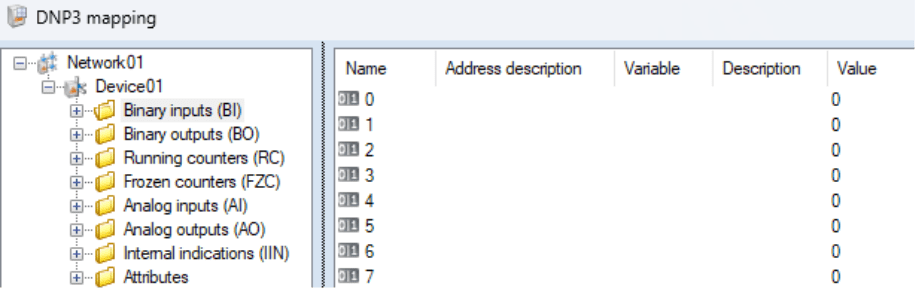
PcVue provides an intuitive Mapping tool to make this process simple.
In the Application Explorer, select the DNP3 Network you created (or right-click on it), and choose Mapping.
This opens a browser window where you can explore the objects available in your DNP3 device, such as digital inputs, analog values, or counters and link them directly to variables in your PcVue project.
You can:
- Map to new variables automatically created from the device’s structure.
- Link to existing variables already configured in your application.
- Filter or browse by object type to find exactly what you need.
Once mapped, these variables can be displayed in mimic diagrams, logged, or used in alarms, just like any other PcVue variable.
💡 Tip: You don’t need to complete this step to confirm your connection. Mapping simply allows you to take the next step: transforming raw data into actionable SCADA information.
Why PcVue Makes DNP3 Integration Simple
Many SCADA systems require long configuration cycles or external tools to bring a DNP3 device online. PcVue reduces that complexity by design. Here’s how:
- Native DNP3 over TCP: Fully integrated and ready to use, no add-ons or middleware needed.
- Smart Defaults: Standard parameters like port 20000 and retry logic are preconfigured for quick tests.
- Built-In Diagnostics: Real-time connection status helps you confirm communication instantly.
- Scalable Architecture: From a single test bench to full utility networks, PcVue keeps your configuration consistent and expandable.
With PcVue, DNP3 configuration takes minutes, not hours. It’s plug, configure, and go.
Conclusion
DNP3 is a powerful and reliable protocol… and with PcVue, it’s also simple.
In just a few minutes, you can go from zero to live data, integrating complex field devices into a modern SCADA system with minimal setup.
Start small, connect fast, and scale confidently with PcVue.
Get Started:
Ready to try it yourself?
👉 Download the PcVue Demo and experience how quickly you can connect to a DNP3 device. Then watch our video for a detailed, step-by-step guide through the configuration process.