Configuring user accounts
This topic describes the tasks to initialize the user directory, configure a profile, configure a user and associate a profile to a user to grant permissions.
It also provides guidance for choosing a strong password, setting up automatic log out and managing network-dependent profiles.
A profile is a set of permissions selected from a number of categories. Each user that you create is associated to a profile to determine the user's access rights. The combination of the user and profile is known as a User account. A profile may be attached to one or several users.
For networked applications, you can optionally attach more than one profile to a user. The profile that is active then depends on the station where the user is logged in.
The access rights for a profile are selected from the following categories each contained within its own tab in the profile configuration dialog.
- Administration - Access to the configuration menus and operating system, password configuration, user account management.
- Programs - Selection of SCADA BASIC programs to run when a user logs in and/or out.
- Mimics - Selection of the window (mimic) that opens when a user logs in, Selection of menu windows (mimics).
- Command - Selection of command level rights.
- Browsing - Selection of variable browsing rights.
- Alarm acknowledgment - Selection of acknowledgment rights by alarm level.
- Alarm masking - Selection of alarm masking rights.
- Alarm maintenance - Selection of alarm maintenance rights.
- Window - Selection of window level rights.
- Layer - Selection of display layer rights.
- Recipe - Selection of recipe rights.
- Web - Selection of options for when a user logs in with WebVue, including initial mimic, language, alarm filter etc.
- Application Architect - User access to the Application Architect.
- Data analysis - User access to Data Export
- Advanced - Automatic logoff and password life span.
You must have at least one user associated to a profile that grants the following permissions:
- Change profile rights - Administration
OR - Create profiles and Create profile associations
If you do not do this, you will have the situation where you cannot change the profile of a user, nor can you create a new profile and associate it with a user. You will be permanently prevented from changing anything associated with User accounts.
Initial setup of the user directory
When you create a project, one of the first action shall be the initial setup of the user directory. It includes:
- Tuning the user account settings
- Creating the super administrator user account
- Minimizing permissions granted to the default profile
When a project is first created, a default user account, known as DEFUSER, together with the profile DEFPROFILE, are created in the built-in directory to provide configuration for the residual permissions when no user is logged in the PcVue desktop application. These residual permissions apply at start-up until a user logs in, and as soon as a user is logged out. The user DEFUSER and the profile DEFPROFILE cannot be deleted.
The DEFPROFILE is automatically created with all access rights.
Prerequisite:
The initial setup of the user directory is eventually the moment when you will start to store sensitive data in the PcVue project configuration, including user credentials and settings critical to the security of your system. For this reason, a prerequisite is to ensure your project is protected before you proceed.
See Protecting and deploying a project for more information about how to establish cryptographic protection of your project.
Once the project is protected, the initial setup of the user directory consists in the following steps:
- Select the User accounts folder in the Application Explorer configuration tree and, from the task list, select Settings. The Settings dialog opens.
- Tune the settings as required to fit the project requirements and policies in place, including integration with the Microsoft Windows directory. See User accounts settings for more information.
Using profile levels and the advanced security strategy is highly recommended to protect the system from the risks of user privilege escalation or privilege abuse.
It also provides better control over user accounts and better traceability:
- Password lifespan
- Password robustness
- User account locking
- Failed login attempt management
- User activities logging and tracking
- Select the Profiles folder in the Application Explorer configuration tree and, from the task list, select Add a profile. A dialog to configure a new profile opens.
- Create a profile for the Application Super Administrator role (level 0) - With as a minimum the permissions in the Administration tab that includes the ability to shutdown the software, access the desktop, manage security administration, and manage users and profiles.
- Create a first Super admin user - And associate it with the profile created in step 4.
- Create a profile for the Application Admin role (level 1) - With as a minimum the permissions in the Administration tab that includes the ability to shutdown the software, access the desktop, manage security administration, and manage users and profiles.
- Create a first Application Admin user - And associate it with the profile created in step 6.
- Create a profile for the Application Developer role (level 2) - With as a minimum the permissions in the Administration tab that includes the ability to shutdown the software, access the desktop, do development and diagnostic.
- Create a first Application Developer user - And associate it with the profile created in step 8.
- Create a profile for the Operator role (level 3) - With as a minimum the permissions to use the product for run time operations.
- Create a first Operator user - And associate it with the profile created in step 10.
- Review and customize the DEFPROFILE - Set the profile level to 9 (or the lower unused profile level), leave only those residual permissions that the project requires, and in particular no high privileges.
Minimizing the set of permissions granted to the DEFPROFILE as soon as a first admin account is created is critical to ensuring secure operations and maintenance. The residual permissions granted to DEFPROFILE must be reduced with the goal of:
- Not granting access to sensitive mimic that should not be accessible to anyone with access to the physical perimeter.
- Not granting access to commands and controls that must be traced back to the individual who performed it.
The review of permissions granted to the DEFPROFILE is an integral part of the periodic review of user accounts and permissions that must be performed by the responsible entity.
The DEFUSER and the concept of residual permissions only apply to PcVue when running as a desktop application or as a Windows service.
The permissions granted to the DEFUSER never apply to WebVue, the WebScheduler, the Mobile applications, or other Web app taking advantage of the Web Services Toolkit. When using the Web and Mobile apps, no data is accessible until a user logs in, no data is accessible once a user logs out.
How to configure a profile
- Select the Profiles folder in the Application Explorer configuration tree and, from the task list, select Add a profile. A dialog to configure a new profile opens.
 Show picture
 - Enter the name for the profile. Profile names are limited to 40 alphanumeric characters and are not case sensitive.
- Enter a description of the profile. The description appears in the contents pane when the Profiles folder is selected. The description is optional.
- Enter a role for the profile. The role is optional.
- Select the Profile level. No needed if the advanced security strategy is disabled.
- Select the profile access rights using the other tabs of the Profile dialog. See the topic Understanding permissions for a detailed description of the permissions.
- Click OK to create the profile and close the dialog.
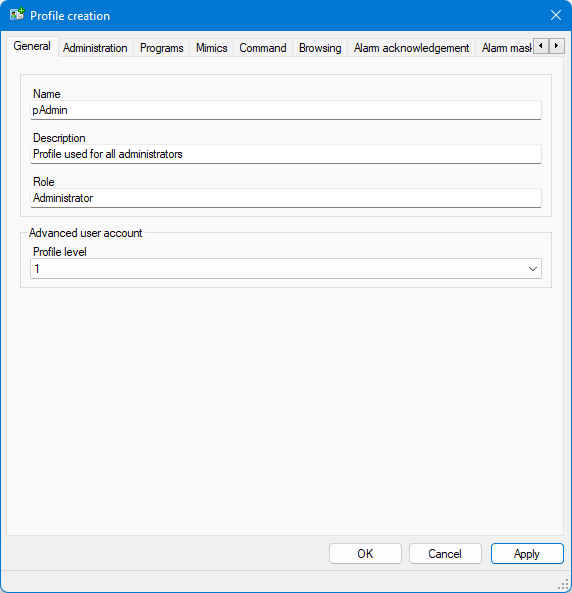
There is no limitation to the number of profiles that can be configured.
When you create a new profile, some permissions are checked by default, including some that are high privileges. This is done purposely to prevent a user from accidentally locking themselves and/or other users out of PcVue.
When you are creating a new profile for a role that does not require high privileges, you must uncheck most of these permissions.
How to configure a user
- Select the Users folder in the Application Explorer configuration tree and, from the task list, select Add a user. A dialog to configure a new user opens. Show picture
- Enter a name for the user. The name is used when logging on using the User Account. The name is limited to 20 characters.
- Enter a description of the user. The description appears in the contents pane when the Users folder is selected. The description is optional.
- Enter the password and password confirmation. For information on choosing a password, see Choosing a strong password.
- Select the Details tab and enter optional user details. The following properties are available.
- First and last name. The first and last name are concatenated to form the read only property Display name.
- Title - The User title, for example Professor.
- E-mail address - The e-mail address can be used when sending a message using an event.
- Mobile phone number - The mobile phone number can be used when sending a message using an event.
- Click Apply to create the user and leave the dialog open or OK to create the user and close the dialog.
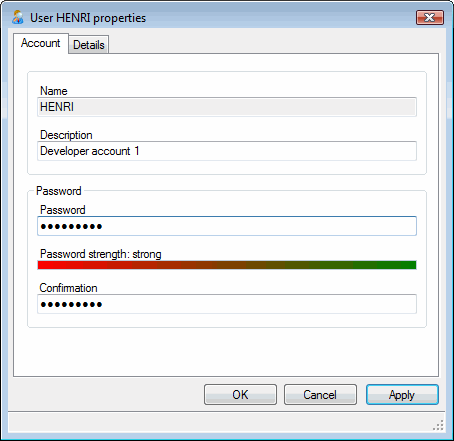
To finalize the configuration of a User account you must associate a profile to the newly created user. Once this is done, the user is able to log in to PcVue using the newly created account.
There is no limitation to the number of users that can be configured.
Many of the properties from the Details tab are also available in System variables.
See User account system variables for more information.
The Display name and Title are also displayed in the dialog opened by the Security - User Information animation.
How to associate a profile to a user
- Select the Users folder in the Application Explorer configuration tree and select the user to which the profile is to be associated.
- From the task list, select Associate a user profile. A dialog is displayed containing a list of available profiles. Show picture
- Select the profile using the drop-down list box and click OK.
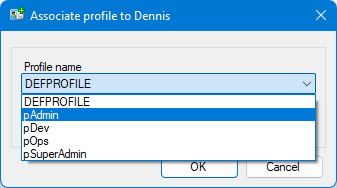
The same profile can be associated to any number of users.
For information about this process in client/server networked applications, see below Using network-dependent profiles.
By selecting the Profiles folder, you can also use the similar but opposite process, that is to associate a user to a profile.
Choosing a strong password
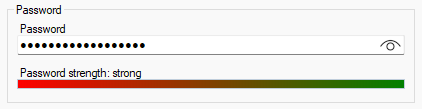
A strong password is one that is difficult to guess or crack with brute force techniques. In PcVue, if you select the setting Case-sensitive strong password in the User accounts settings, only strong passwords are accepted, for all user accounts.
PcVue uses the following criteria to determine if a password is strong:
- It meets the minimum length criteria as defined in the settings.
- It cannot contain the user name.
- It must contain characters from at least three of the four following types of character:
- Upper case alphabetic: A-Z
- Lower case alphabetic: a-z
- Digit: 0-9
- Special characters: ` ~ ! @ # $ % ^ * ( ) _ + - = { } | [ ] \ ? . /
- Upon renewal, it is different from the earlier passwords of the user.
Only printable characters can be used in password. Non-printable control characters are not allowed.
The max length of a password is 127 characters.
If you have selected Case-insensitive or Case-sensitive then users cannot use special characters in the password.
If you have selected Case-sensitive strong password then users can use special characters in the password.
In all cases, the user name is not case sensitive.
As you enter the password its strength is indicated by a colored bar. Show picture
Using automatic log out
Automatic logout automatically logs out a user after a period of inactivity. Inactivity is defined as the time since the last use of any user input device, the keyboard and/or mouse or tap on a touch device.
Automatic logout is configured based on 2 settings.
- In the HMI Options dialog box. This enables or disable the automatic logoff for the entire project. By default, it is enabled. You can also enter the period for which the warning dialog is displayed. By default, this is set to zero. Show picture
- In each user profile, you can enable/disable the automatic logoff and the max inactivity period on a per profile basis. See the topic Understanding permissions for more information.

Once configured, automatic log out takes place in two stages.
- After a period of inactivity equal to that specified in the User's profile, the Automatic logoff dialog is displayed. Show picture
- The Automatic logoff dialog initially displays the number of seconds that was entered in the HMI Options dialog. The seconds count down to zero at which point the User is logged out and the dialog closes.

Any activity will reset both timers and close the Automatic logoff dialog (if open) and the process starts again.
If the default period of zero is used in the HMI Options dialog, no warning dialog is displayed before the User is logged out.
Automatic log out is supported in WebVue, but no warning box will be displayed to the inactive user.
Using network-dependent profiles
In client/server networked projects, you can configure user accounts so that the profile that applies when the user logs in, is dependent on the station he/she is using. This behavior is activated via a setting that, once enabled, allow you to attach more than one profile to each user. Each profile is then associated with a station list that determines on which stations it is active. Station lists are created when defining the station networking communication. Log in is rejected on any station that is not in at least one of the station lists as there is no profile configured for that station. Show picture
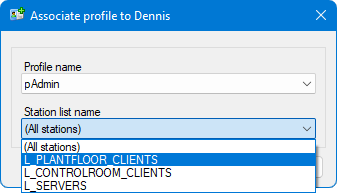
To use network dependent profiles you must first tick the option Enable network dependent profile association in the User accounts settings.
To add a profile and station list to a user:
- Select the Users folder in the Application Explorer configuration tree and select the user to which the profile is to be added.
- From the task list, select Add a user profile. A pop-up dialog is displayed containing a list of available profiles
- Select the profile using the drop-down list box.
- Select the station list using the drop-down list box and click OK.
You configure network-dependent profiles based on station lists, and not based on specific stations). By creating the proper station lists in advance, you can easily grant permissions to a user for all client stations, all server stations, of for a specific station only.