Using certificates with the WDC
As part of the web site binding, the WDC helps you select, create, request and import certificate. This topic describes how to create and use self-signed certificates, and also how to request and import a certificate issued by a trusted CA.
A certificate is a small data file that digitally binds a cryptographic key to an organization’s details. Using a certificate allows a person, computer or organization to exchange information securely over a network using a public key infrastructure (PKI). A certificate can also be referred to as a digital certificate or a public key certificate.
A certificate provides identification information, is forgery resistant and can be verified because it was issued by a trusted party. The certificate contains the name of the certificate holder, a serial number, expiration date, a copy of the certificate holder's public key (used for encrypting messages and digital signatures) and the digital signature of the certificate-issuing authority (CA) so that a recipient can verify that the certificate is valid. To provide evidence that a certificate is genuine and valid, it is digitally signed using a root certificate belonging to a trusted party. Operating systems and browsers maintain lists of trusted CA root certificates so they can easily verify certificates that the CA's have issued and signed. When the PKI is deployed internally, certificates are signed by the department operating the internal PKI (usually the IT department).
For security, modern web client applications communicate with the web server using the HTTPS protocol. HTTPS is the secure version of HTTP and it means that the identity of the server is verifiable and all communications between client and server is encrypted. When a client requests a HTTPS connection, the server will initially send its certificate to the client. The certificate contains the public key needed to begin the secure session. Based on this initial exchange the client and browser initiate a handshake, which establishes a uniquely secure connection between client and server.
PcVue web client applications all require HTTPS and therefore the web server (IIS) requires a certificate. As each certificate is unique, it must be generated as part of the deployment of the web server.
The following types of certificates are available:
- Self-signed certificate - A self-signed certificate is one that has been signed by the same entity whose identity it certifies. As a self-signed certificate is not issued by an official Certification Authority (CA) or trusted internal party, it is not secure and, must not be used a web server deployed in production. A self-signed certificate also has the disadvantage that it will not be recognized by web browsers and an exception will have to be created in the web browser's configuration. However, a self-signed certificate can be useful at the development and testing stages.
- Certificate from a Certification Authority (CA) - A certificate requested from, and issued by, a Certification Authority. Anyone with system administrator rights can request a certificate using the IIS web server and it is a process generally managed by a company's IT department. Certificate authorities can be private (internal) or commercial ventures in which case the certificate is chargeable.
- Certificate from Let's Encrypt - A free, automated, and open Certification Authority (CA), provided by the Internet Security Research Group (ISRG).
- Anyone who owns a domain name can use Let’s Encrypt to obtain a trusted certificate at zero cost.
- Software running on a web server can communicate with Let’s Encrypt to obtain a certificate, configure it for use, and automatically renew it (let's Encrypt certificates are only valid for three months).
When the WDC detect that you select a certificate that cannot be validated (a self-signed cert for example), it automatically activates the Ignore certificate errors for WebVue and the WebScheduler. This is to make development and testing possible without a trusted certificate.
This setting is defined automatically by the WDC at the time of 1st deployment and when importing a deployment configuration.
It is important that you manually disable this setting from the Service configuration if you replace an untrusted certificate by a trusted one on a web server.
How to create a self-signed certificate with the WDC
A self-signed certificate is one that has been signed by the same entity whose identity it certifies. As a self-signed certificate is not issued by a recognized Certification Authority (CA) and therefore shall not be considered secure nor be used on an application in production. A self-signed certificate also has the disadvantage that it will not be recognized by most web browsers and a security exception will have to be created in the web browser's configuration. However, a self-signed certificate can be useful at the development and testing stages if you do not have access to a Certification Authority.
Most web browsers do not cache the contents of web sites that use a self-signed certificate. This can result in reduced performance.
You can create a self-signed certificate with the WDC from the Site Bindings view of the deploy site wizard.  Show picture
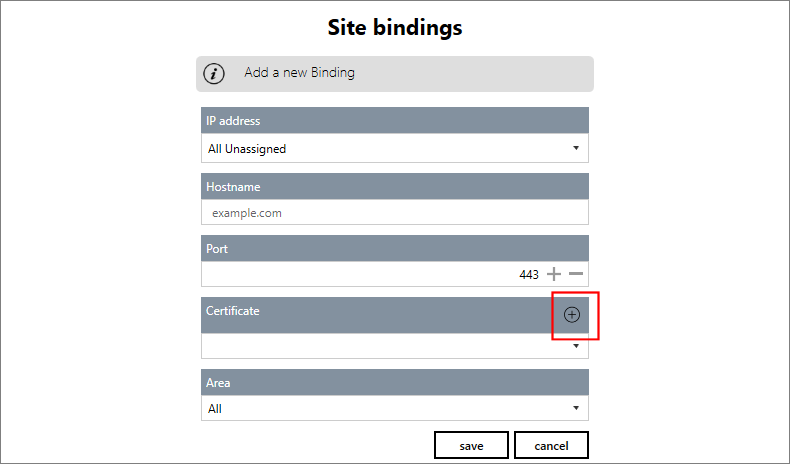
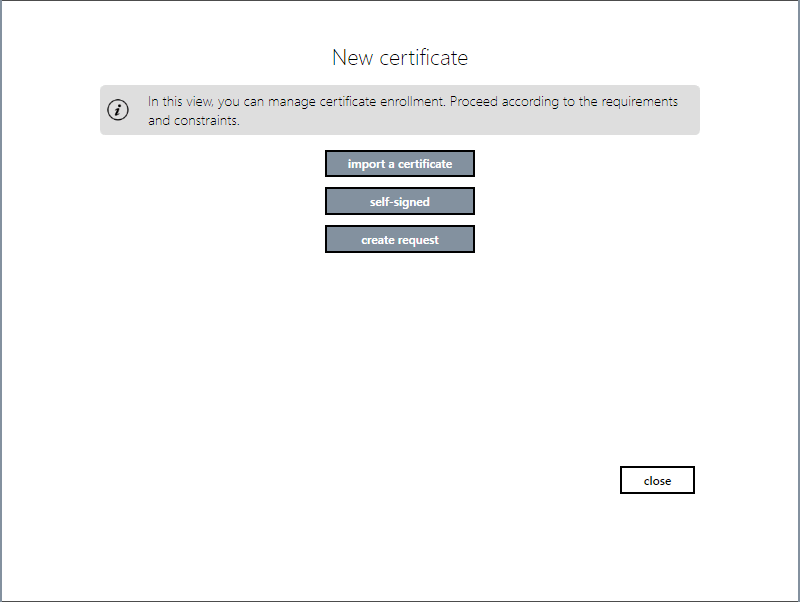
- Click the plus symbol (+) - the New certificate view opens. Show picture
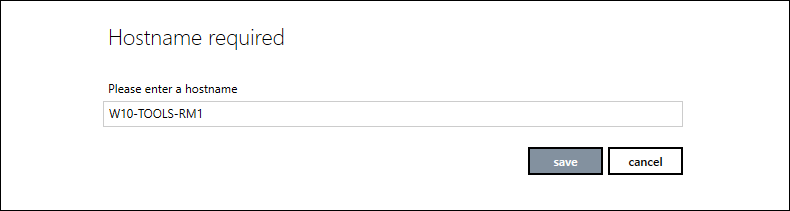
- Select self-signed. You are prompted to enter the hostname to which the certificate applies. The local hostname is pre-configured by default. Show picture
- Click save to continue. The certificate is created and you are returned to the deploy site wizard.
How to request a certificate - Certificate Signing Request
Obtaining a proper certificate from a recognized Certification Authority (CA) for usage in production is a 3-step process:
- Step 1 - Request a certificate, also known as generating a CSR or Certificate Signing Request,
- Step 2 - Send the CSR to the Certificate Authority,
- Step 3 - Import the certificate issued by the Certificate Authority into the web server.
The WDC is equipped to generate a CSR and help you in imported a certificate into the web server. By default, it uses the Web hosting certificate store.
While the practical details vary, the 3 steps are similar for all Certificate Authorities, whether it is a public trusted third party or an internal CA within your organization.
Certificates are not valid forever. Depending on their type and issuer, they may be valid for a few days (typically 30 days for a free test certificate), up to 2 or 3 years.
It is recommended to monitor the validity of certificates and plan renewal a few weeks in advance, as the process can take time.
Prerequisite #1 - A 'proper' certificate means that it will be issued for a web server associated to a domain name that can be validated by the Certificate Authority:
- If the CA is internal to the organization, the domain may only be local.
- However, if the CA is public, the domain must have been registered before any other attempt to obtain a certificate, and only the organization owner of the domain can be delivered a certificate for a web server associated to the domain.
Prerequisite #2 - The domain name that will be associated to the web server and its certificate has to be used when defining the binding of the web site. Other than that, if for example you bind the web site on the IP address or any other name, web browsers will not recognize the certificate as valid, because the domain name on the certificate will not match the domain name you use to reach the web server.
You can create a Certificate Signing Request with the WDC from the Site Bindings view of the deploy site wizard. Show picture
- Click the plus symbol (+) - the New certificate view opens. Show picture
- Select create request. You are prompted with the Create request form and will have to enter the following information: Show picture
- Common name - Enter the domain name that was allocated to the web site, for example, lab.example.com
- DNS name - Enter the domain name again, same value as for the field Common name.
- Organization - Enter the name of your organization, it is the owner of the domain.
- Organizational unit - Usually optional.
- City - The city where the Organization is based.
- State - The state where the Organization is based.
- Country - The state where the Organization is based.
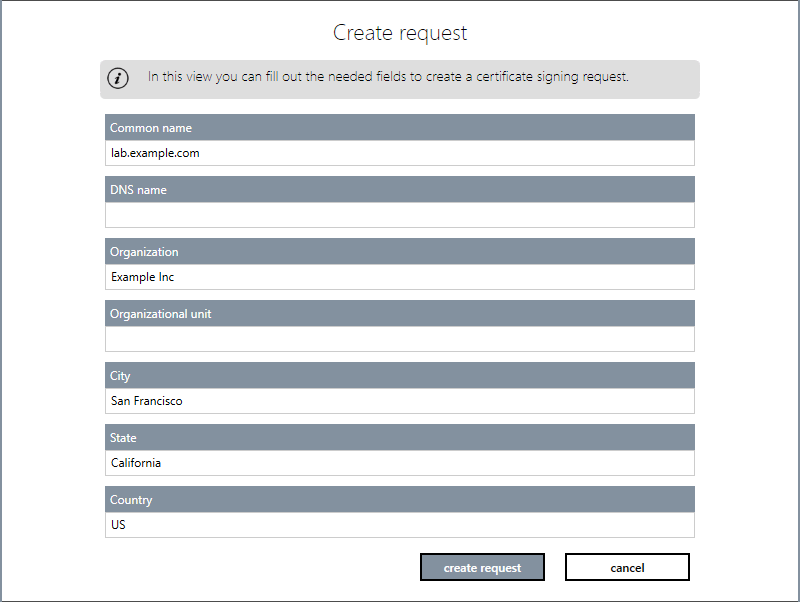
And then click create request.
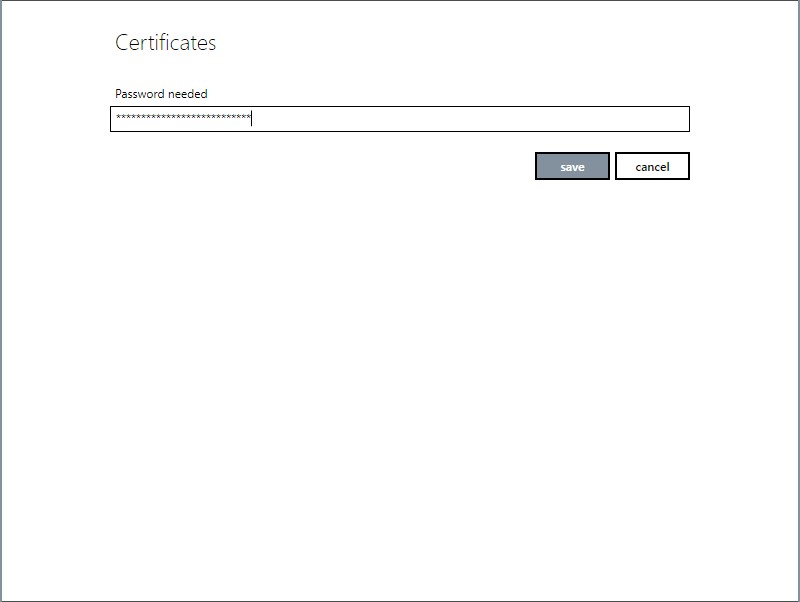
- You are prompted to enter a password of your choice. Show picture
This password is the secret that will be required for all subsequent operations with the certificate, including its import. You should choose a proper, secure, unique password, and store it in a safe place.
Please note that CA require a certain strength for the password, and will not deliver the certificate if this criteria is not met. One of the strength criteria is the length (10 characters minimum is usual). - Upon clicking save, you will be prompted to select a directory where to save the files resulting from the request: request.csr and requestKey.pkey.
- The .pkey file contains your private key, derived from your password. It must be stored in a safe place and not be disclosed.
- The .csr file will be transmitted to the CA.
At that stage, your certificate request is ready.
The next step consists in transmitting the Certificate Signing Request to the CA of your choice.
The exact procedure vary, but you will be requested to fill in a form where you will confirm the information entered for generating the CSR (Common Name, DNS Name or Subject Alternate Name, Organization, Organization Unit, City, State and Country), as well as the .csr file generated by the WDC.
After verification, a process that can take from a few minutes to a few days, you will be notified that the certificate is ready and can be downloaded.
How to import a certificate
After a request and once the CA has issued the certificate, you can import it with the WDC from the Site Bindings view of the deploy site wizard.
- Click the plus symbol (+) - the New certificate view opens. Show picture
- Select import a certificate. You are prompted to select the certificate file supplied by the Certificate Authority. The WDC supports the following file formats for the import: PKCS#12 and PFX.
And then click open.
- You are prompted to enter the password associated to the certificate.
- Upon clicking save, the WDC imports the certificate, and you can select it in the list of available certificates of the web server.
- Finalize the deployment of the web site.