Deploying a web site with the wizard
A wizard is provided to deploy the Web site, the Web services and the Web apps of PcVue. The wizard offered a simplified Quick Setup based on defaults suitable in most cases. It also offers a Custom Setup that let you specify more settings.
This topic also goes into the details of why you would need more than one binding for your Web site.
Using the Custom setup is required if Services and Apps are deployed across more than one Web server.
How to use the Quick Setup wizard
The Quick Setup wizard takes you through the steps to deploy a site, web services and web apps using mainly default settings. The Quick Setup wizard can be used if all services must be deployed on the same web server.  Show picture
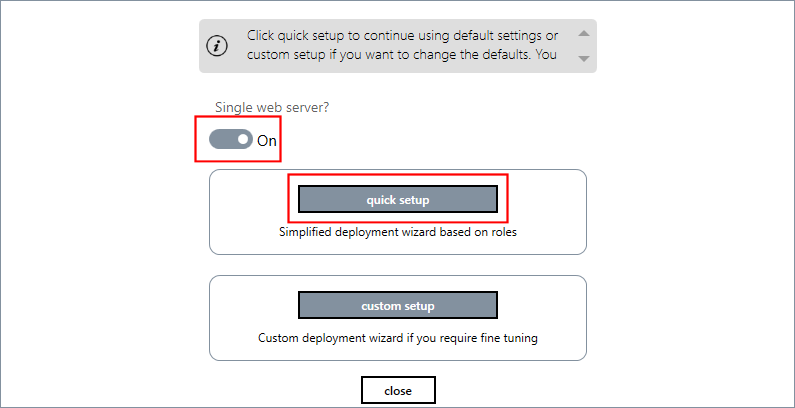
The Quick Setup wizard guides you through the following steps.
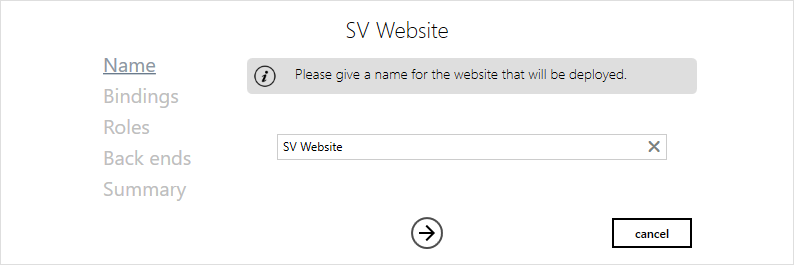
- Name - The name by which the site is known. The name appears in the Sites node of the IIS configuration. The default is SV Website. Show picture
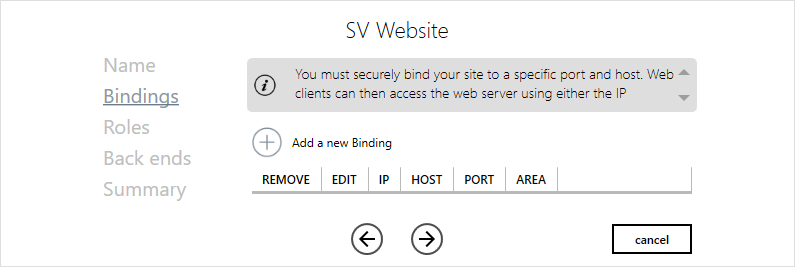
- Bindings - The binding specifies the domain, port and server certificate used by the client web apps to connect to the web server. You can create one or more bindings. See notes below about why you might need to create more than one binding. Show picture
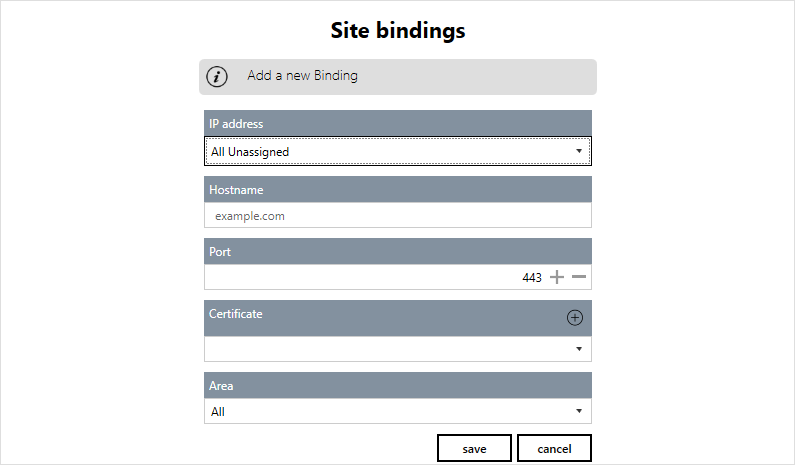
- To add a binding click Add a new binding. Show picture
- IP address - The IP address from which the website will receive incoming requests.
Using All Unassigned (default) tells the IIS server to transmit to this web site incoming requests received on all IP address not explicitly assigned to another web site. If you select a specific IP address, the IIS server only transmits to this web site incoming requests received on the given IP address only. Typically used when the web services are hosted on an IIS server where there are also other company resources (intranet etc.). - Hostname - You can use either a hostname or the IP address. If you use a hostname, the network must include a mechanism by which it can be resolved, that is its IP address found. Windows hosted clients can use the integrated Windows Internet Name Service (WINS). For other hosts, Android for example, a DNS server must be available. For example, if you enter <MyHostName> as the hostname, web clients will be able to connect to the WebVue on this web server using the Url https://<MyHostName>/WebClient.
While the use of an IP address as the hostname can be handy on test machines, this practice must be avoided as it prevents from using a proper certificate. - Port - The port on which the website listens for incoming requests.
- Certificate - Choose a certificate for the site using the Certificate drop down list box. You must have a certificate in order to use HTTPS. You can either select an existing certificate or create a new one using the + button. There are a number of certificate types that can be used. The type that is acceptable will depend on the IT policy in place. See the topic Using certificates with the WDC
When the WDC detects that you select a certificate that cannot be validated (a self-signed cert for example), it automatically activates the Ignore certificate errors for WebVue and the WebScheduler. This is to make development and testing possible without a trusted certificate.
This setting is defined automatically by the WDC at the time of 1st deployment and when importing a deployment configuration.
It is important that you manually disable this setting from the Service configuration if you replace an untrusted certificate by a trusted one on a web server.
- Area - Defines if the binding is to be used only for communication between web applications within the server (Internal), for user access (Public) or both (All). All is the default. See the below for examples.
- IP address - The IP address from which the website will receive incoming requests.
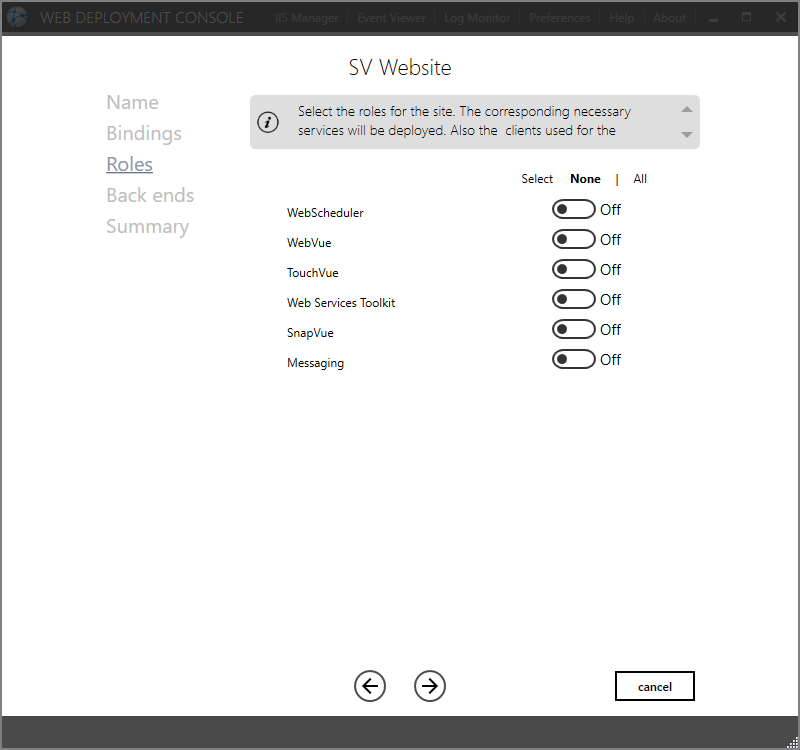
- Roles - Select the roles that the site is to support. Show picture
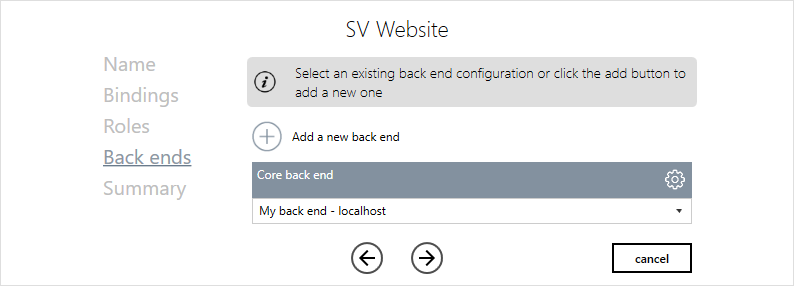
- Back ends - Select the back ends, which define the connection between the IIS web server and PcVue. Depending on the configuration, you will require one or more back ends. For example, if you were using WebVue and SnapVue, you would require both the Core back end and the Geolocation back end. If you were using the Instant Messaging with SnapVue, you would also require the Messaging back end. Show picture
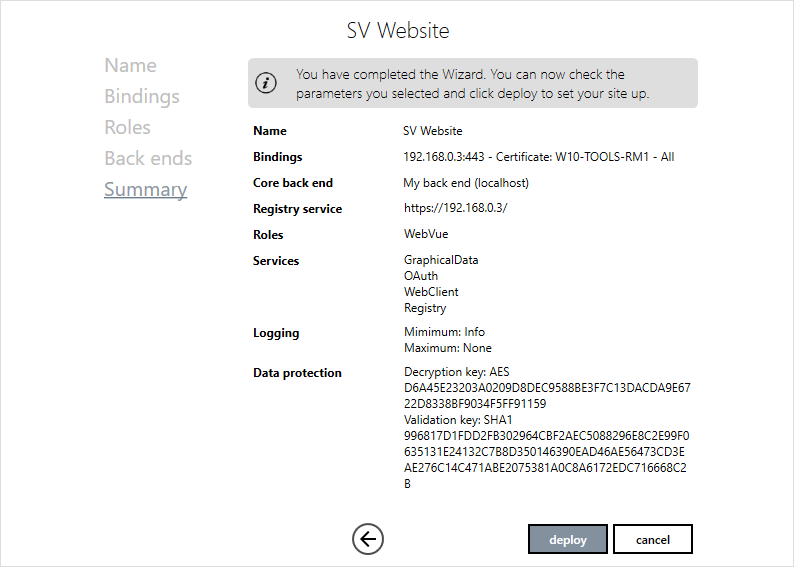
- Summary - The final step in which the configuration to be deployed can be reviewed. Show picture
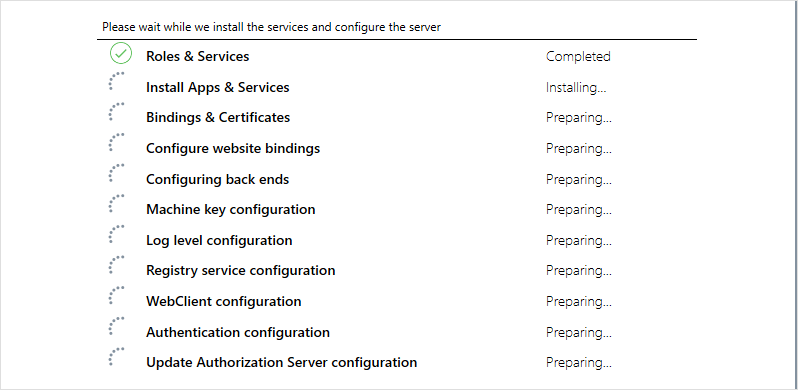
- Clicking Deploy completes the wizard and deploys the site. Show picture
- When deployment has finished the wizard can be closed. The WDC then shows the newly created site. Show picture
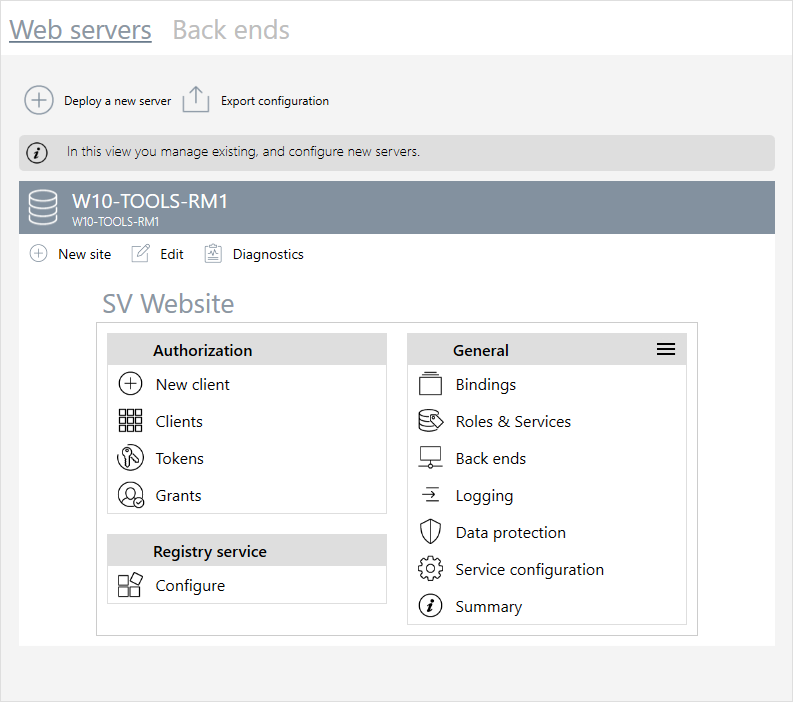
Clicking the Service configuration item of your site opens a panel with the list of deployed web services and apps.Icons are available to launch directly the desired web application with your web browser.
You can generate a QR code to quickly test the connection to the newly deployed website from a mobile app. Click on the Generate QR code button, start TouchVue or SnapVue an scan the QR code from the Account view. The Web server host and port are automatically filled in, you just have to enter your user credentials to connect.
Why would you need more than one binding?
Depending on the IT infrastructure and network setup, web clients may need to address the server using different hostnames depending on which network they connect from. For example, clients connecting from the internal network may need to use a hostname only valid from the company office network (for example https://mycompany.local), while clients connecting from the internet may need to use another hostname valid from the public internet (for example https://extranet.mycompany.com).
A similar case is for internal calls between services deployed on the IIS server. There must be a valid binding for these calls, including a hostname that can be resolved from within the IIS server itself.
There are various solutions, in particular, hairpinning whenever the web server is behind a router. But it can be easier just to create two bindings with different hostnames, certificates and area settings.
Consider the following scenario. An IIS Web server with private IP 192.168.1.1 hosts WebVue. The Web Server is behind a router accessible with the public IP 80.150.147.5. Users access WebVue from the internet using the Url https://webvue.example.com/WebClient.
- Option 1
A single binding using hostname = webvue.example.com (FQDN - Fully Qualified Domain name) and Area = All.
A DNS server is required on the public network to ensure that the hostname is resolved to the public IP 80.150.147.5 for the user.
A DNS server behind the router (or properly configured host file on the IIS Web Server) is required to ensure that, internally for the web applications, the hostname is resolved to the private IP 192.168.1.1.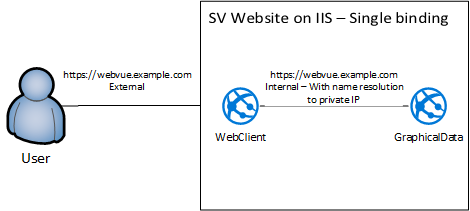
- Option 2
A single binding using hostname = webvue.example.com (FQDN - Fully Qualified Domain name) and Area = All.
A DNS server is required on the public network to ensure that the hostname is resolved to the public IP 80.150.147.5 for the user.With Hairpinning enabled at the router, no need for name resolution to the private IP on the IIS web server, the configured host name can be used for internal requests between web services, they will pass through the router.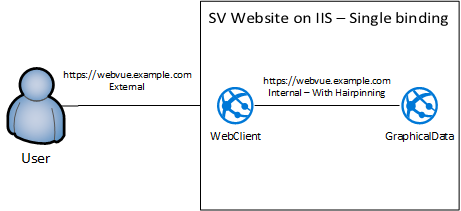
While the following is not recommended in production or if the public IP is accessible from non-trusted computers, the same can be achieved on a test platform with a similar network segmentation using only IP addresses and a self-signed certificate (instead of a hostname requiring a DNS and a trusted certificate).
One binding using hostname = 80.150.147.5 (public IP address) and Area = Public.
A second binding with hostname = 192.168.1.1 (private IP address) and Area = Internal.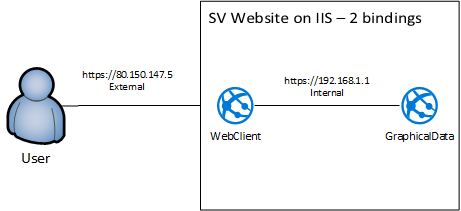
Custom Setup wizard
The Custom Setup wizard takes you through more steps to deploy sites and / or web apps, and support deployment or more complex architectures, including scenarios where deployment is distributed across several web servers. Show picture
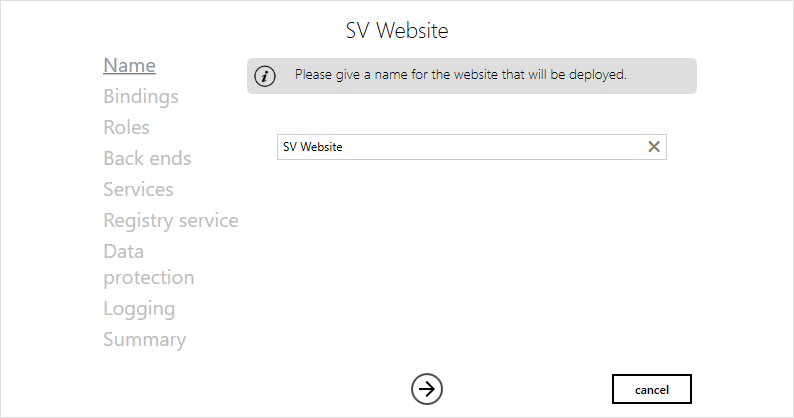
- Name - The name by which the site is known.
- Bindings - The bindings specify the domain and port by which a web client or app can connect to the web server. You also choose a certificate for the site.
- Roles - Select the roles that the site is to support. The custom setup includes additional roles.
- Back ends - Select the back ends, which define the connection between the IIS web server and PcVue.
- Services - The services that are deployed depend on the roles that have been selected and can be customized.
- Registry service - Configure the registry service. The registry service determines which web servers provide which services.
- Data protection - Specifies the methods by which data is encrypted and validated.
- Logging - Management of the range of information that is sent to the Log Monitor.
- Summary - The final step in which the configuration to be deployed can be reviewed. Clicking Deploy completes the wizard and deploys the site.
Roles view
The Roles View is displayed by both the Quick Setup and Custom Setup wizards and can also be opened by clicking the Roles and Services button in a site's tile. The choice of roles also determines which services are provided. Show picture
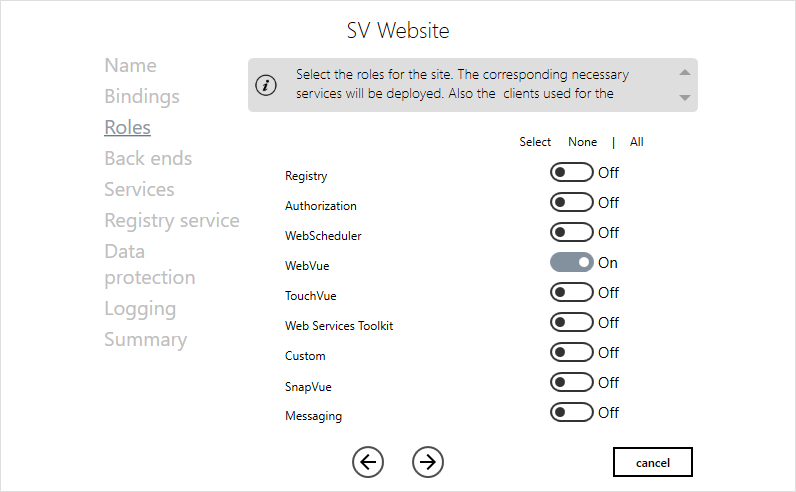
- Registry - Select to deploy the registry service.
- Authorization - Select to deploy the authentication service of PcVue (OAuth).
- WebScheduler - Select to deploy the WebScheduler server role. The WebScheduler is used to manage the built-in schedules of PcVue and those of BACnet devices.
- WebVue - Select to deploy the WebVue server role. WebVue is used to view PcVue mimics in a web browser.
- TouchVue - Select to deploy the TouchVue server role. TouchVue is a mobile app used to monitor PcVue variable values.
- Web Services Toolkit - Select to deploy the Web Services Toolkit server role. The Web Services Toolkit is a web API that can be used to develop custom apps.
- Custom - Select if deploying a custom app and wish to deploy a customized list of services.
- SnapVue - Select to deploy the SnapVue server role.
- Messaging - Select to deploy the instant messaging role.
Services view
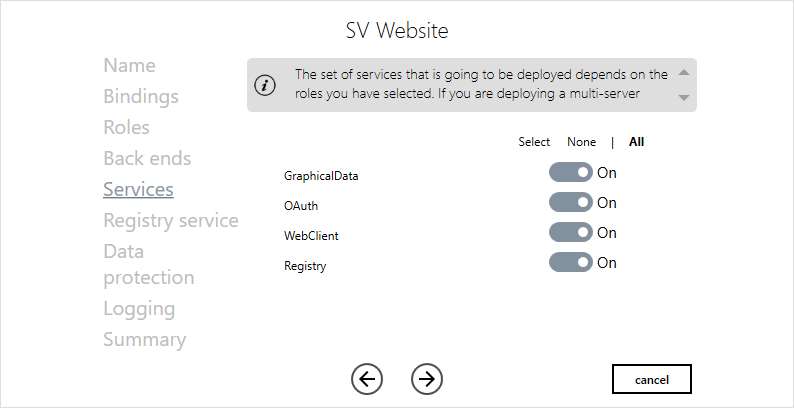
The Services View is displayed by the Custom Setup wizard and can also be opened by clicking the Roles and Services button in a site's tile. The services that are deployed depend on the roles that have been selected. If you are using multi-server architecture, it is possible to distribute the services across several web servers for the purpose of load balancing. See below Registry Service view. The following screen shot shows the services required for WebVue. Show picture
Registry service view
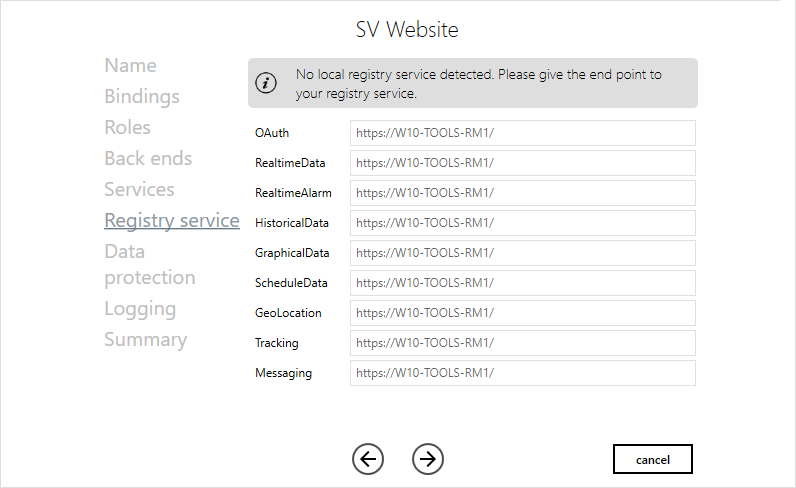
The Registry Service view is displayed by the Custom Setup wizard and can also be opened by clicking the Configure button in the Registry Service group in the main dialog of the WDC. The registry service determines which web server provides which services. By default, the services are all provided by the local server. Show picture
Data protection view
The Data Protection View is displayed by the Custom Setup wizard and can also be opened by clicking the Data Protection button on a site's tile. It is used to configure the methods by which data is encrypted and validated. Show picture
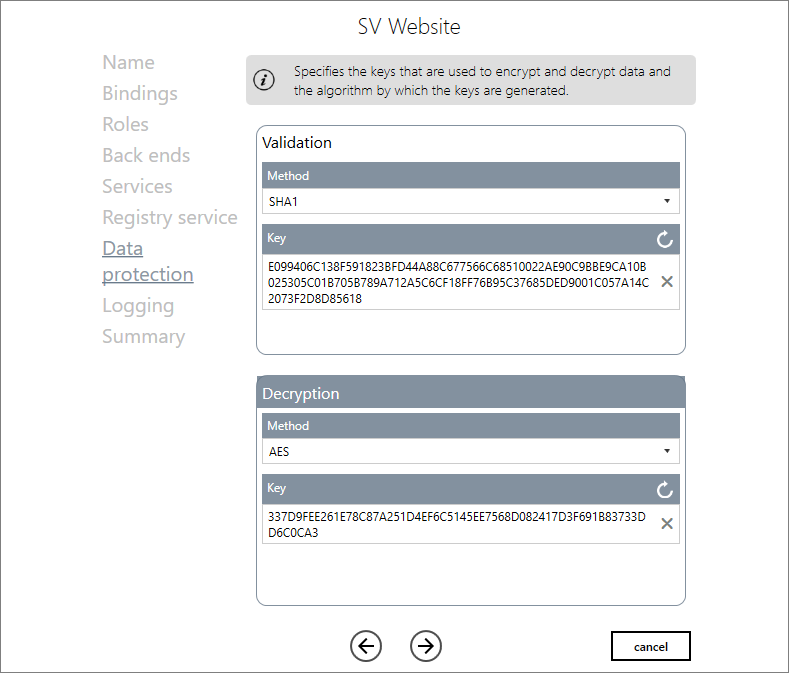
- Validation method - Selection of the method used to validate data. The default is SHA1.
- Validation key - The key for the validation method. For security purposes a new key is generated each time this view is opened - the actual key in use is never displayed. The new key can be manually edited if required.
- Decryption method - Selection of the method used to decrypt (and encrypt) data. The default is AES.
- Decryption key - The key for the decryption method. For security purposes a new key is generated each time this view is opened - the actual key in use is not displayed. The new key can be manually edited if required.
-
 - Generate new decryption and validation keys.
Logging View
The Logging View is displayed by the Custom Setup wizard and can also be opened by clicking the Logging button in the tile of a site. The Logging view is used to manage the range of information that is sent to the Log Monitor. The logging applies to all services. Show picture
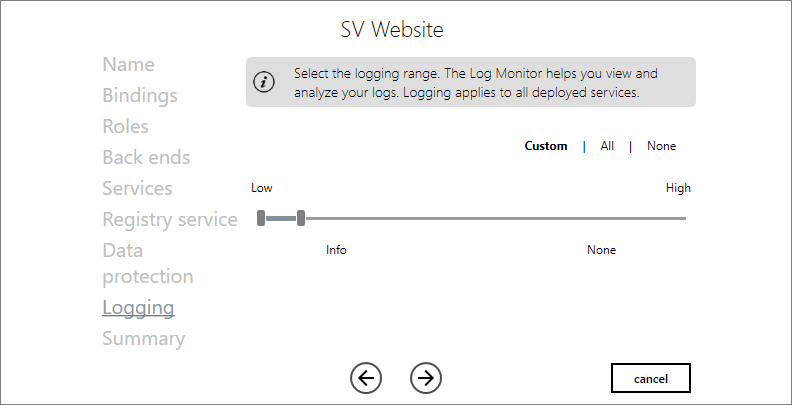
The log range can be set from, and to, the following levels.
- Trace - General trace messages.
- Debug - Used for debugging queries.
- Info - Information about normal behavior.
- Warn - Incorrect behavior but the application continues.
- Error - Highest-level errors such as failures and exceptions.
- Fatal - Fatal errors, the application fails.
Service configuration view
The Services Configuration View is opened by clicking the Services Configuration button. It is used to manage settings for each of the site's web applications and web services. A list of the applications and services is displayed in a slide out pane. Show picture
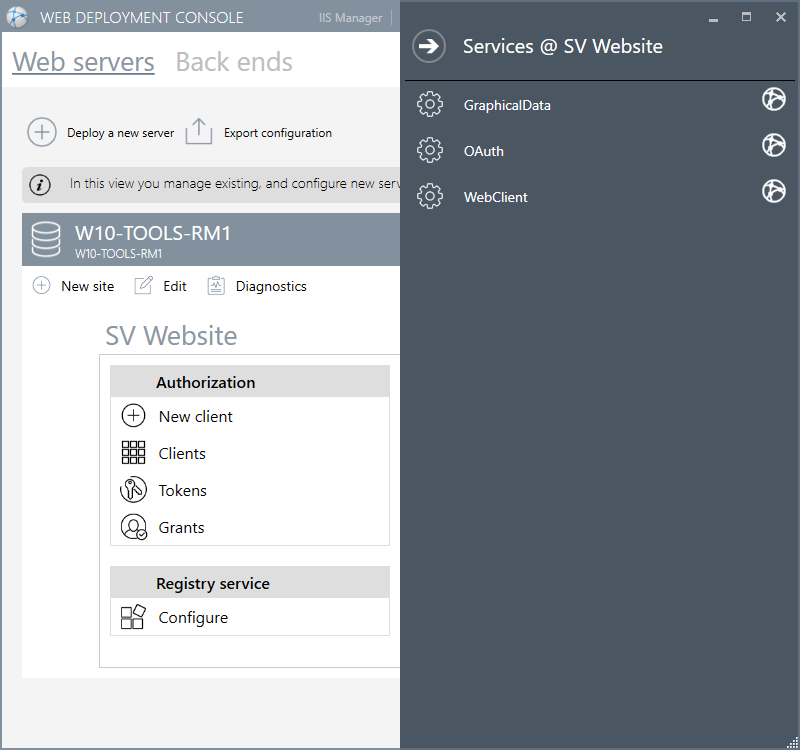
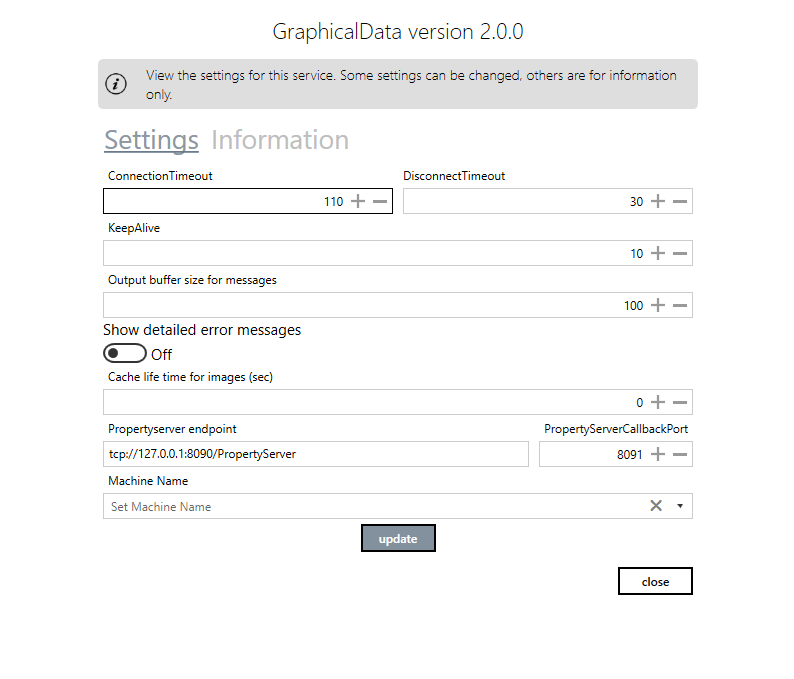
To view the setting for a particular service click on its name. Many of the setting are read only as they are generated automatically by the WDC at the time of deployment and require re-deploying the web site for taking any change into account. These are displayed in the Information tile. Those settings that can be changed are displayed in the Settings tile. The following screen-shot of the settings for the GraphicalData service. Show picture
Service configuration reference
Service settings are accessible in the Services configuration view opened by clicking the Services configuration button.
Using the Information tab can be useful for diagnostics, but changing settings affects the behavior of the corresponding service or web application and will anyway be replaced at the next re-deployment if changes were not done using the WDC itself. You should not change them if not recommended to.
Settings for the OAuth service
- Access token lifetime - The access token is a short-lived token used when accessing the services. The default is 20 minutes.
- Refresh token lifetime - The refresh token is a long-lived token used when renewing the expired access token. Range 0 to 2147483647 minutes. The default is 10080 minutes (7 days).
- Property Server endpoint - Reserved.
- Allow Remember me - If activated, users of WebVue and the WebScheduler web apps will be offered the Remember Me tick box on the login page. Depending on your IT policy, you may or may not want to offer users this opportunity leading to storage of user credentials in a cookie. In all cases, users should be recommended not to tick this box when connecting from a device shared with other users.
- Perform a reverse DNS lookup to get the client host address - If activated, the service attempts to get the client host address using the IP address.
Settings for the WebClient web app
- Ignore certificate errors - If activated, a certificate will be accepted by the web app even if it is not trusted. You can activate it as a convenience on development and test machines if a self-signed certificate is in use. But it is recommended to use a valid certificate and disable this setting on web servers in production.
- Use client host for redirect - Services perform several redirects to other services to handle Authentication. By default, the redirect URIs are generated by IIS based on the binding configuration. This leads to errors in case the IIS is behind a network device performing port translation. If enabled, the redirect URIs are generated based on the hostname that the clients sends in the Http request header. This setting must be enabled if a Gateway or a Router with Port Address Translation (PAT) is in place.
- Enable PWA - If activated, allow installation of the web app as a PWA.
Settings for the WebScheduler web app
- Ignore certificate errors - If activated, a certificate will be accepted by the web app even if it is not trusted. You can activate it as a convenience on development and test machines if a self-signed certificate is in use. But it is recommended to use a valid certificate and disable this setting on web servers in production.
- Hide schedule status columns - If activated, the timetable status columns are not displayed in the Overview page of the WebScheduler portal (columns Standard week is empty and Exception period is active).
- Enable trigger support - If enabled, the WebScheduler gives access to recurring period-based actions.
- Responsive Schedule view - If enabled, the schedule view is rendered in a responsive layout.
- First day of week - Set the first day of week for week-based views.
- Enable help - If not activated, the user access to the help from the run-time WebScheduler portal is prevented.
More settings are available, they are described in the topic WebScheduler Portal configuration.
Settings for the GraphicalData service
- Connection timeout - The amount of time to leave the web socket connection open and waiting for a response before closing it and opening a new connection. Defaults to 110 sec.
- Disconnect timeout - The amount of time to wait after a web socket connection is lost before raising the Disconnected event. Defaults to 30 sec.
- Keep alive - The interval in seconds at which the Core back end is pinged by the GraphicalData service to keep the session alive. Minimum value is 5 sec, maximum is 60 sec, default is 10 sec.
- Number of buffered messages - Each time something changes in a mimic, a message is sent from the GraphicalData service to the client. This setting defines how many of these messages are buffered in case that there are more updates in a mimic than the client can handle. If the connection is slow, it can help to increase the value of this setting, but it will also increase the memory consumption on the server. The minimum value is 32, maximum is 65535, default is 100.
- Show detailed error messages - If enabled, detailed traces are generated by the service for diagnostic purpose.
- Cache lifetime for images - The amount of time in seconds that will be transmitted to the Web browser for handle the caching of images and audio file when using WebVue (max-age cache Http header). The default value is 0, it correspond to requesting web browsers to refresh their cache after 'age of the file/10'. For example, if an image file is 100 days old, the cache lifetime on the web browser side will be 10 days, after which it will ask the resource again to the web server. This setting does not apply to caching of JavaScript and Html files.
- Maximum size of incoming messages - The max size of a message between the back end and the Graphical data service.Larger messages are dropped without being processed.
- Property Server endpoint - Reserved.
- Property Server callback port - The TCP port used by the Core back end to call the web server back to notify about data changes. This port must be open (incoming) on the IIS web server computer (default 8091).
- Machine name - This setting is related to the communication layer used between the GraphicalData service and the Core back end. When the connection is established, the client (GraphicalData service) needs to tell the back end where it listens to the callbacks.
By default, the hostname (or IP) from the first NIC is used, this setting overrides the default. It is necessary to customize the Machine name setting if you need to tightly control which network interface is used on the IIS Web server for callbacks from the Core back end, for example, if you use a VPN tunnel between the 2 machines.
Settings for the SessionContext service
- Property Server endpoint - Reserved.
- Perform a reverse DNS lookup to get the client host address - If activated, the service attempts to get the client host address using the IP address.
Settings for the other services - Reserved
SessionContext, RealTimeAlarm, RealTimeData, HistoricalData, ScheduleData, Geolocation, Tracking and Messaging - These services have no setting other than reserved.