How to import an ICS Triplex ISaGRAF configuration
The Smart Generator ISaGRAF allows you to import an ISaGRAF database file (.MDB) to generate the following PcVue configuration elements:
-
OPC server and OPC group.
- I/O variables including mapping onto the OPC server and group.
The project database file is produced by the ISaGRAF programming software. It is not necessary to have the ISaGRAF programming software installed for the smart generator to run. For information on how to generate the project database file, refer to the help documentation provided with ISaGRAF.
Refer to the overview topic Smart Generators overview to learn more.
Selecting the source data
Before you start the import process, we recommend that you back up the PcVue variables configuration in case of any problems occurring during the import process. The variable configuration is stored in the file VAREXP.DAT in the project's C folder.
Make sure that PcVue is shut down before copying the file.
-
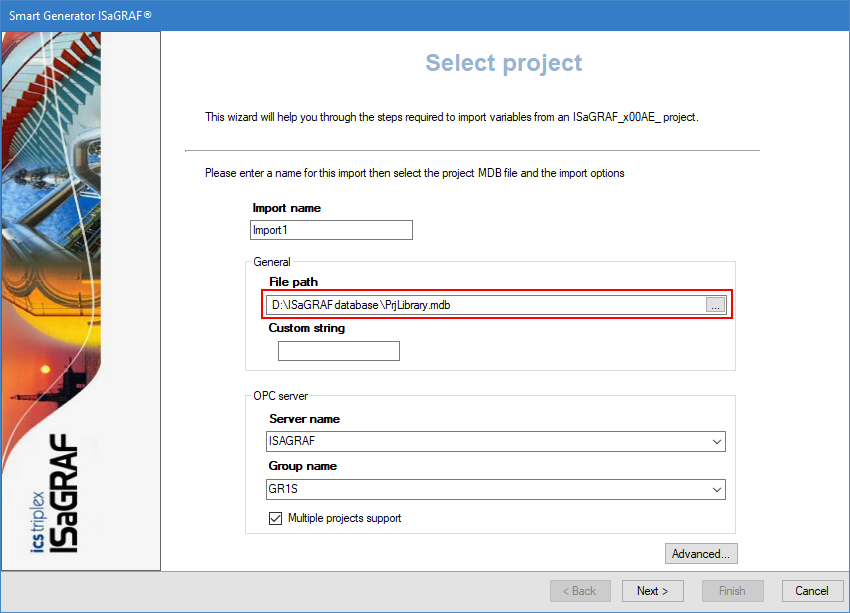
Go to Configure then Smart Generators and click New ISaGRAF import. The Smart Generator ISaGRAF dialog opens with a specified import name. You can change this name.
 Show picture
 -
Click on the ellipses button in the File path field, then select the ISaGRAF project database file to be import.
-
(Optional) Enter a Custom string. This property pre-filters the import by matching the supplied string against the contents of the variable's comment field in the Unity project database. Only variables with comments containing the supplied string pass the pre-filter. For example, if you enter {hmi} in the Custom string field, the smart generator will only makes available items whose comment field contains {hmi}. This custom string does not support wildcards.
-
Select the name of the ISaGRAF OPC server and group to be used to map variables. If the PcVue project does not already have an ISaGRAF OPC server and group configured, the smart generator creates a default OPC Server (ISAGRAF) and Group (GR1S).
-
Click the Advanced/Options button, then select a server list and a client list in the Networking list tab to define the behavior of PcVue variables for a multi-station project.
The lists of servers and clients must already have been created in PcVue and the station from which you run the smart generator must be in the servers list.
-
Select the OPC server tab and enter the name of the computer host on which the ISaGRAF OPC server is located if not on the local computer where the PcVue host runs. Next enter an update rate for the OPC Group (in milliseconds).
-
Select the Options tab and configure the import of branches, domains, and variables. You can set the following properties:
-
Branch - If selected, the smart generator prefixes the name of the imported variables with a branch constructed from the configuration and task names. This option is recommended if there are multiple configurations and resources. Example: BIT1 belonging to the TASK1 of the PLC1 will be imported as PLC1.TASK1.BIT1
-
Domain - If selected, the smart generator generates a domain corresponding to each group of variables. Select the option Assign domain to generated variables to automatically assign the generated domain to each variable in the group as part of the import.
-
Local variables - If selected, it enables the import of local variables. Select the option Branch local variables with POU name to prefix the name of the imported variables with the name of the POU (Program Organization Unit). Example: ST1.BIT belonging to the POU P1 will be imported as P1.ST1.BIT.
-
Comment - If selected, the smart generator uses the ISaGRAF variable and sub-variable comment for the PcVue variable description.
-
Defining branches and selecting variables
After you have selected the source data and configured the networking lists and options of the import via the Select project dialog, the next step is to define the branches and select the variables you want to generate.
-
Click Next, the Branch Management dialog opens. This step allows you to control how branches and variable names are derived from source data names so that the generated variables fit in the branching and naming logic of your project. First, you can enter a global branch if you want to prefix the name of all generated variables with a particular branch segment. You can also select branch separator options to control how source data names will be split into branch segments:
-
Use numeric characters as branch separator - If selected, a branch separator will be added after each numeric character. For example, a source data named MOT1DEFAULT1 will generate a variable named MOT1.DEFAULT1.
-
Use specific sequence character as branch separator - If selected, the sequence of characters you select will be replaced by a branch separator. For example, if you select the underscore ('_') as sequence character, a source data named CONTROLROOM_COMMAND will generate a variable named CONTROLROOM.COMMAND.
A branch separator is not added when a numeric character is at the end of the name.
-
-
Click Next, the variable import process is initialized and the Select import type dialog opens. Select the type of import you need:
- Custom import if you want to access the Select variables dialog in which you can filter and manually select the list of variables to import.
- Full import if you want to generate variables for all source data.
-
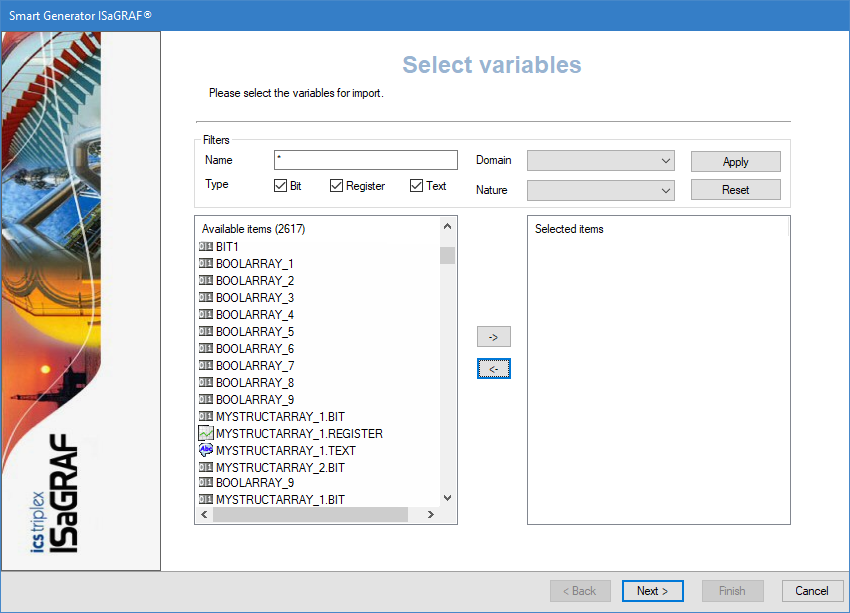
(Custom import option) Adjust the filters to find the variables to import. The Name field allows to filter the list of variables according to the name in the source data. You can use wildcards, the asterisk (matches any number of characters) and the question mark (matches a single character).
For example:
'Pump1' would only match a source data named 'Pump1'.
'Pump?' would match 'Pump1' or 'Pump2' etc. but not 'Pump10'.
'Pump*' would match 'Pump1', 'Pump2' and 'Pump10' but also 'Pumpkin'.The variables that match the filter appear in the Available Items pane.
-
(Custom import option) Select the variables filtered in the Available items pane for import and click the right-arrow -> button. The variables in the Selected items pane are to be imported and generated.
PcVue does not support all characters for variable naming. In particular, the characters '[' and ']' are not supported, so some tags are automatically renamed.
For example in the case of an array item, 'BoolArray[1]' is renamed to 'BoolArray_1'.
Renaming and generating variables
After you have defined the branch and selected variables to generate via the Select variables dialog, the next step offers the possibility to edit the variables you have selected and prepare them for generation.
If a variable is displayed in red, it means that it is invalid for use in PcVue and will not be generated. Use the Rename variables dialog to ensure variable name compliance:
- The max length of a variable name is 255 characters.
- The max number of branch elements in a variable name is 12.
- The name of a branch element or the name of the leaf element cannot be empty (length =0) or exceed 255 characters.
- The name of a variable can only include letters, digits, or the underscore.
- Variable names shall be unique. Two variables cannot have the same name.
-
Click Next. The Generate variables dialog opens, listing all variables selected for generation. To rename variables, either select variables and click Rename selected, or use the Rename invalid button. The Rename variables dialog displays variables in a grid and offers several actions.
-
The Rename variables dialog is designed to make it easy to give a final polish to variable names and fix invalid ones, and also to bulk modify variable properties, to set the Command level or Alarm property for example.
The following operations are available:
- To modify a single variable, double click it, or select it and click Properties. You can edit its name in the General tab. Click OK to validate.
- To add a leaf to one or more variables (to add a .Cmd or .AlarmTmpHigh for example), select them, then click Suffix and enter the suffix to be added. Click OK to validate.
- To replace characters in the name of one or more variables, select them, then click Replace to open the Replace dialog. Enter the strings to search and replace, then click OK.
- To replace branch segments, select the variables, then select the branch segments to be replaced by clicking on the column header and click Replace to open the Replace dialog. Enter the strings to search and replace, then click OK.
- To delete a branch segment, select the variables, then the branch segments to be removed by clicking on the column header and click Delete. The selected branch segments are then removed from the selected variables.
- To merge branches, select the variables, then the branch segments to be merged by clicking on the column header and click Merge. The selected branch segments are then deleted for the selected variables. You can only merge consecutive branch segments.
You can edit the variable properties in the Details tab. These properties can be its type, domain, nature etc.
You can use Shift+click to select a group of adjacent variables and branches or Ctrl+click to select several individual variables.
Once you are done editing the variables click OK to close the dialog.
-
Click Finish and Yes in the Generation dialog to start the generation of variables in PcVue. A dialog is displayed indicating the progress. Any variables in the smart generator that already exist in PcVue are discarded. The corresponding variables in PcVue are not overwritten or updated in any way.
Any variables appearing in red are invalid and will not be generated when clicking Finish.

Synchronizing an existing import
When you synchronize an import, the smart generator compares the configuration elements available in the import file with those that have been imported previously to PcVue.
The synchronizing process takes into account any filter that you may have used previously with the import. For example if there are 400 variables in the import file and the previous use of the import was with a filter and created 100 variables in PcVue, synchronization will inform you that there are 300 new variables available for import.
-
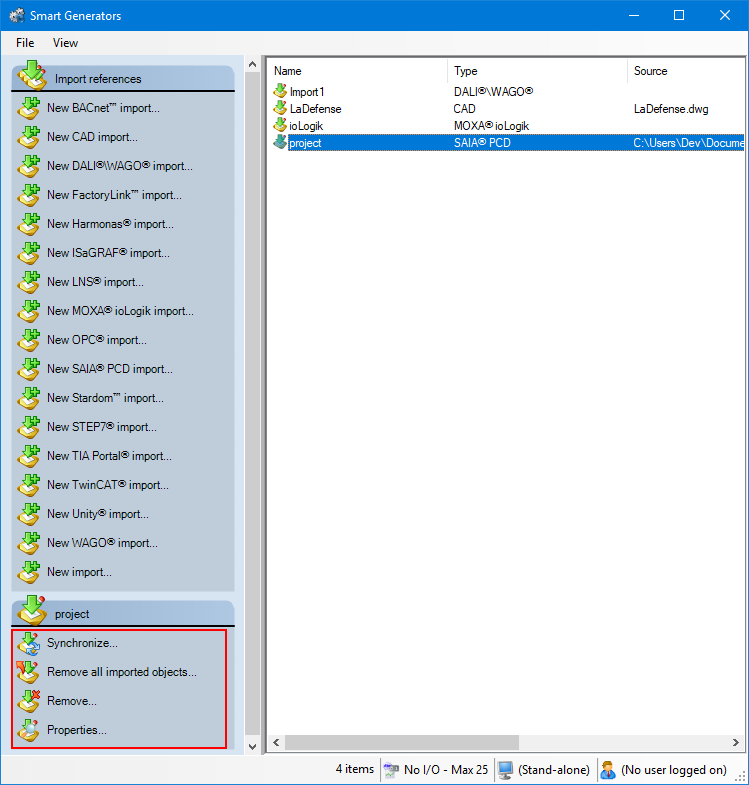
Select the import to synchronize in the right pane of the Smart Generators dialog. A list with actions appears under the Import references pane.
Show picture -
Click Synchronize. This will open the smart generator dialog in which you can reconfigure the import. If variables have been added to the import file since the last import, the smart generator will display the Import new variables dialog, inviting you to make either a full or a custom import of the remaining variables.
-
If you select full import, all variables not already in PcVue are imported.
-
If you select custom import, you can filter the variables using the Select variables dialog.
-
If the smart generator finds variables in PcVue that no longer exist in the import file, a list of the variables is displayed. Using this list, you can choose to remove some or all of the variables from PcVue.
You can choose to only remove imported configuration elements of a smart generator without removing the smart generator import itself. This can be done by right-clicking the import generated and selecting Remove all imported objects.