How to configure networks, devices, and frames
Equipment drivers can be configured from the Application Explorer. This configuration starts with creating a network. Devices can then be created attached to the relevant network, and frames to the relevant device.
Prerequisites:
- For drivers with specific software or hardware prerequisites, you have completed the required setup. Click on the driver you want to configure in this illustration to learn more.
Configuring a network
-
Go to Configure.Application Explorer and expand Communication then Data acquisition nodes.
-
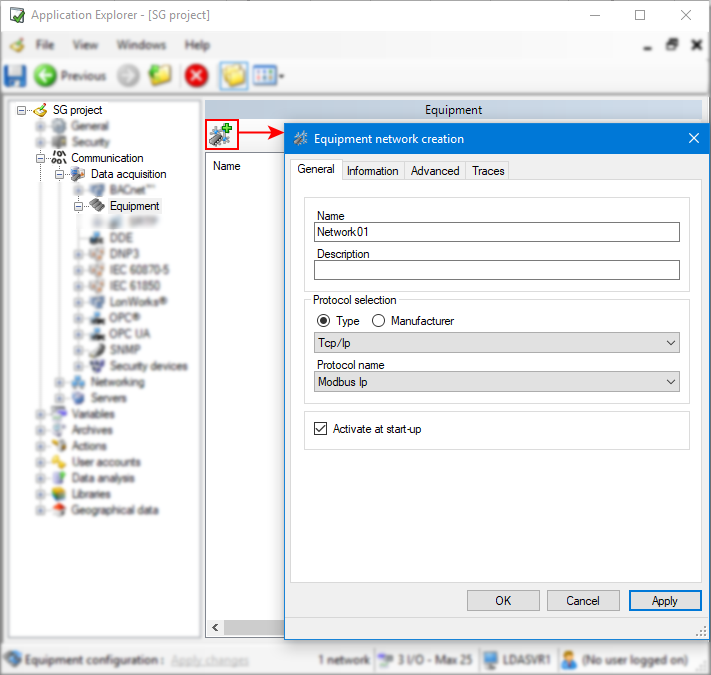
Select the Equipment node then click the Add a network button on the toolbar. The network creation dialog appears.
 Show picture
 -
Enter a name for the network and a description (optional).
-
Select a protocol type and name. You can also filter protocol by Manufacturer instead of type. Depending on the protocol selected, enter the rest of the properties required.
-
(Optional) Check the Activate at start-up box if you wish the network to be activated upon launching PcVue .
You can check the information on the driver you created from the information tab.
-
(Optional) Select the Advanced tab, here you can fine tune the configuration of the network. Click on the appropriate driver in this illustration to learn more about its network properties.
-
(Optional) In the Traces tab, you can activate the trace messages you wish PcVue to generate when performing a diagnostic. The trace messages are logged in the Trace files and displayed in the Event viewer (F7).
-
Click OK to save the configured network and close the dialog box.
-
If you are done with configuration changes behind the Equipment node, click Apply changes in the status bar of the Application Explorer to apply the changes.
The configuration changes are only taken into account by the Equipment drivers' runtime modules when you click the Apply changes. This causes the drivers' runtime module to reload its configuration and restart. You will notice that connections go down and then up again in this phase.
You can start, stop, remove, modify a network and map variables using the toolbar or the task pane on the left.
Removing a network removes all the devices and frames attached to it.
Adding a device to a network
-
Double-click on the network to which you want to add a device. Once added, all the devices attached to the selected network appear in the right pane.
-
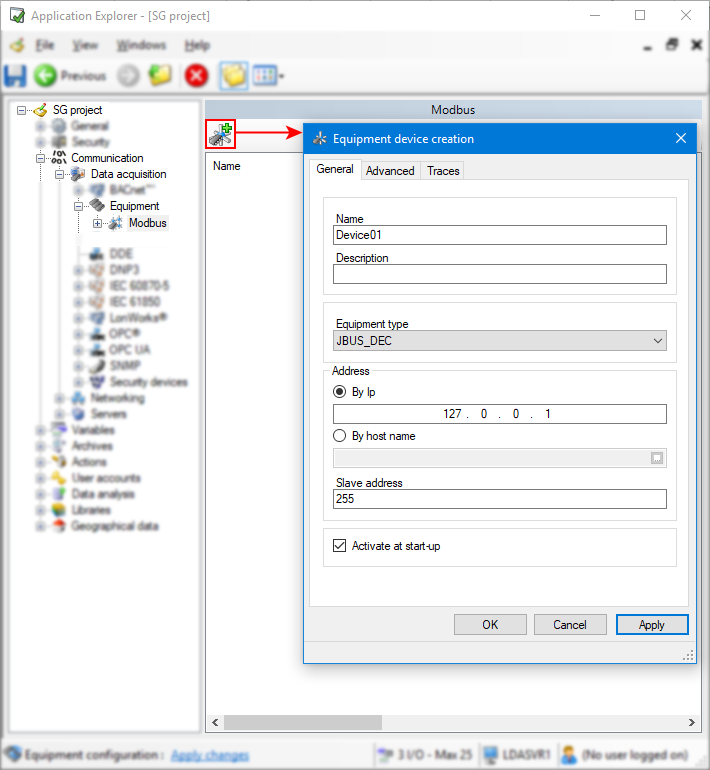
Click the Add a device button on the toolbar. The device creation dialog appears.
Show picture -
Enter a name for the device and a description (optional).
-
Select the equipment type that matches your actual field device from the drop-down list. Depending on the equipment type selected, enter the rest of the properties required.
-
(Optional) Check the Activate at start-up box if you wish the device to be started at the start-up of the network.
-
(Optional) Select the Advanced tab, here you can fine tune the configuration of the device. Click on the appropriate driver in this illustration to learn more about its device properties.
-
(Optional) In the Traces tab, you can activate the trace messages you wish PcVue to generate when performing a diagnostic. The trace messages are logged in the Trace files and displayed in the Event viewer (F7).
-
Click OK to save the configured device and close the dialog box.
-
If you are done with configuration changes behind the Equipment node, click Apply changes in the status bar of the Application Explorer to apply the changes.
The configuration changes are only taken into account by the Equipment drivers' runtime modules when you click the Apply changes. This causes the drivers' runtime module to reload its configuration and restart. You will notice that connections go down and then up again in this phase.
You can start, stop, remove and modify a device using the toolbar or the task pane on the left.
Removing a device removes all the frames attached to it.
Adding a frame to a device
-
Double-click on the device to which you want to add a frame. Once added, the frames attached to the selected device appear in the right pane.
We recommend to minimize the number of frames configured on a device because in term of message flow on the wire, the cost is in the number of frames sent and received between field devices and PcVue. It is preferable to use a few large frames than several small ones, even if not all frame addresses are mapped to variables.
-
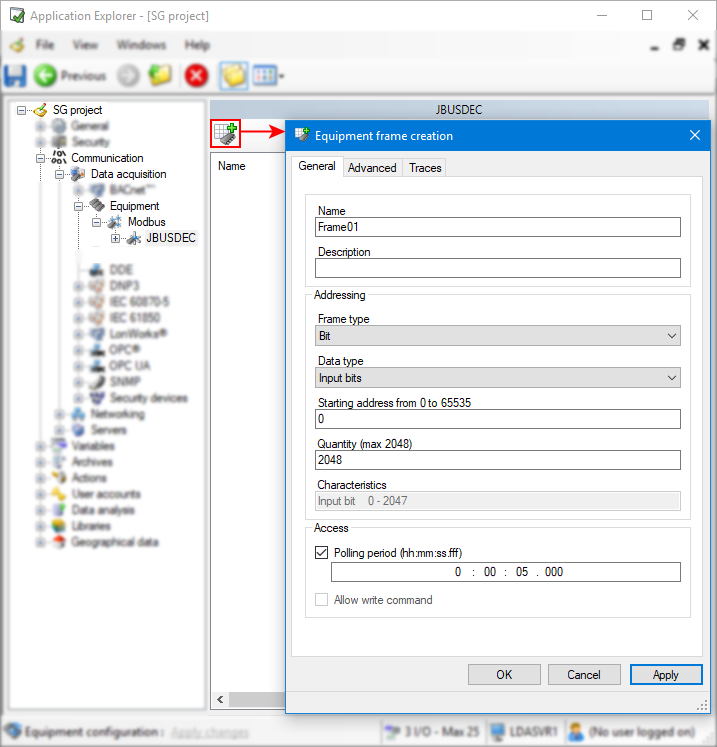
Click the Add a frame button on the toolbar. The frame creation dialog appears.
Show picture -
Enter a name for the frame and a description (optional).
-
Select the frame type and the data type that match your need. Click on the appropriate driver in this illustration to learn more about frame addressing.
-
Enter a starting address and a quantity of data.
-
Enter the polling period and, for frame corresponding to output data types, check the Allow write command box.
-
(Optional) Select the Advanced tab, here you can fine tune the configuration of the frame. Additional properties specific to the driver, equipment type, frame type and data type may need to be configured. Click on the appropriate driver in this illustration to learn more about its frame properties.
-
(Optional) In the Traces tab, you can activate the trace messages you wish PcVue to generate when performing a diagnostic. The trace messages are logged in the Trace files and displayed in the Event viewer (F7).
-
Click OK to save the configured frame and close the dialog box.
-
If you are done with configuration changes behind the Equipment node, click Apply changes on the status bar of the Application Explorer dialog to apply the changes.
The configuration changes are only taken into account by the Equipment drivers' runtime modules when you click the Apply changes. This causes the drivers' runtime module to reload its configuration and restart. You will notice that connections go down and then up again in this phase.
You can start, stop, remove and modify a frame using the toolbar or the task pane on the left.
Starting the communication
Communication between PcVue and field devices can be started as follows:
-
Automatically - Upon startup, the drivers starts the communication. The settings are in the menu Configure.Project.Settings. See the topic Station startup.
-
Manually - You can turn all communication on or off using the tasks in the Application Explorer.
-
From a SCADA Basic program -You can control drivers from a script. For details, see the CIMWAY instruction modes START and STOP.
If you start the communication from the network or device, all devices with Activate at start up option checked will start. If you start it from frames, only the individual frame will start.
For a frame to be started you must link at least one variable to it, otherwise the frame will not be polled.