How to manage project and library versions
PcVue Central project management enables you to centrally manage PcVue project and library versions. It is designed to help you manage successive versions of your project and libraries as part of your project lifecycle policy. It includes tools for the project designer and facilitates deployment.
The original and main use of Central project management is for centralized project management in a networked, client/server project. However, it can also be used for a single station project or a system with multiple stations and different projects. When updating a version, the local project or library is copied to the central storage and replaces the existing one as a whole.
Central project management is not designed for concurrent engineering. It is neither a revision control software, nor a source code management tool (SCM). It is not designed to keep track of atomic changes done from one version to another in your PcVue project. It does not compress nor do differential saving to save storage space.
Using Central project management, you can:
- Save a project to a central folder, either as a new version or as an update to an existing version.
- On a host, select the version of the project from the list stored in the central folder, load it and launch PcVue with that version.
- Manage the state of project versions in the central project folder in order to control which version should run on hosts in production.
- Do all the above with the shared and common libraries.
Central project management takes advantage of a file server you host on your network to store the history of projects and libraries versions.
You can manage any number of projects in the same central project folder. However, from a particular host, you only see versions of the project that is currently being loaded on that host.
See the topic Backing up and restoring projects and libraries.
Creating, updating, and managing versions takes place in your development and testing environment, typically on an engineering host computer running PcVue. Central project management helps you apply a project management and versioning policy, including the identification and follow-up of:
- Versions at development or testing stage.
- Version at validation stage, prior to deployment in production.
- Version of reference in production.
- History of operational versions, the ones that were once the reference in production.
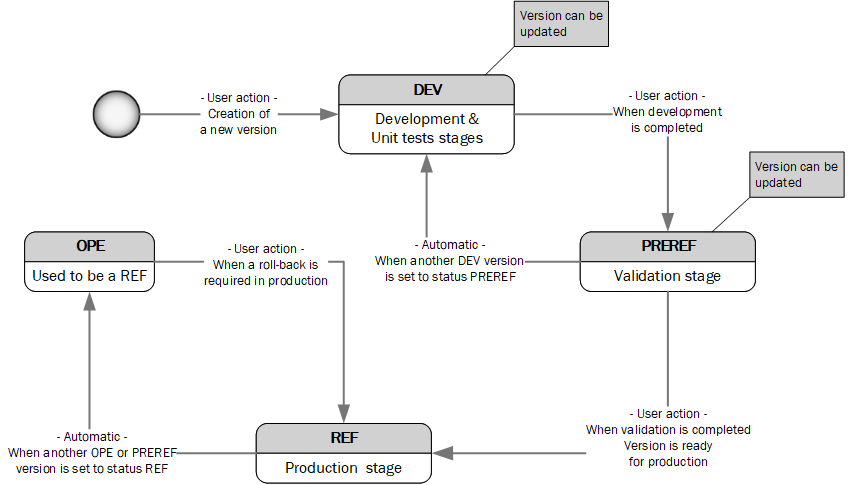
The state machine behind Central project management is as follows.  Show picture
Version numbering follows widely accepted software versioning schemes using three digits known as Major (a major version), Minor (a minor version) and Revision (a revision to a Major/Minor version). For example, 1.0.0. The major and minor digits can be set according to whatever version control standards are being followed. The revision digit starts at zero and is incremented automatically each time a new version of a particular Major/Minor version is created.
While Central project management does not enforce any policy, it has been designed so that you can set up a development process for your PcVue project, with typical, widely accepted rules.
In particular:
- The 3-digit version number allows you to identify and track major changes, minor changes, and revisions of the configuration.
- The status allows you to identify if a version is at development or unit tests stage (DEV), at validation stage (PREREF), in production (REF), or was the reference in production in the past (OPE).
- In addition, you can associate tags with versions. Tags allow you to bypass the lifecycle proposed with the predefined states if your context requires a simpler workflow. For example, if all you need is to identify a version for production and another one for dev, you can ignore the concept of state, and simply use the tags Dev and Prod.
When using Central project management, it is essential to make sure that the time is synchronized across all the involved host machines.
Initial setup of the Central project management
This section describes the parameters that must be set after the creation of a project, or if you want to start using the Central project management with an existing project.
A prerequisite to using central project management on a PcVue host is to enable it and specify the central folder where versions of projects and libraries are stored.
The setup can be performed using the Host Deployment Console:
- Open the Host Deployment Console as a user with Administrative privileges, a shortcut is available on the desktop and in the Programs menu.
- In the left pane, click on Central version. The Central version view opens, it displays the current setup.
- Click the Enable central project management check-box.
- Select or enter manually the path to the Central version folder where versions of your projects and libraries are stored. It is usually a network resource on a file server under the form
\\MyFileServer\CentralStore - (Optional) Select or enter manually the path to the Export folder where files are stored when you export the version history.
- (Optional) Click the Enable updating the version when in OPE or REF state if necessary.
- Click the Save button. A confirmation dialog is displayed, click Confirm to save changes.
Alternatively, you can use the svcmd CLI:
- Open a terminal as a user with Administrative privileges and go to the program files folder where PcVue is installed. By default, C:\Program Files\ARC Informatique\PcVue 17\
- Run the following commands. Replace the paths with your own central and export folders.CopyInitial setup of Central version management
svcmd central-versions enable --central-folder \\MyFileServer\CentralStore
svcmd central-versions tune --ope-ref-update=true|false
svcmd central-versions tune --export-folder \\MyFileServer\Export
The central folder can be located anywhere on a computer acting as file server that all of the PcVue hosts can reach over the network. Central project management requires bulk file copies, so it is best to choose a file server that has fast access speed and enough storage space to accommodate the needs.
When using Central project management, it is recommended to have the SV Core Data Isolation service running. This service is in charge of performing file and folder copies between a PcVue station host and the central folder - upload of a new or updated project version, or download of a project version. It is designed to be delegated tasks that would otherwise require more permissions for the account executing the main process of PcVue.
Using the Windows services app, you should review and tune the settings of the SV Core Data Isolation service:
- Set Startup type to Automatic
- Customize the Logon account (default Network service)
- Set the Recovery options
Using the SV Core Data Isolation service is recommended because it makes it possible to minimize ACLs on project and library files for the account used to run PcVue, ACLs on files stored locally on hosts and also ACLs on the central folder itself. The project configuration files, mimics and symbols (among others) can be read-only for the interactive user or service account that runs PcVue. Only the service will add/modify/remove such files as part of a version update.
With the SV Core Data Isolation service, direct access to the central folder by users can be avoided completely, thus reducing the risk of unintended changes to files that are important for traceability of configuration changes.
At the time of uploading or downloading files, if the SV Core Data Isolation service is not reachable, for example because it is not started, PcVue will attempt to copy file directly from within the main sv32.exe process. And it may fail if ACLs are minimized for the executing account.
The folder you choose as your central storage location must have the following permissions set:
- The account running the SV Core Data Isolation service on station hosts must be able to browse folders, read and copy files from the central folder. Alternatively, interactive user or service account running PcVue on station hosts must have equivalent permissions.
- In addition, the account running the SV Core Data Isolation service on engineering station hosts must be able to create and delete sub-folders, delete, create, write, and modify files on the central folder. Alternatively, the interactive user running PcVue on engineering station hosts must have equivalent permissions.
If you are using central project management for the first time with a project, you can then check the configuration from within PcVue:
-
Go to Configure, then Projects and select Versions.
The Central project management dialog is also available as a Standard Action in the Function Key configuration dialog, although it is not allocated to a function key by default.
-
Click General parameters in the left pane of the Central project management dialog. The dialog displays if Central project management is enabled, and the configured Central versions folder.
Show picture
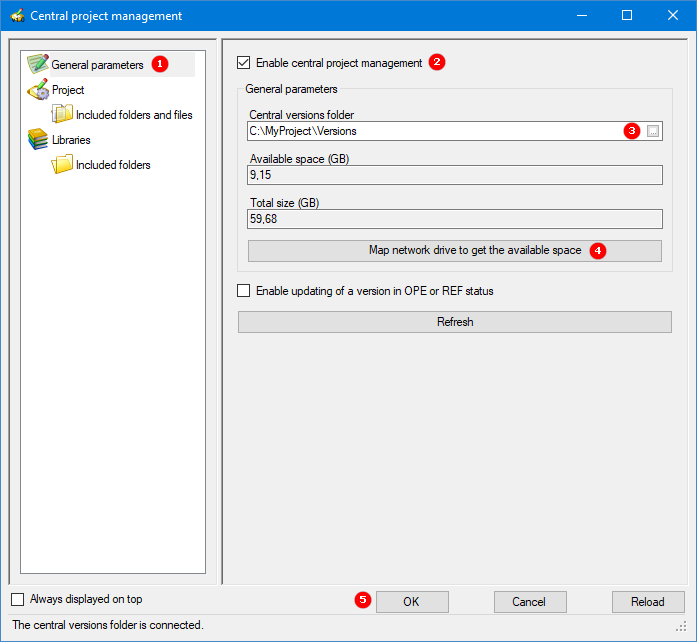
The Reload button can be used when the connection to the central storage folder is lost while the dialog box is open. Click the Reload button once the connection is recovered to refresh the dialog box: List of versions, states etc.
Selecting the folders and files to include
Selecting the exact sub-set of libraries you actually use in your project is important to avoid the burden of copying several unused files when deploying or updating a station's libraries. It can be hundreds or thousands of files depending on project and library sizes.
-
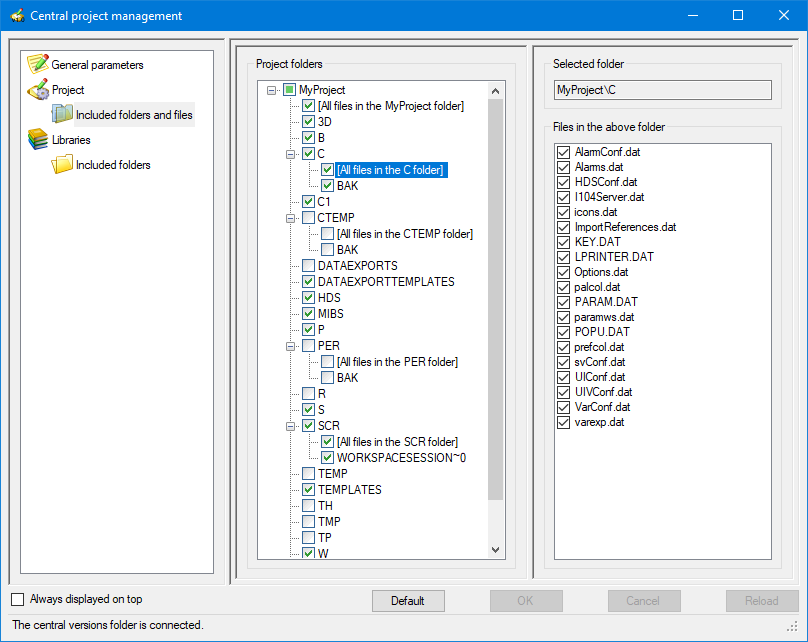
Click Included folders and files under Project in the left pane of the Central project management dialog. Here you select which project folders and files are included when creating or updating a version of the project.
-
Tick and untick the project folders and files in the Project folders pane as required. To display the items that a folder contains, click on the '+' nodes to the left of the folder name.
Show pictureUnless you have specific requirements and are familiar with the project folder structure, it is recommended that the default selection be used. If you have made changes but wish to restore the default settings, select the Default button to do so. In particular, strong recommendations apply to the following folders:
-
The \TH folder must be excluded to avoid overriding proprietary archive unit data.
-
The \PER folder must be excluded to avoid overriding persistent data, including saved variable values.
-
The \TP folder is dedicated to storing project-specific files. At design time, it is recommended to clearly identify files that will have to be part of the version management (configuration files common to all stations), from files that should not be overridden upon version loading on a host. And based on this, to separate project-specific files in different sub-folders of \TP, some included to version management, and some others excluded.
-
-
Next, click Included folders under libraries in the left pane of the Central project management dialog. Here you select which folders are included when saving a version of the libraries.
-
Tick and un-tick the library folders as required. For the custom libraries, you can only select/de-select an entire library. For the common library, you can select/de-select each sub-folder individually. This selection process allows you to use Central project management for the entirety or part of the Common library and a sub-set or all Shared libraries.
Creating and updating project and library versions
Make sure all files are properly saved before creating or updating a version, including mimics and configuration files. If there is any unsaved file, the newly created or updated version will not match what runs locally.
-
Click Project in the left pane of the Central project management dialog. Here you can create a new version of the project, update or delete an existing one. The right pane changes to show details of the local project and of any versions of projects that are stored centrally. The same goes for Libraries except that you have to click on Libraries instead of Project.
-
To create or update a project version, follow either of these two steps:
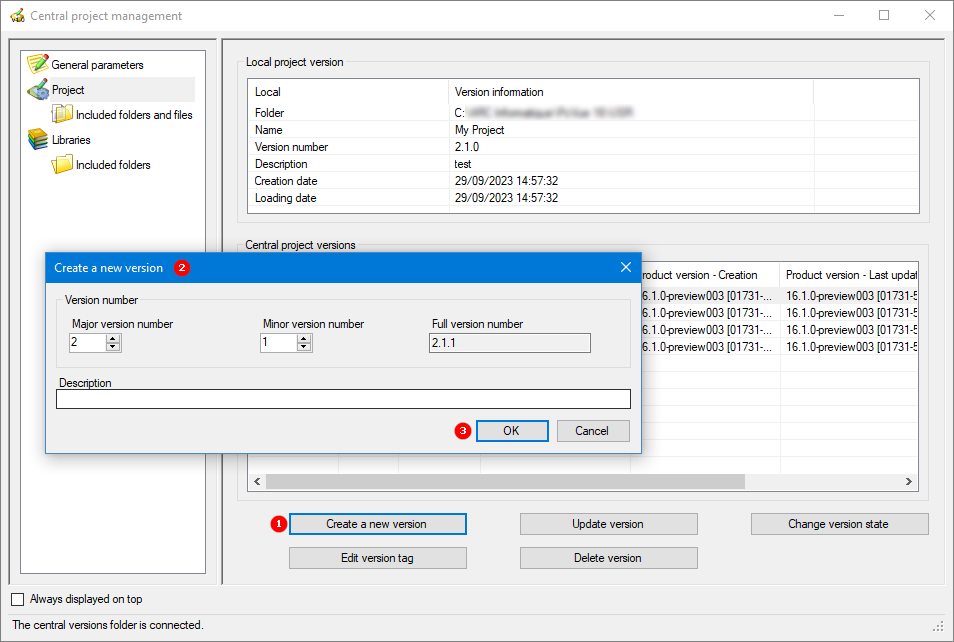
(Create a new version) Click the button Create a new version. The Create a new version dialog opens. Here you can choose new major and minor version numbers or use the existing one. You can also add a description to reflect the changes brought by this new version then click OK to start the copying process. The new version is created in the central project folder by copying the selected files from the local project under a selected version number. The new version is given the DEV state and the local version number is updated to reflect the version you have created.
Show pictureThe version number is used to name the sub-folder in which the version is centrally stored.
Version numbers are applied independently to projects and to libraries. For example, you can have at some point in time, libraries version 1.4.2 and project version 3.0.4. For instance, Project XYZ version 1.3 and version 1.3 of the libraries need not correspond to each other in any way.
Prior to PcVue version 12.0, version numbering used two digits. Upon migration, the existing centrally stored versions are left untouched, and keep a 2-digit version. Any new version you create will have a 3-digit version number (with the revision digit set to 0).
(Update a version) Select the version to update and click the Update version button. Click Yes in the confirmation dialog and the Version update dialog appears allowing you to select the type of update you wish to do: A full update, a partial update from a given date or to just change the description. The selected local files are then copied to the central folder overriding any existing files.
By default, you can only update a version that has the DEV or PREREF state. However, you can remove that restriction by enabling the update of a version in OPE or REF status.
See Initial setup for more information. -
(Optional) Select the version created and click the Change version state button to change the default DEV state associated with the version. This state determines the readiness of the version for deployment. There are four possible states to choose from to best represent the state of a version:
-
Development (DEV): A version that is at stage dev-in-progress. You can have more than one version in state DEV. You can load, update, and delete a version in this state.
-
Pre-reference (PREREF): A version that is being validated before deployment in production. You can only have one PREREF version at a time. You can load, update, and delete a version in this state.
-
Reference (REF): A version that is validated for deployment in production and typically used on all run time station hosts of the system. You can only have one REF version at a time. You can load, but you cannot update a version in this state, unless you enable the update of a version in OPE or REF status.
-
Operational (OPE): A version that is used to be a REF in the past. Depending on your practices, the most recent OPE version may be used a fallback when the REF version proves to be faulty once deployed. You can load and delete, but you cannot update a version in this state unless you enable the update of a version in OPE or REF status.
You cannot change straight from DEV to REF. If you do not wish to take advantage of the PREREF state for the validation stage, you must first change the state to PREREF and then you can set it to REF.
If you apply the REF state to a version when a REF version already exists, the latter is changed to OPE.
If you apply the PREREF state to a version when a PREREF version already exists, the latter is changed to DEV.
-
-
(Optional) Select the version created and click Edit version tag button to add a tag that can later be used to start up the version by using the '-d' command line. The tag should not be more than 12 characters and be unique. The list of allowed characters is [-_#$a-zA-Z0-9]. Refer to How to select a project version at start-up topic for more information.
You can use the Delete all other tags box in the Edit version tag dialog to delete tags associated with other versions.
Project version information is saved in the file INFOS.DAT found in the project root. This file only exists for projects using Central project management and appears in both the local project and versions in the central project store.
Deleting a version is an irreversible operation that deletes all corresponding files in the central folder and cannot be reversed nor called off. To delete a version, select it and click Delete version, then click Yes to confirm deletion in the confirmation dialog.
Deploying a version
The process of selecting and loading a version of a project, and / or a version of the libraries, from the central folder to a station host takes place at start-up. It is controlled by command line arguments that you add to the PcVue shortcuts.
By using the proper shortcuts, you control that:
- Only a validated version is run in production.
- The user can pick any version on an engineering or test station.
- The user only runs the proper version on validation stations.
See How to select a project version at start-up for more information.
See Central Project Management status variables for more information about system variables.
Example of managing versions with Central project management
The station hosts
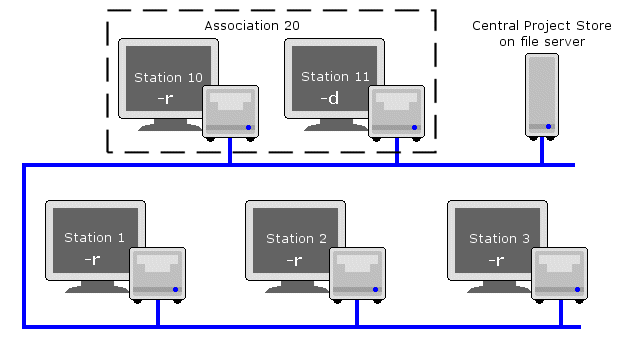
An application has been living for some time, but evolving requirements mean that its configuration is modified occasionally. The architecture is as follows:
- Two server stations, station 10 and 11 in an association for high availability.
- Three client stations, station 1, 2 and 3, are connected to the association. The client station 3 is used as engineering host.
- A file server \\MyFileServer holds the central project store.
Central project management is enabled on all stations and \\MyFileServer\CentralStore is configured as the central project store.
Client station 3 has a complete license, development, and run-time, and is started with the command line argument -d.
All other stations have run-time licenses and are started with the command line argument -r.
The versions
The versions to be controlled are at various stages of the development cycle.
| Version | Description | State |
| 1.7.0 | The final release of the previous version, archived if a rollback is necessary. | OPE |
| 2.1.0 | The version currently in use in production, but due for replacement shortly. | REF |
| 2.2.0 | Newly tested and in state PREREF during the validation phase. | PREREF |
| 3.0.0 | Under development. | DEV |
All of the versions are stored in the central project store on the file server. Show picture
- Development and testing occur on Station 3. With the -d switch, it can download any of the versions for development, test and troubleshooting as required.
- When operational testing on a version is completed, it progresses to state PREREF. Version 2.2.0 is currently in that state.
- The server stations (10 and 11) and 2 client stations (1 and 2) are configured with the -r switch to load the REF version when they are restarted. Version 2.1.0 currently has that state, so it is loaded automatically on start-up of these stations.
- When the changeover to version 2.2.0 takes place, it is given REF state. Version 2.1.0 reverts to the OPE state and remains available for rollback.
- When the stations using the -r switch (station 1, 2, 10 and 11) are next restarted, Central project management automatically downloads version 2.2.0 onto it.
- If there is a need to fall back temporarily, the administrator re-assigns the state of REF to version 2.1.0 then restarts the stations to load version 2.1.0 again. This assumes that versions 2.1.0 and 2.2.0 are interchangeable functionally and able to serve the users' basic needs.
- In this example, the libraries remain unchanged in support of versions 2.1.0 and 2.2.0 of the project. Version 1.7.0 is stored for practical reasons only.
The result
After the changeover to version 2.2.0, the project versions are as follows.
| Version | Description | State |
| 1.7.0 | The final version of the previous release, archived for troubleshooting purposes. | OPE |
| 2.1.0 | The previous version available for fallback. | OPE |
| 2.2.0 | The version currently in use on Stations 1 to 3. | REF |
| 3.0.0 | Under development. | DEV |