


Overview
The workflow consists of two actions available from a WebVue mimic:
- Generate – triggers the Data Export engine to produce an Excel file.
- Open – opens the generated file directly in the WebVue browser tab.
A status variable (GENERAL.EXPORTS.DIAGNOSTIC.STATUS) reflects the current state of the export in real time, using enumerated labels to display a human-readable status (e.g., Idle, In progress, Done, Error).
Prerequisites
- Microsoft Excel installed on the local machine.
- PcVue Web Server and PcVue Backend with Data Export on the same station.
Step 1 – Configure the Data Export
In PcVue Application Explorer > Data Analysis > Data Exports, create a new export named DIAGNOSTIC and configure it as follows:
| Setting | Value |
|---|---|
| Export name | DIAGNOSTIC |
| Output type | Excel (.xlsx) |
| Template file | Diagnostic.xlsx (in DataExportTemplates\) |
| Output file name | Diagnostic |
| Output folder | DataExports\ (relative to the project root) |
| Behaviour if file exists | Overwrite |
| Status variable | GENERAL.EXPORTS.DIAGNOSTIC.STATUS |
The output file will be written to the DataExports\ folder at the root of the project, for example:
C:\PcVue Projects\WebVueDataExport\DataExports\Diagnostic.xlsxStep 2 – Add Enumerated Labels to the Status Variable
The Data Export engine writes a numeric code to the status variable to indicate the current export state. Adding enumerated labels to that variable makes the status readable at a glance in mimics with “Label display” animation.

Note: The exact numeric values and their meanings are documented in the Data Export section of the PcVue Reference Guide.
Step 3 – Write the SCADA Basic Scripts
The two actions are implemented as subroutines in the program PROGLOADED.SCB (located in the P\ folder of the project). This program is loaded at PcVue startup.
' PROGRAM : PROGLOADED.scb
' Loaded at start-up from the program INIT.scb

SUB GenerateExport()
  Export("GENERATE", "DIAGNOSTIC");
END SUB

SUB OpenExportFromWebVue()
  Webvue("HYPERLINK", "/DataExports/Diagnostic.xlsx", 1);
END SUB
GenerateExport()
Calls the Export() instruction with the GENERATE mode to trigger the production of the export named DIAGNOSTIC. The engine updates the status variable throughout the generation process.
OpenExportFromWebVue()
Calls the Webvue() instruction with the HYPERLINK mode to instruct the WebVue client to navigate to the URL /DataExports/Diagnostic.xlsx. The third parameter 1 opens the file in a new browser tab.
Note: The
/DataExports/path is a virtual directory configured in IIS – see Step 5.
Step 4 – Configure the Mimic
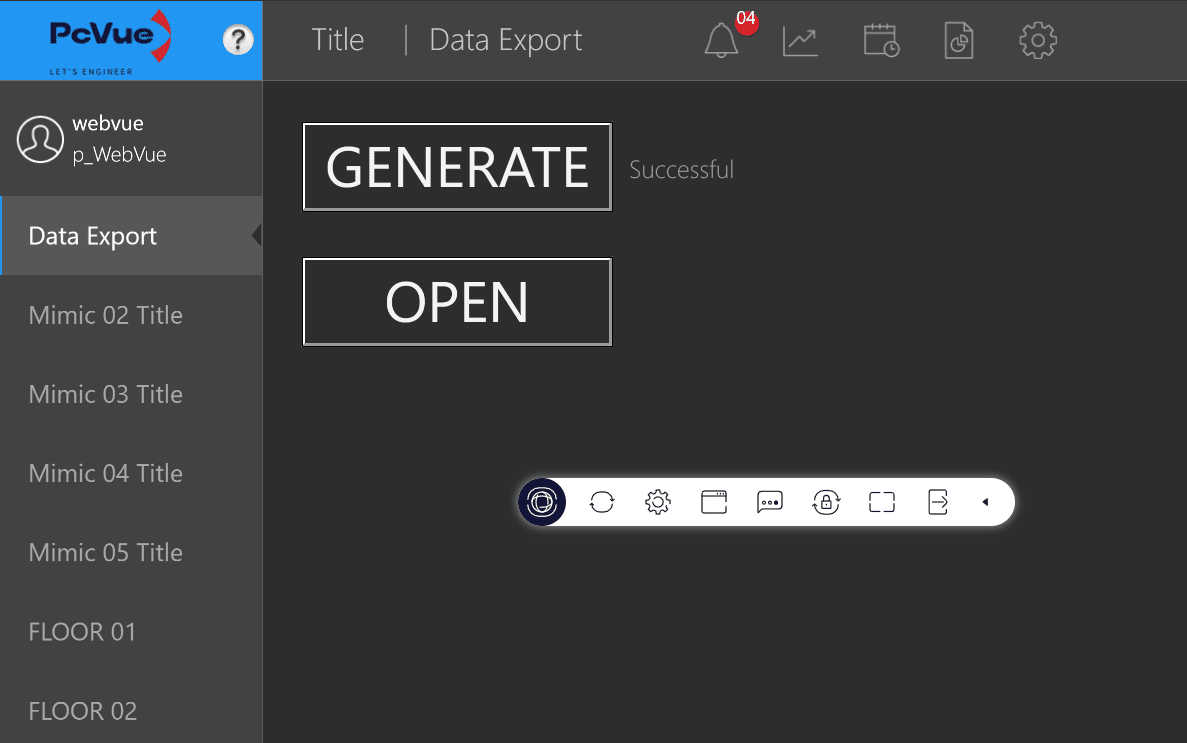
Open mimic Mimic 01 in PcVue. The mimic contains three objects:
4a – Status display (text object)
A text object shows the current value of the status variable using the Display animation linked to @GENERAL.EXPORTS.DIAGNOSTIC.STATUS. Thanks to the enumerated labels configured in Step 2, the label (e.g., Done) is displayed instead of the raw numeric value.
4b – “GENERATE” button
A push-button calls GenerateExport() on click via a Run Program animation:
| Animation property | Value |
|---|---|
| Program | PROGLOADED.SCB |
| Subroutine | GenerateExport |
4c – “OPEN” button
A second push-button calls OpenExportFromWebVue() on click via a Run Program animation:
| Animation property | Value |
|---|---|
| Program | PROGLOADED.SCB |
| Subroutine | OpenExportFromWebVue |
This button also has a Visible animation based on @System.LocalHost.Session.Type set to show the button only in WebVue sessions (session type = 100), hiding it in PcVue desktop sessions. This is intentional: the Webvue("HYPERLINK", ...) instruction only works in a WebVue context.
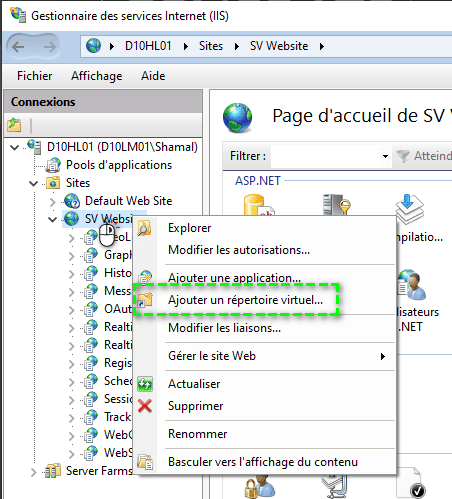
Step 5 – Configure the IIS Virtual Directory
The Webvue("HYPERLINK", "/DataExports/Diagnostic.xlsx", 1) instruction uses the path /DataExports/ relative to the WebVue web application root in IIS. By default, IIS does not know where to find this folder, so a virtual directory must be added.
Procedure
- Open IIS Manager (
inetmgr). - Expand the tree to locate the WebVue website.
- Right-click on it and select Add Virtual Directory…
- Fill in the dialog: FieldValue Alias as
DataExports andPhysical path as Full path to theDataExports\folder of the PcVue project, e.g.C:\PcVue Projects\WebVueDataExport\DataExports - Click OK.
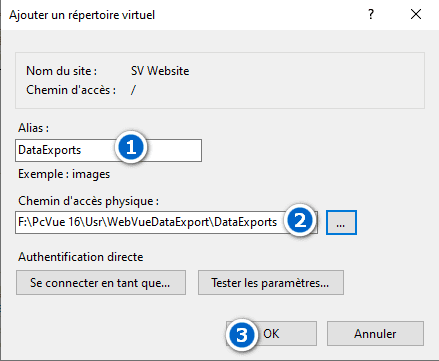
Important: The IIS application pool user (or the
IUSRaccount) must have Read permission on theDataExports\folder so that IIS can serve the file.
After this configuration, the URL https://<webclient_binding>/DataExports/Diagnostic.xlsx will resolve to the physical file generated by PcVue.
End-to-End Workflow
Once everything is configured:
- The WebVue operator connects to the WebVue interface and navigates to Mimic 01 – Data Export.
- The operator clicks GENERATE. The
GenerateExport()subroutine firesExport("GENERATE", "DIAGNOSTIC"). - The status label updates in real time: Idle → In progress → Done.
- When the status label shows Done, the operator clicks OPEN. The
OpenExportFromWebVue()subroutine firesWebvue("HYPERLINK", "/DataExports/Diagnostic.xlsx", 1). - The browser opens a new tab and downloads/displays
Diagnostic.xlsxfrom the IIS virtual directory.
Sample Project
The sample PcVue project used in this article is available here:
Created on: 06 May 2026 Last update: 18 May 2026