









Projects are not protected by default. Migrating a project to PcVue 17 does not protect it: some of its files are still encrypted with a default key, exactly like a newly created project. An encrypted file taken from such a project can be loaded into any other project, on any computer, by anyone with access to the files. Binding the project to a key that you own is the step that follows migration, before test and validation resume.
Protection relies on two elements that you generate: a key file, which holds a randomly generated secure key, and the passphrase that protects that key file. Back up both and keep them safe: they are required to deploy the project on other hosts, to restore a host, and to renew the key. If they are lost, access to the configuration data is lost with the last host that still knows the key.
Before you start
– The project must already run on PcVue 17. A project coming from an earlier version must be migrated first : see [KB1272] PcVue 17 – Project Migration Guide.
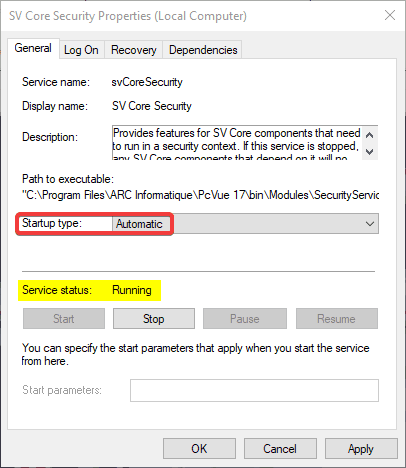
– The SV Core Security service is in charge of cryptographic operations. In order to use protected projects, it has to be running on every PcVue host, not only on the one where you protect the project. Set its startup type to “Automatic” in Windows Services Manager, and verify the “running” service status.
– The command line operations require a Command Prompt opened as a user with administrative privileges, in the folder where svcmd is located :
by default C:\Program Files\ARC Informatique\PcVue 17\Bin\.
Generating a key file
Protecting a project starts with the key file. Generate it first: every operation that follows uses it, and the passphrase, as input. The key file holds a randomly generated secure key and is protected by the passphrase. If you manage several projects, use a different key file and passphrase for each of them.
Each operation described in this guide can be performed either from the Host Deployment Console or from the svcmd command line.
The two are equivalent: use one or the other, not both.
Using the Host Deployment Console
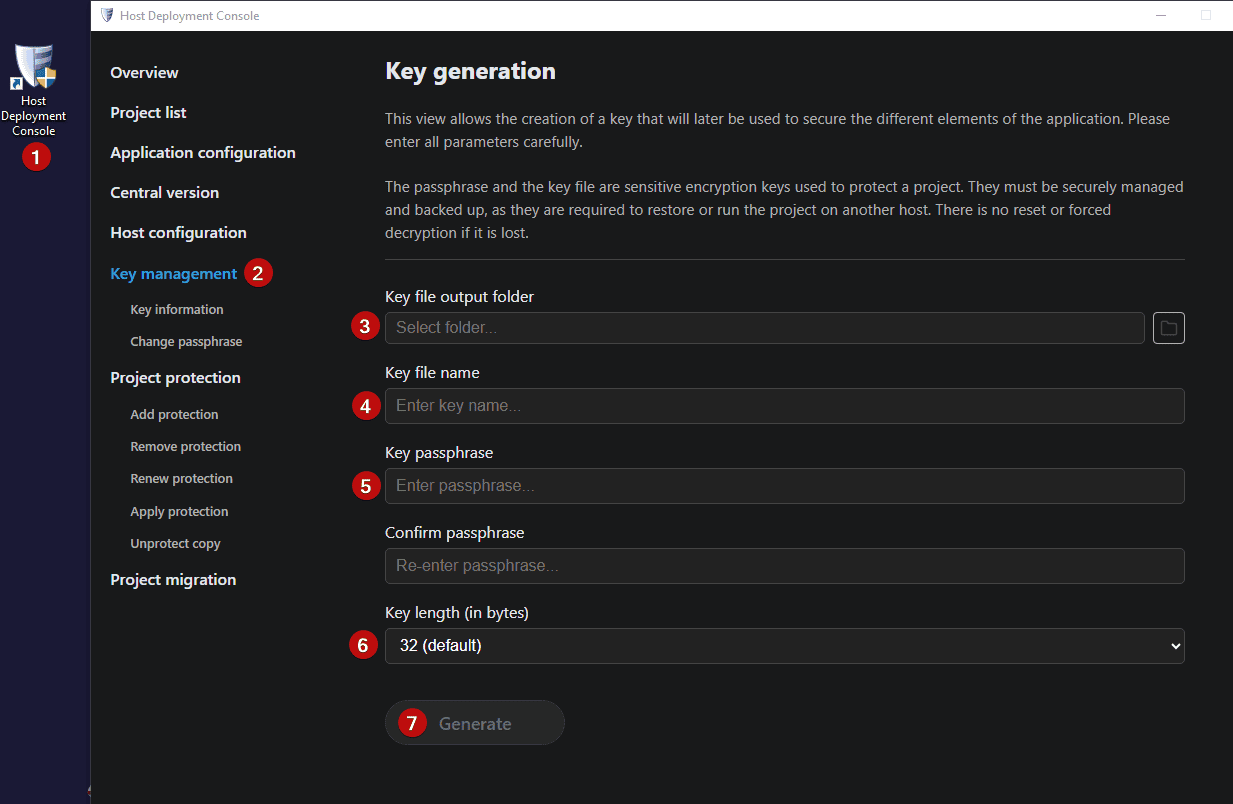
- Open the Host Deployment Console as a user with administrative privileges. A shortcut is available on the desktop and in the Programs menu.
- In the left pane, click Key management. The Key generation view opens.
- Select or enter the path to the folder where the key file is to be stored.
- Enter a name for the key file.
- Enter a passphrase of your own and confirm it. It protects the key file.
- Select the key length, 32 bytes by default.
- Click Generate. After a few seconds the key file is available in the output folder.
Or using the svcmd command line :
svcmd key generate "X:\keys\my-project.key" --pass MyPassphrase
You have to specify in the command line the destination folder, and the passphrase.
Protecting a project
Using the Host Deployment Console
- In the left pane, click Add protection. The Add protection view opens.
- Select the Project folder, or enter the Project name manually.
- Select the Key file you generated and enter the Passphrase used to protect it.
- The project is not protected yet, so make sure to enable “Protect the project immediately”
- Click Add.
- Back up the key file and its passphrase.
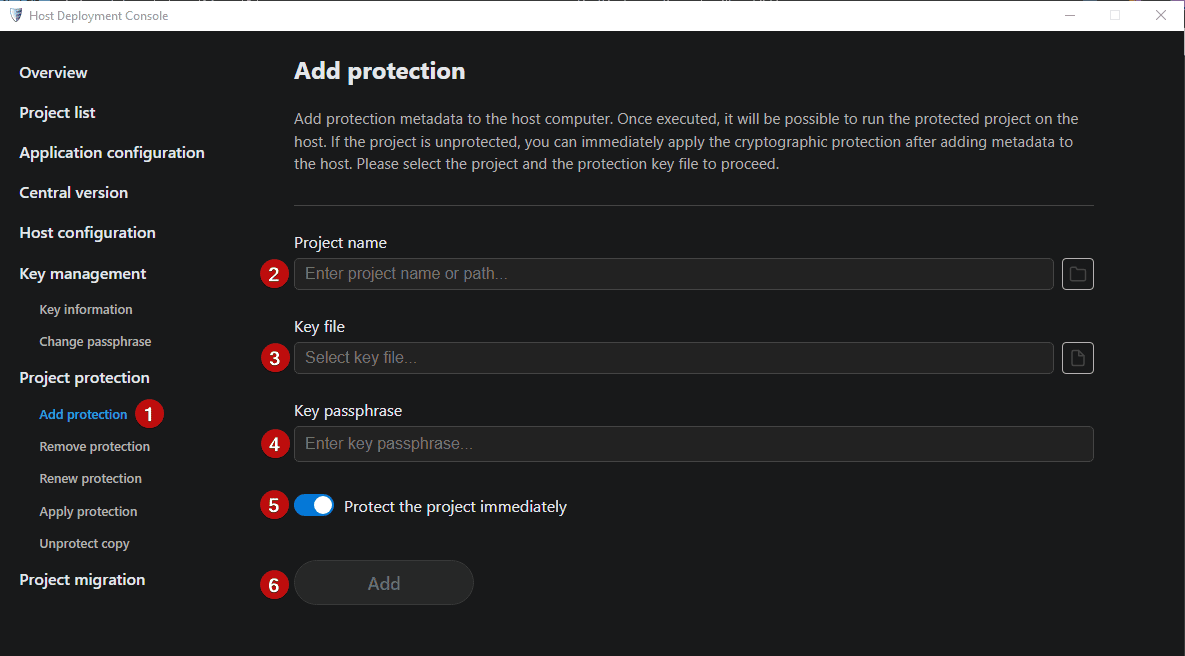
Step 4 imports the key so that PcVue can cipher and decipher data for the project. Because the toggle was enabled, it also deciphers the project with the current default key, rotates the keys, and ciphers the project with your own key.
Or using the svcmd command line
1. Retrieve the identifier of the project, since protection is applied to a project identified by its GUID and not by its name:
svcmd project get-id MyProject
2. Register the key for that project:
svcmd project-protection add <PROJECT-ID> X:\keys\my-project.key --pass MyPassphrase
3. Apply the key to the project:
svcmd project-protection apply <PROJECT-ID> X:\keys\my-project.key C:\Projects\usr\MyProject --pass MyPassphrase
Then back up the key file and its passphrase.
Running add alone does not protect the project: it only registers the key so that PcVue can use it, and leaves the project files untouched. They remain ciphered with the default key until apply is run.
Deploying a protected project on another host
On every other host that runs the project, register the key without applying it again: the project is already ciphered with it.
In the Host Deployment Console, open the Add protection view, select the project and the key file, enter the passphrase, and make sure Apply protection to the project immediately is disabled before clicking Add.
Instead, if you want to use the command line, run the add command only :
svcmd project-protection add <PROJECT-ID> X:\keys\my-project.key --pass MyPassphrase
Renewing the secure key
Renew the key when your security policy requires a rotation, or whenever you suspect that the current key has been compromised.
Using the Host Deployment Console
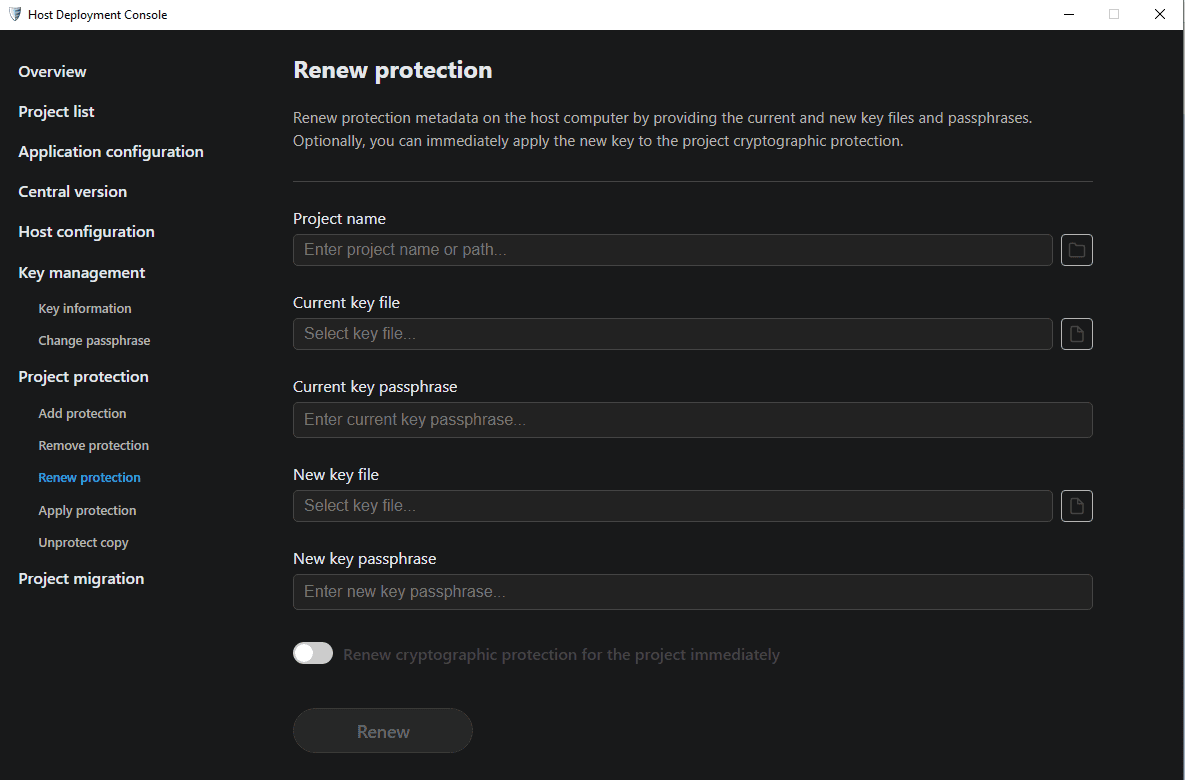
Go to Project protection > Renew protection and fill in every field.
Or using the svcmd command line
svcmd project-protection renew <PROJECT-ID> <Current key file path> <New key file path> --apply <Project folder name>
For example:
svcmd project-protection renew a040230f-575a-449d-8f2f-8077092990dc "F:\Key\ProjectKey.key" "F:\Key\NewProjectKey.key" --apply MyProject
The tool prompts for the passphrase of the current key and for the passphrase of the new key before processing the renewal. See the project-protection renew command line help for the full list of options.
Unprotecting a copy
When a project has to be sent to an external party, for instance to obtain support on a problem, you can produce an unprotected copy of it without removing the protection of the project in use.
Using the Host Deployment Console
Go to Project protection > Unprotect copy and fill in every field.
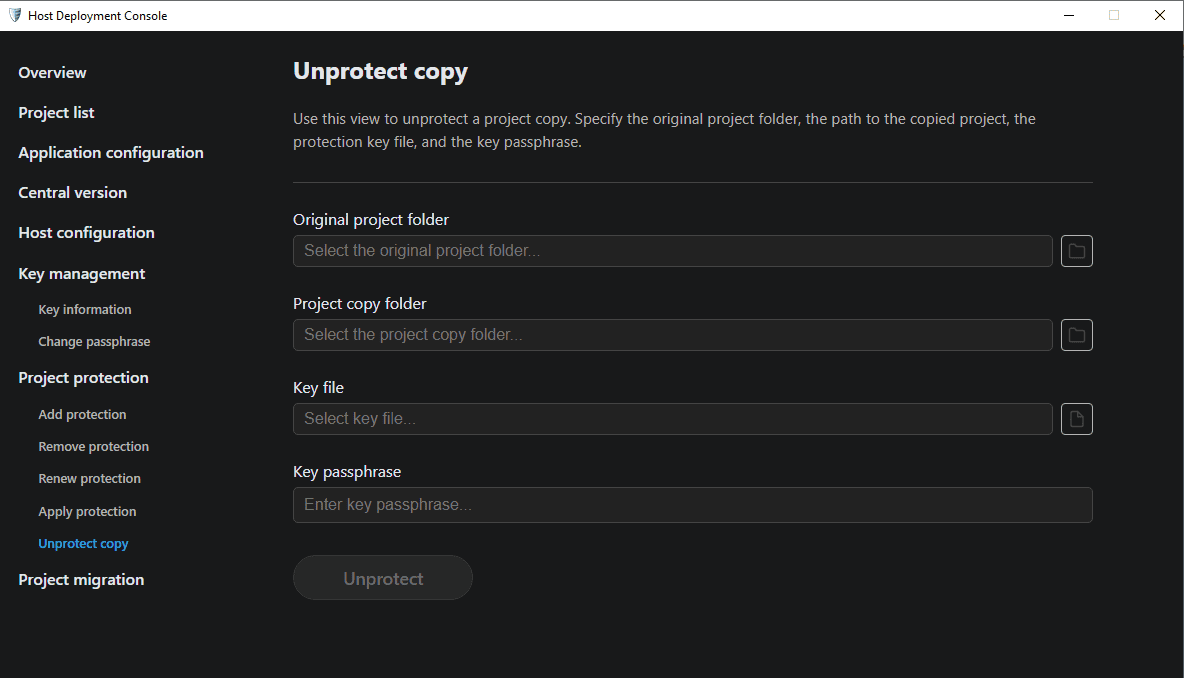
Or using the svcmd command line
svcmd project-protection unprotect-copy <PROJECT-ID> <Key file path> <Destination folder>
For example:
svcmd project-protection unprotect-copy a040230f-575a-449d-8f2f-8077092990dc "F:\Key\ProjectKey.key" "E:\ProjectToShare\MyProject"
Write the copy to a folder outside the usr data folder. Storing it inside would unprotect the project currently in use.
Before sending the copy, anonymise it: station IP addresses, user account names and any other data you do not want to disclose.
Related articles
- [KB1272] PcVue 17 – Project Migration Guide
-
[KB1275]PcVue 17 – Project Protection Guide
Created on: 20 Jul 2026 Last update: 21 Jul 2026