









What changed in PcVue 17
The Central Project Management dialog no longer allows you to define the central folder or to enable the feature. It is now used only to create a project version, update it, or change its state.
Both operations moved to host level: they are performed once per station, with the Host Deployment Console or the svcmd command line, and are written to the AppDeployment.json file located in the <Install Dir>\config folder.
Instead of granting write permissions on the share directly to users or to the PcVue runtime engine, file operations in the central folder are delegated to a dedicated PcVue service. This improves protection, reduces accidental modifications, and simplifies the management of the ACLs on the share.
Before you start
- PcVue must be stopped on the station you are configuring.
- The central folder must already exist and be reachable over the network by every PcVue host. It can reside on any machine acting as a file server.
- The command line method requires a Command Prompt opened with administrative privileges.
- A project created with an earlier version must be migrated to PcVue 17 before it can be published as a version. See [KB1272] PcVue 17 – Project Migration Guide.
Method 1 – Host Deployment Console
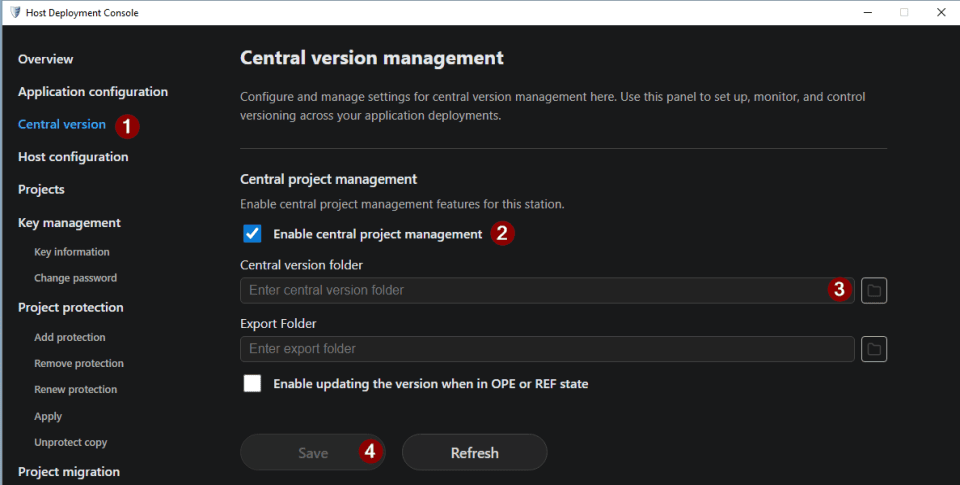
- Stop PcVue if it is running.
- Open the Host Deployment Console.
- Select the Central version tab.
- Check Enable central project management.
- Select the shared folder.
Method 2 – svcmd command line
-
- Stop PcVue if it is running.
- Open a Command Prompt with administrative privileges, and move to the installation folder where
svcmdis located. By default, it is C:\Program Files\ARC Informatique\PcVue 17\Bin . - Register the central folder, where
<Central version folder>is the path to your own shared folder:svcmd central-versions tune --central-folder "<Central version folder>"
For example:
svcmd central-versions tune --central-folder "\\Server\Versions\Projects"
- Enable the feature:
svcmd central-versions enable
Keep the straight double quotes around the path: they are required as soon as it contains a space.
Checking the configuration
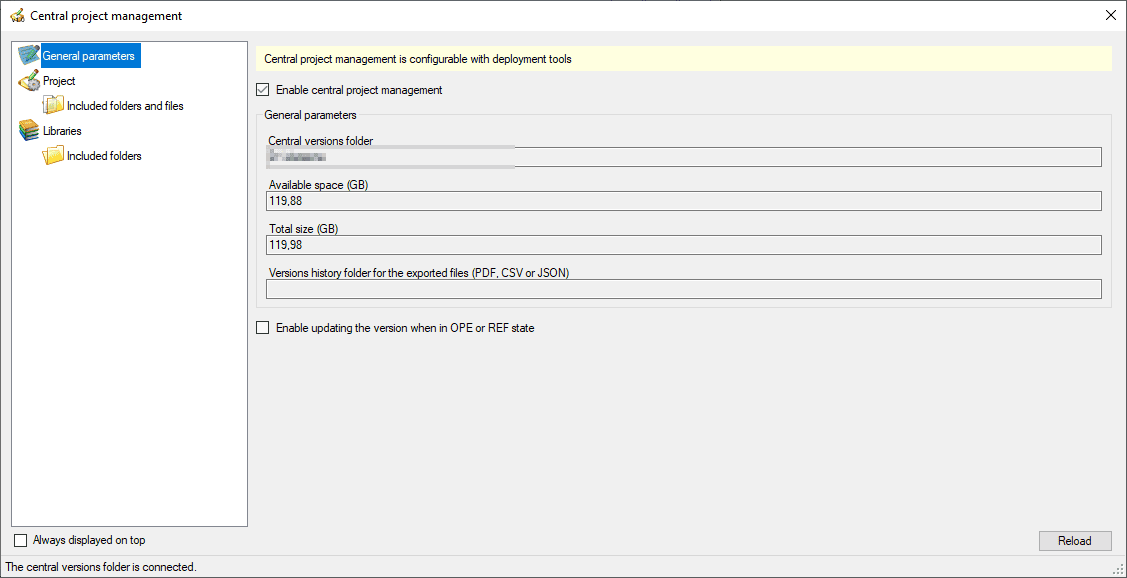
Open the Central project management dialog. A banner recalls that the feature is configured with the deployment tools, and the general parameters are displayed for verification only: Enable central project management is ticked and Central versions folder shows the registered path. Available space (GB) and Total size (GB) are reported for that folder, and the status bar confirms that the central versions folder is connected.
The same path can be read in AppDeployment.json, in the <Install Dir>\config folder.
From this point on, you can create project versions and manage their state, using the “Project” entry.
Permissions on the central folder
All hosts need network access to the shared folder, but they do not need the same rights:
- Runtime stations only read and copy project versions. Read access is sufficient.
- Engineering stations publish new versions, and additionally require the right to create and delete subfolders, and to create, modify and delete files.
Related articles
Created on: 20 Jul 2026 Last update: 21 Jul 2026