





Critical vulnerabilities affecting certain versions of the PHP language (CVE-2026-109618 and CVE-2026-109619) were disclosed on October 20 and 21, 2026.
Based on our analysis, we confirm that our products are not affected by these vulnerabilities.
In fact, they do not contain any PHP components and are therefore not vulnerable to the risks described in the published security advisories.
No action is required regarding our products.
If PcVue closes after approximately 3 days, check whether a Windows scheduled task is used to start it.
A task configured to stop after three days may also stop PcVue.
Cause
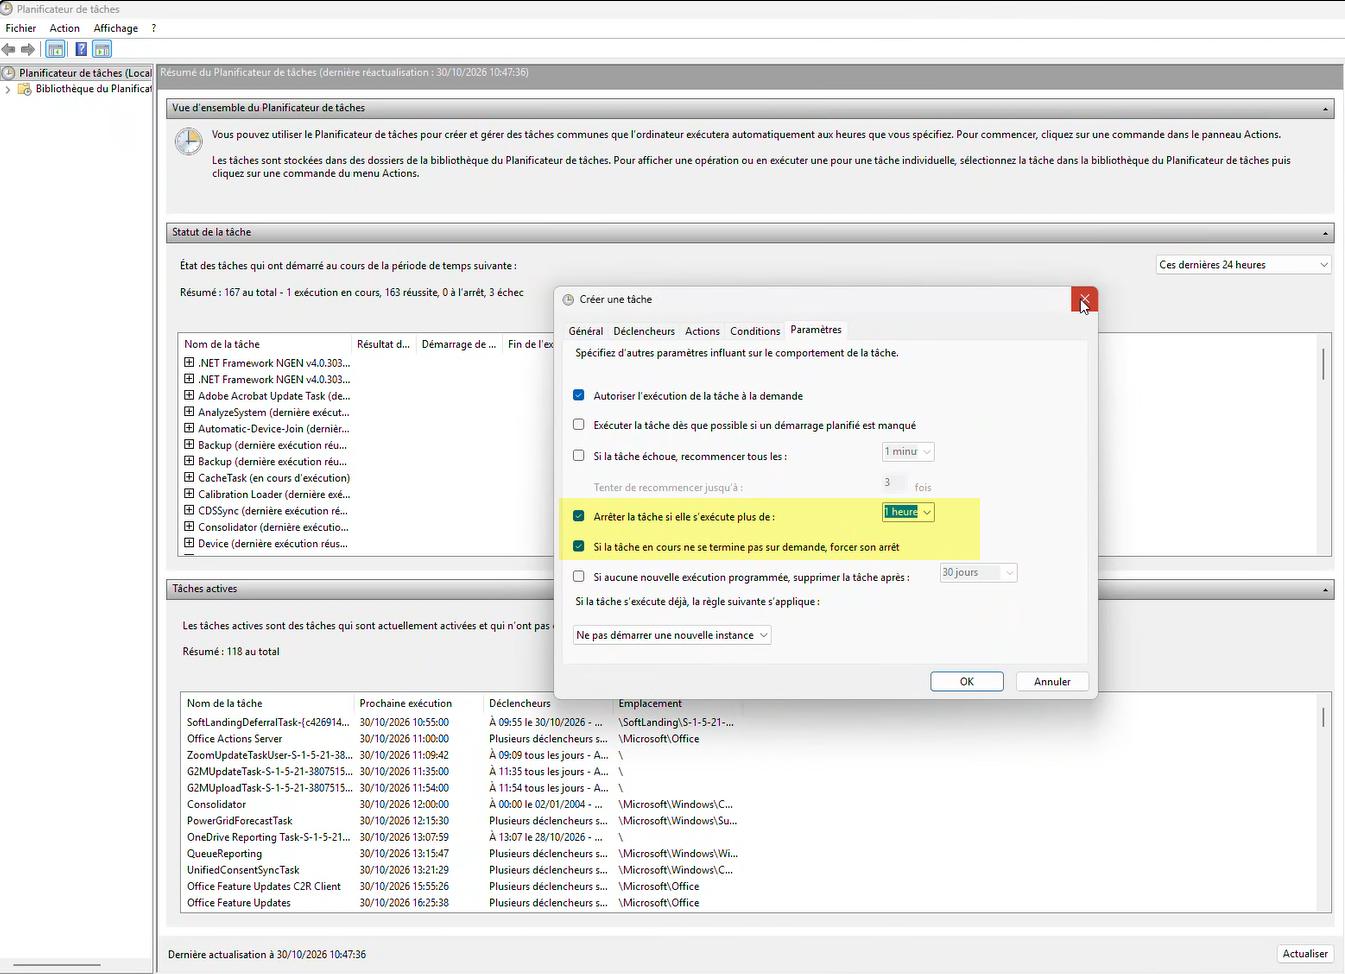
A scheduled task can be used to delay the start of PcVue, for example to give the computer time to reach a stable state. If the task’s settings limit its execution time to one hour, Windows may stop the task and close PcVue. A forced-stop setting may also be enabled.
Check the scheduled task
- Open Windows Task Scheduler.
- In Task Scheduler Library, locate the task that starts PcVue. Check its Actions tab if necessary.
- Open the task’s Properties and select the Settings tab.
- Check whether Stop the task if it runs longer than is selected, and whether If the running task does not end when requested, force it to stop is selected.
Resolution
- In the task’s Settings tab, clear Stop the task if it runs longer than.
- Also clear If the running task does not end when requested, force it to stop, if it is enabled and available.
- Click OK to save the task.
- Start PcVue using the scheduled task and confirm that it remains open beyond the previous one-hour limit.
Keep the existing startup delay if it is needed; changing these settings does not require removing it. If PcVue still closes, investigate other possible causes.
When Mosquitto starts without a configured listener, version 2.x listens only on the local loopback interfaces (127.0.0.1 and ::1). Clients on other computers cannot connect to the broker.
This article explains how to configure a listener on all IPv4 interfaces, check the Windows firewall, and test the connection. The example allows anonymous access and is intended only for testing on a trusted network.
Symptoms
- MQTT clients can connect using
localhost, but cannot connect using the broker computer’s network IP address. - Remote clients report a connection timeout or a connection refused error.
- The broker appears to be running, but accepts only local connections.
These symptoms can also have other causes, including firewall rules or authentication failures. On the broker computer, run the following command to check port 1883:
netstat -ano | findstr :1883For example, the following output shows listeners bound to the loopback interfaces:
TCP    127.0.0.1:1883    0.0.0.0:0    LISTENING    <PID>
TCP    [::1]:1883        [::]:0       LISTENING    <PID>
Compare the PID with the Mosquitto process in Task Manager; another application may also use port 1883. If there is no listener on the port, check that the broker is running and using the expected configuration.
Configuration
Security warning: This example permits any client that can reach the listener to connect without a username or password. It does not enable TLS. Use it only temporarily on a trusted test network. Do not expose this listener to the Internet or use it for production.
Step 1: Configure the listener
- Identify the configuration file used by the running Mosquitto service. A common installation path is:
C:\Program Files\Mosquitto\mosquitto.conf - Open the configuration file in a text editor running as administrator. Back up the file before making changes.
- Add or update the following directives:
listener 1883 0.0.0.0allow_anonymous true
Listens on TCP port 1883 on all available IPv4 interfaces.
Allows clients to connect without username/password authentication. Check for existing listeners and authentication settings first. Modify the appropriate settings rather than adding a conflicting listener on the same address and port. Retain any existing authentication and access-control configuration required by your installation; do not enable anonymous access on a production broker. - Save the file.
Step 2: Restart Mosquitto
- Open Services (
services.msc). - Locate the Mosquitto service and restart it.
- Confirm that the service is running. If it fails to start, check the Mosquitto logs, the configuration file, and whether another process is already using the port.
Step 3: Verify the listening interface
Run the following command again on the broker computer:
netstat -ano | findstr :1883Expected output includes a line similar to:
TCP 0.0.0.0:1883 0.0.0.0:0 LISTENING <PID>Confirm that the PID belongs to Mosquitto. 0.0.0.0 indicates that the listener is bound to all IPv4 interfaces; it is not an address that clients should use to connect.
Step 4: Allow traffic through Windows Firewall if needed
If remote connections are blocked by Windows Firewall, create an inbound TCP rule on the broker computer. The example below applies only to the Domain and Private profiles and restricts access to 192.168.1.0/24. Replace this subnet with your trusted client network before running the command in an elevated PowerShell window:
New-NetFirewallRule `
    -DisplayName "Mosquitto Broker (TCP 1883)" `
    -Direction Inbound `
    -Protocol TCP `
    -LocalPort 1883 `
    -RemoteAddress 192.168.1.0/24 `
    -Profile Domain,Private `
    -Action Allow
Check the active Windows network profile and any other firewall or network controls. A rule for Domain and Private profiles does not allow traffic on a Public profile. Follow your organization’s firewall policy and remove the test rule when it is no longer needed.
Step 5: Test MQTT connectivity
Find the broker computer’s IPv4 address with ipconfig. From a client on the trusted network, open a PowerShell window and run the following command. Replace 192.168.1.10 with the broker’s actual IPv4 address. The example assumes the Mosquitto client tools are installed at the shown path; adjust it if necessary.
& mosquitto_sub -h 192.168.1.10 -p 1883 -t "test/topic" -v -dLeave the subscriber running and check its debug output for a successful SUBACK. In a second PowerShell window on a client that can reach the broker, publish a test message:
& mosquitto_pub -h 192.168.1.10 -p 1883 -t "test/topic" -m "Hello from MQTT"The subscriber should display:
test/topic Hello from MQTTReceiving the message confirms that the client can reach the broker and publish and subscribe to this topic. If the test fails, check the broker IP address, port, listener PID, service logs, authentication or topic permissions, network routing, and firewall rules.
Production security
For production, disable anonymous access and configure authentication and topic access controls appropriate to your deployment. Restrict firewall access to trusted clients or networks, and configure TLS to protect credentials and MQTT traffic in transit. Test the secured configuration with clients configured to use the appropriate credentials and TLS settings.
References
In a multi-station architecture with a client-server archive unit, depending on the project configuration, the logon and logoff performed on client stations may not be recorded on the historical server.
To have them recorded, check that both settings below are applied, then restart the project on all stations.
1. Allow the historical server to record the actions of all stations
This option is not selected by default in a new project.
- Open the project settings, then Advanced > Compatibility.
- Under Archives > Proprietary, free and ODBC log lists recording, select Record all variables and actions (Execute program and Logon/logoff) from any stations.
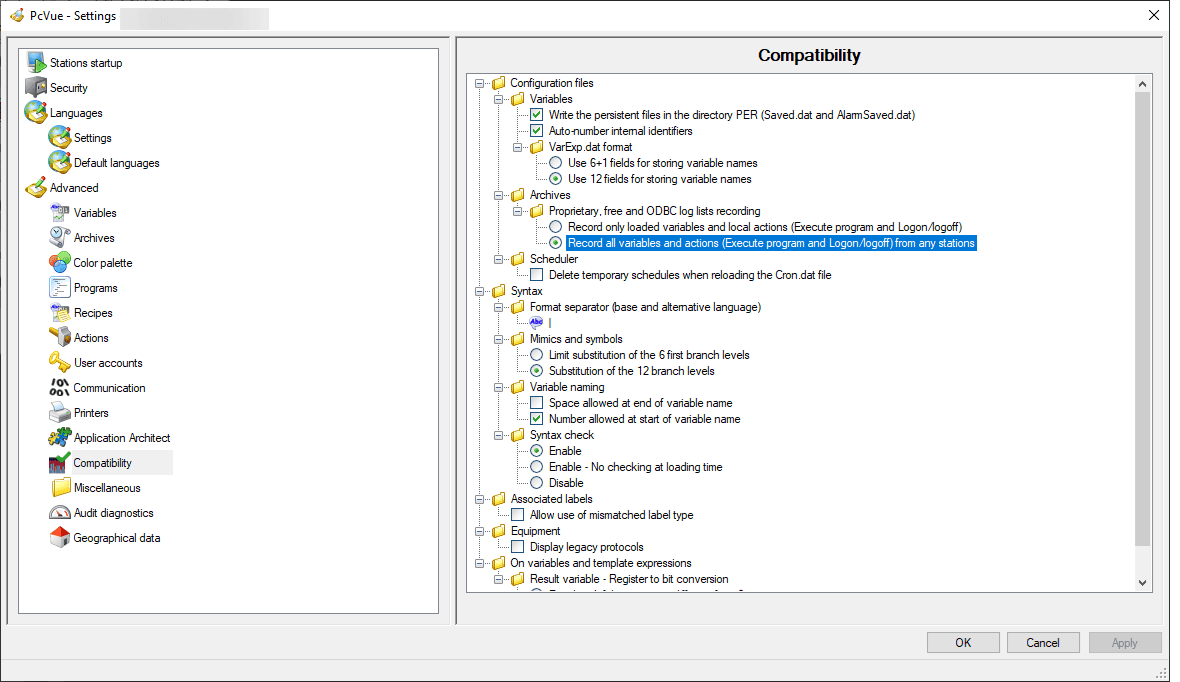
On its own, this option only allows the historical server to record the actions it receives from other stations. Step 2 is what makes the server receive them.
2. Declare the historical server as a client of each client station
- In the network configuration, open the properties of the historical server node.
- In the Links tab, under Select servers node, check the node of every client station whose logon/logoff must be recorded.
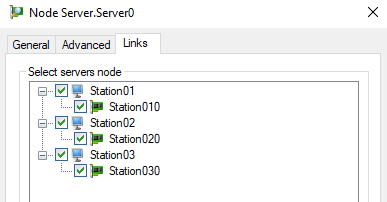
To check the result, log on and log off on a client station, then open the Log Viewer on the historical server: the events now appear with the name of the client station.
Good to know
- Any client station added to the project later must also be checked in the Links tab of the historical server node, otherwise its logon/logoff will not be recorded.
- Adding these links has no noticeable impact on performance. The historical server only subscribes to the log flow and system variables of each client station. If a client station is stopped, the server logs connection-lost messages for it, without impact on its own operation.
- The other actions that a non-historical station can log (send program, alarm acknowledgement, alarm mask, forcing of a variable unknown to the historical server) follow the same path and require the same configuration. See KB613: Compatibility issue with Client-Server Archiving.
- To configure the archive unit lists themselves, see Configuring client-server archive units in the product help.
Exports can be initiated manually or automatically using periodic and timestamp requests, with support for both WebVue and PcVue. SH_EXPORT also provides batch exports, email delivery, event-triggered exports, export lists, messages, and configurable export expressions.
A built-in scheduler allows exports to run once or at hourly, daily, weekly, or monthly intervals. Utility screens and expressions are available to display schedules, events, and batches, and to start or stop batches.
The package includes setup scripts, configuration templates, and examples for each supported data type. Before integrating the library into a project, read the EXPORT_LIB_READ_BEFORE_USE mimic (in W folder) and follow the instructions in the user manual (attached to this article).
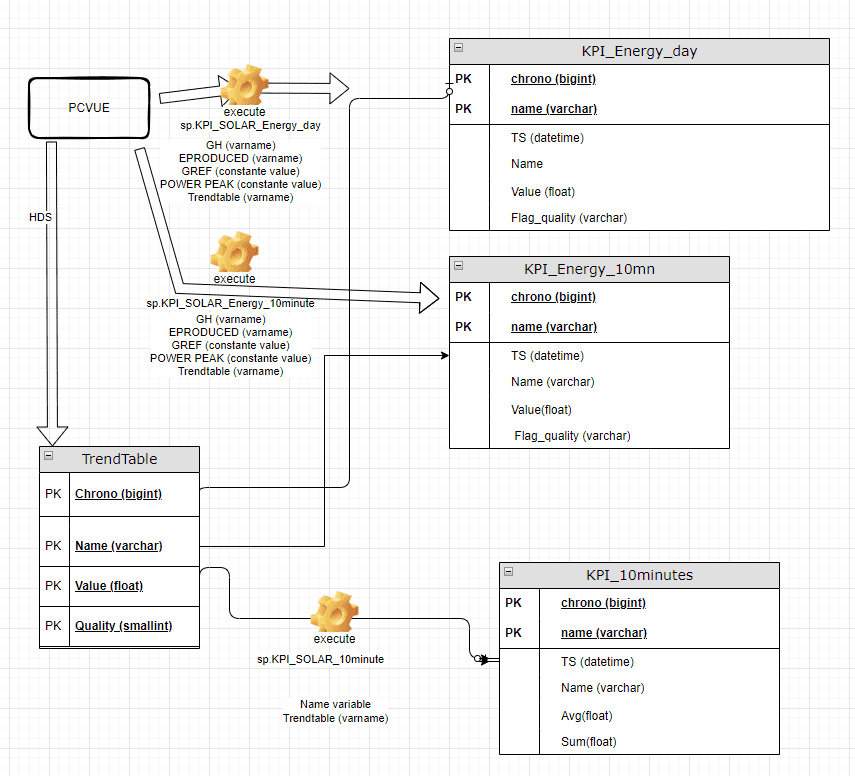
Data flow principle:
PcVue collects data from equipment and stored directly in the SQL database through HDS.
UDC connection execute stored procedure to insert data in KPI table and read data from Trendtable as below:
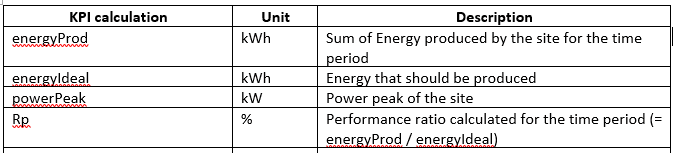
KPI list:
The system is able to give the following performances indicators.
Prerequisite:
Having historical data for :
◦ Global horizontal irradiance of PV site
◦ Energy produced of PV site
How to integrate KPI?
To use this project, you will need to :
1/ Before starting the project, from KPI_SOLAR_PACKAGE_v2 folder in PcVue copy paste DataConnectionsConf in C folder in your project
2/ Copy the mimic KPIConfiguration and the mimic template
3/ Start the project and in AA Import KPI model from AA (AA_KPI_import.xml)
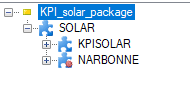
4/ In AA create instance named KPISOLAR
5/ In SQL open query script “scriptSQLKPI.sql”
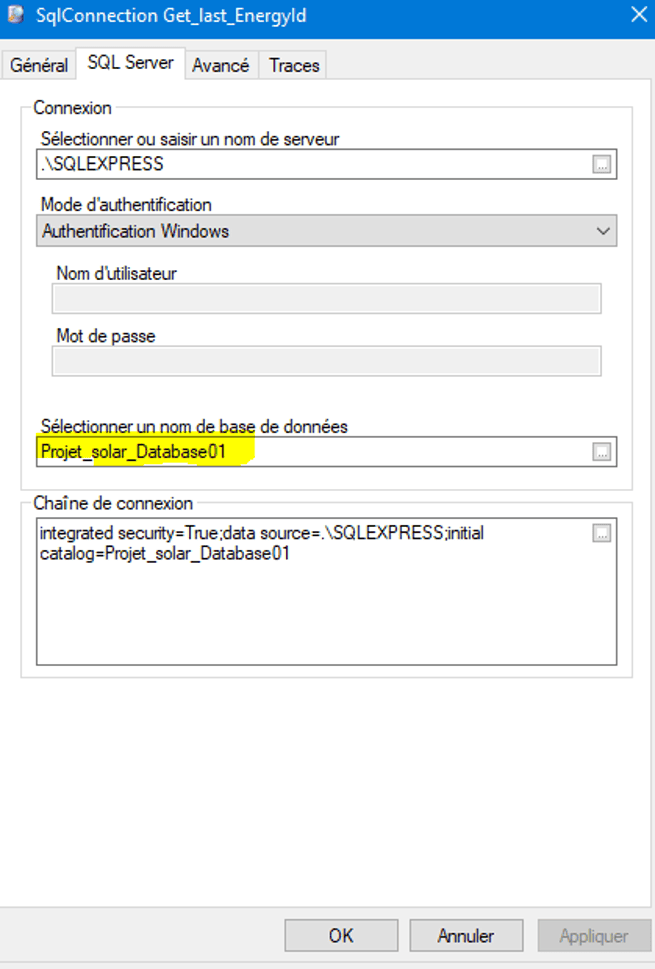
6/ Change database name before executing the script according to your HDS database name
7/ In AE configure SQL connection with the appropriate database name
8/ Stop and Start the project and open the window Dashboard.
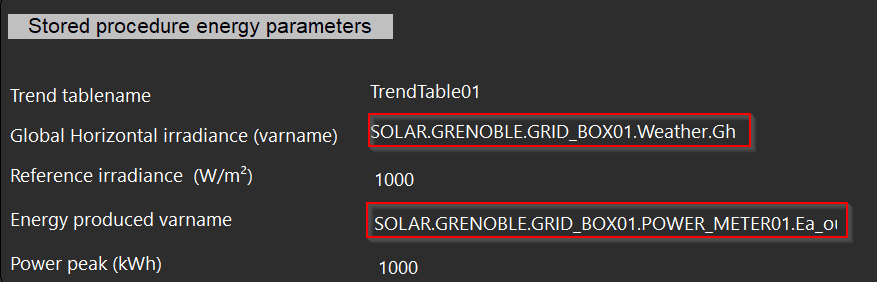
9/ Enter Gh varname and Energy produced varname and click on the Execution button
10/ By default KPI results will be refreshed every 1 minute
Principle
A WebVue client is a browser tab connected to the PcVue backend server. To force it to log out, the WEBVUE("HYPERLINK", ...) instruction must be executed in the context of that specific browser session, it cannot be triggered directly from an operator working on PcVue.
The sample project solves this by relaying an operator action through three variable scopes, until it reaches the right client:
- Shared scope – the operator’s action (button click) is visible to the whole system.
- Session context scope – each connected WebVue session evaluates the request and decides whether it is concerned.
- Client context scope – the targeted browser executes the actual disconnection.
Two use cases are covered:
- Closing one specific session, selected from a list of the currently connected clients.
- Closing all the WebVue sessions at once.
Displaying the list of connected clients
At project startup, the main function of the WebVue.SCB program is executed to initialize some variables and tell which function to launch when the user is selecting a row in the grid (AIgrid1):
Sub Main()
	sWindow = "Mimic 01";
	sBranch = "";
	Identity = "AIgrid1";
	Selector("SELPROG", sWindow, sBranch, Identity, "WebVue.SCB", "", "UpdateSessionToClose");
End Sub
The list itself is retrieved with the new LIST mode (syntax 6) of the WEBVUE instruction, which returns an XML fragment describing every active session:
Sub ListSyntax6()
	Webvue("LIST"); ' Retrieve the list of sessions
	iSessionCount = XMLPATH("COUNT", "webvue/list", "list/session");
	...
	For (i = 1; i <= iSessionCount; i++)
		sPath = FORMAT("list.session[%d].id", i);
		hBuff = XMLPATH("GET", "webvue/list", sPath);
		id = CGET_BUFFER(hBuff, 0, 255);
		...
	Next
End Sub
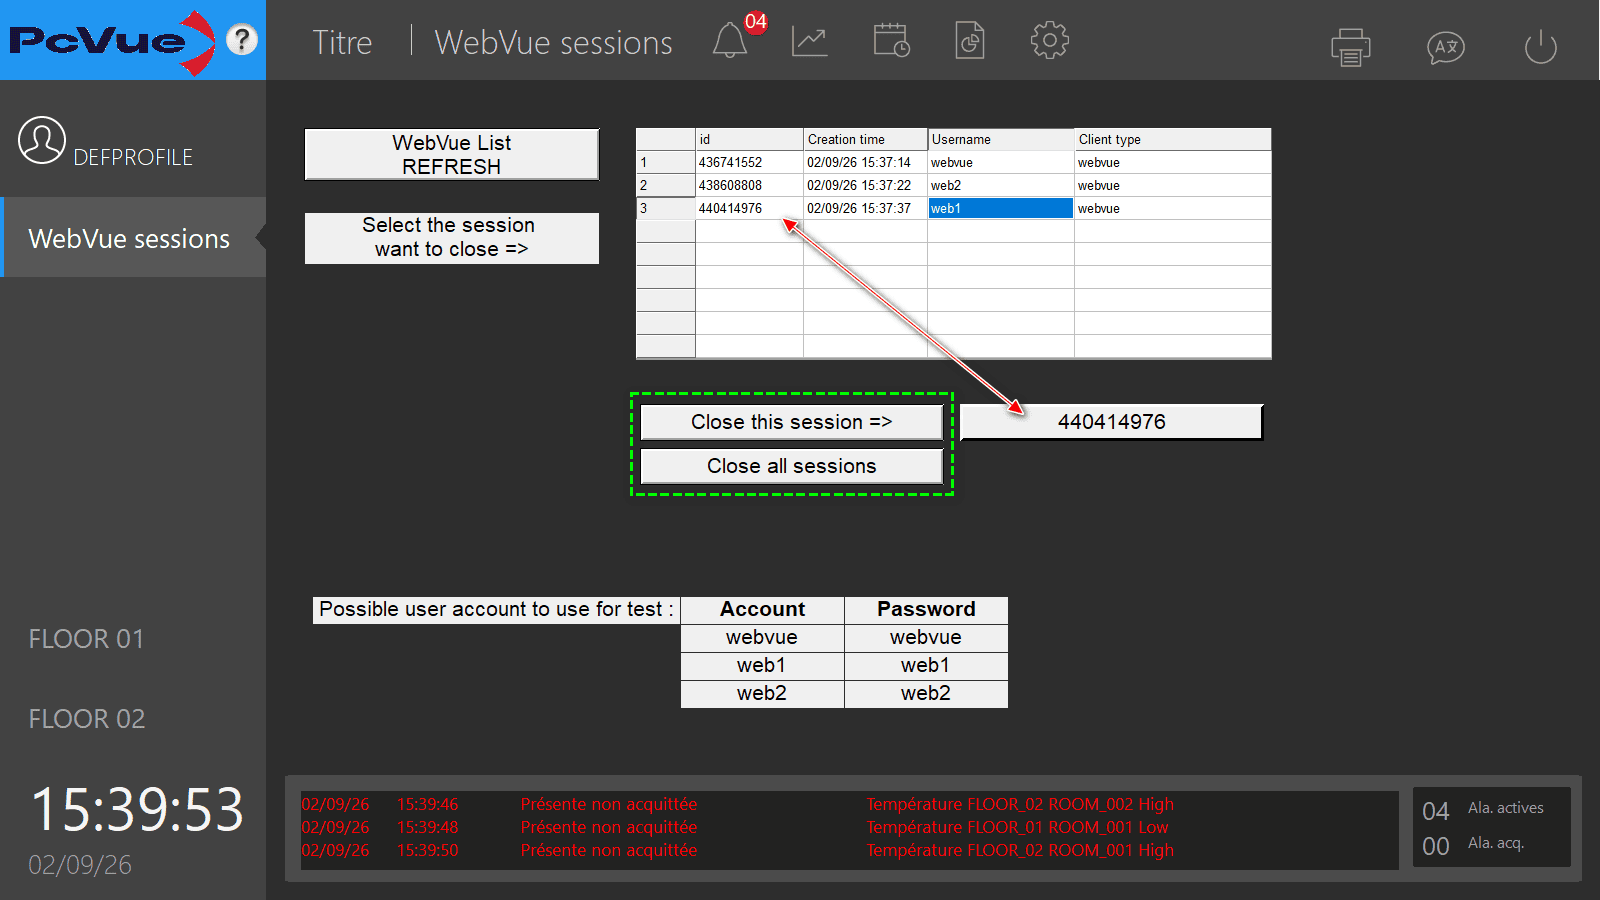
For each session, the id, creationtime, username and clienttype are extracted with XMLPATH and displayed in the grid. This program can be run once or on a cyclic basis (StartRefreshList / StopRefreshList) to keep the list up to date.
Selecting a row in the grid stores the corresponding session id in a shared variable:
Sub UpdateSessionToClose()
	@WEBVUE.IdToClose = DVAL(Selector("GETCELL", sWindow, sBranch, Identity, Selector("SELECTLINE", sWindow, sBranch, Identity), 0));
End Sub
The WEBVUE branch variables
All the variables used to relay the close request are grouped in a dedicated branch, WEBVUE. Their scope and role are documented directly in their description field:
| Variable | Type | Description (scope / usage) |
|---|---|---|
WEBVUE.IdToClose | Integer | Scope Shared (set by a Scada Basic) – id of the session selected in the grid |
WEBVUE.CloseMain | Command | Scope Shared (set by an animation) – “close this session” button |
WEBVUE.CloseAllMain | Command | Scope Shared (set by an animation) – “close all sessions” button |
WEBVUE.CloseSession | Bit | Scope Session context (updated by expression) – mirrors CloseMain in every session context |
WEBVUE.CloseAllSessions | Bit | Scope Session context (updated by expression) – mirrors CloseAllMain in every session context |
WEBVUE.CloseClientContext | Command | Scope Session context (set by a Scada Basic) – tells the targeted session to act |
WEBVUE.OpenMimic | Command | Scope Client context (updated by expression) – tells the targeted browser to act |
Two “on variable” expressions bridge the Shared scope to the Session context scope, so that the click on a button is instantly visible to every connected session:
EXPRESSIONONVAR,"CloseWebVueSession",...,"WEBVUE.CloseSession","","@WEBVUE.CloseMain"
EXPRESSIONONVAR,"CloseAllSessions",...,"WEBVUE.CloseAllSessions","","@WEBVUE.CloseAllMain"
EXPRESSIONONVAR,"OpenMimicOnWebVue",...,"WEBVUE.OpenMimic","","@WEBVUE.CloseClientContext"
A last expression bridges the Session context scope to the Client context scope (WEBVUE.OpenMimic from @WEBVUE.CloseClientContext), so that the request finally reaches the individual browser tab.
The WebVue.SCB program – reacting in each context
At logon, every WebVue session dynamically registers three programs to react to the variables above:
Sub CreateDynamicEvent()
	Event("ADDPROG", "@WEBVUE.CloseSession", "ALL>1", "WebVue.SCB", "", "CloseWebVueSession");
	Event("ADDPROG", "@WEBVUE.CloseAllSessions", "ALL>1", "WebVue.SCB", "", "CloseAllWebVueSession");
	Event("ADDPROG", "@WEBVUE.OpenMimic", "ALL>1", "WebVue.SCB", "", "OpenMimic");
End Sub
- Closing one session – when
CloseSessionbecomes 1 in a given session context, that session compares its own id (GetArg("WEB")) with the id selected by the operator (@WEBVUE.IdToClose). Only the matching session switchesCloseClientContextto 1:
Sub CloseWebVueSession()
	If (TOLL(GetArg("WEB")) == TOLL(@WEBVUE.IdToClose)) Then
		@WEBVUE.CloseClientContext = 1;
	End If
End Sub
- Closing all sessions – every WebVue session unconditionally switches
CloseClientContextto 1:
Sub CloseAllWebVueSession()
	If (GetArg("WEB") != 0) Then
		@WEBVUE.CloseClientContext = 1;
	End If
End Sub
- Reaching the browser – setting
CloseClientContexttriggers, through the expression above,WEBVUE.OpenMimicin the client context. This opens a dedicated mimic in that browser tab, so that the following instruction is finally executed by the targeted browser itself:
Sub OpenMimic()
	Window("OPEN", "CloseWebVue", ""); ' Opens a mimic to execute the Hyperlink mode of WEBVUE in the client context
End Sub

Sub CloseSession()
	WEBVUE("HYPERLINK", "WebClient/Authentication/Logout?useraction=true");
End Sub
The CloseSession sub above runs when mimic “CloseWebVue” opens, and performs the actual logout of that browser.
Note: The same
WEBVUE("HYPERLINK", ...)instruction can also be used to redirect a client to any URL, or to force it to reload the web client:
- Redirect:
WEBVUE("HYPERLINK", "https://your-web-site")- Reload (F5):
WEBVUE("HYPERLINK", "WebClient")- Logout:
WEBVUE("HYPERLINK", "WebClient/Authentication/Logout?useraction=true")
Profile configuration
The CreateDynamicEvent sub must be executed by every WebVue session as soon as it logs on, so that the dynamic events described above are registered in its own context. This is configured on the WebVue user profile (p_WebVue): the “Execute Scada Basic script at logon” property is set to call WebVue.SCB / CreateDynamicEvent.
Usage
- Open “Mimic 01”: the grid displays the currently connected WebVue sessions (id, creation time, username, client type).
- Select the row corresponding to the session to disconnect: this stores its id in
@WEBVUE.IdToClose. - Press the “Close this session” button (sets
@WEBVUE.CloseMain) to disconnect only the selected session, or press “Close all sessions” (sets@WEBVUE.CloseAllMain) to disconnect every connected WebVue client.
Sample project: See the attached PcVue project WebVueCloseSession.
Projects are not protected by default. Migrating a project to PcVue 17 does not protect it: some of its files are still encrypted with a default key, exactly like a newly created project. An encrypted file taken from such a project can be loaded into any other project, on any computer, by anyone with access to the files. Binding the project to a key that you own is the step that follows migration, before test and validation resume.
Protection relies on two elements that you generate: a key file, which holds a randomly generated secure key, and the passphrase that protects that key file. Back up both and keep them safe: they are required to deploy the project on other hosts, to restore a host, and to renew the key. If they are lost, access to the configuration data is lost with the last host that still knows the key.
Before you start
– The project must already run on PcVue 17. A project coming from an earlier version must be migrated first : see [KB1272] PcVue 17 – Project Migration Guide.
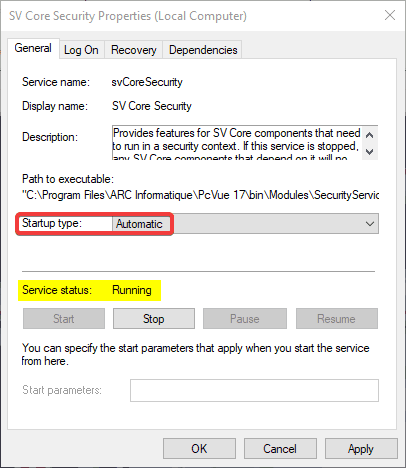
– The SV Core Security service is in charge of cryptographic operations. In order to use protected projects, it has to be running on every PcVue host, not only on the one where you protect the project. Set its startup type to “Automatic” in Windows Services Manager, and verify the “running” service status.
– The command line operations require a Command Prompt opened as a user with administrative privileges, in the folder where svcmd is located :
by default C:\Program Files\ARC Informatique\PcVue 17\Bin\.
Generating a key file
Protecting a project starts with the key file. Generate it first: every operation that follows uses it, and the passphrase, as input. The key file holds a randomly generated secure key and is protected by the passphrase. If you manage several projects, use a different key file and passphrase for each of them.
Each operation described in this guide can be performed either from the Host Deployment Console or from the svcmd command line.
The two are equivalent: use one or the other, not both.
Using the Host Deployment Console
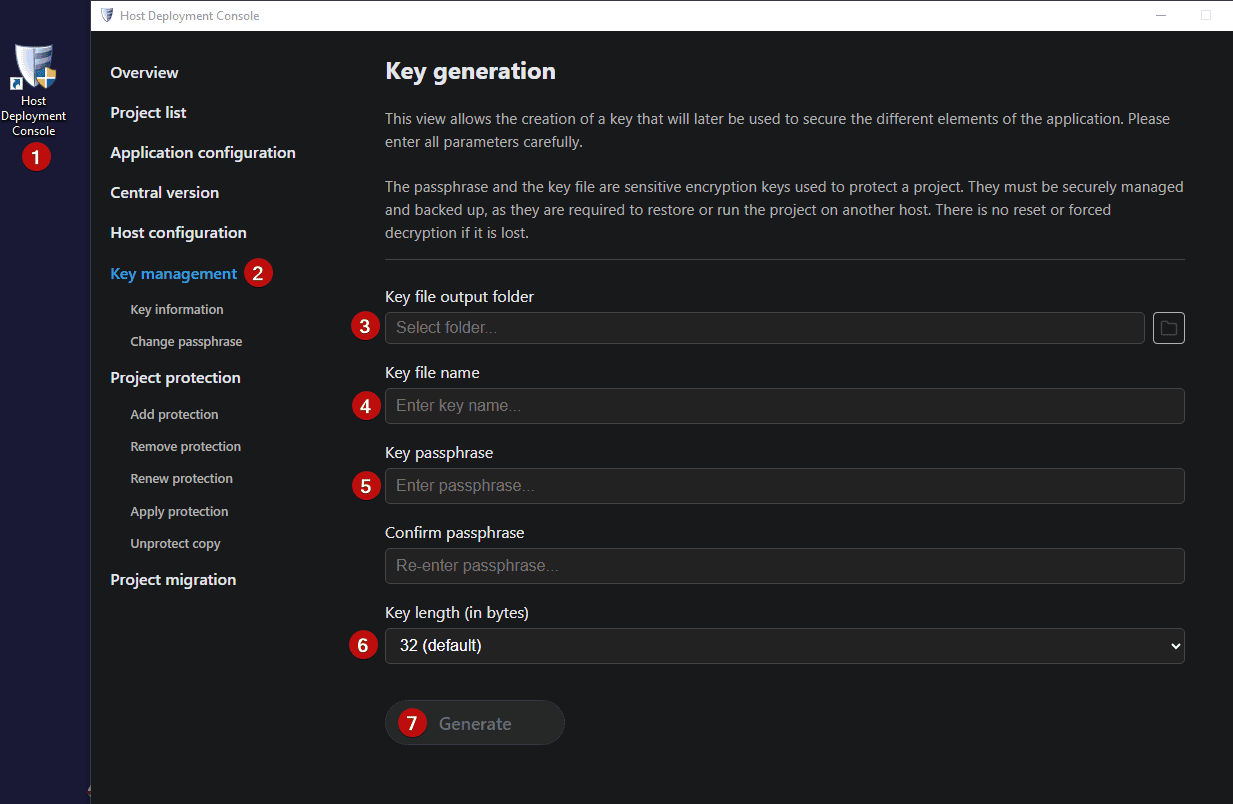
- Open the Host Deployment Console as a user with administrative privileges. A shortcut is available on the desktop and in the Programs menu.
- In the left pane, click Key management. The Key generation view opens.
- Select or enter the path to the folder where the key file is to be stored.
- Enter a name for the key file.
- Enter a passphrase of your own and confirm it. It protects the key file.
- Select the key length, 32 bytes by default.
- Click Generate. After a few seconds the key file is available in the output folder.
Or using the svcmd command line :
svcmd key generate "X:\keys\my-project.key" --pass MyPassphrase
You have to specify in the command line the destination folder, and the passphrase.
Protecting a project
Using the Host Deployment Console
- In the left pane, click Add protection. The Add protection view opens.
- Select the Project folder, or enter the Project name manually.
- Select the Key file you generated and enter the Passphrase used to protect it.
- The project is not protected yet, so make sure to enable “Protect the project immediately”
- Click Add.
- Back up the key file and its passphrase.
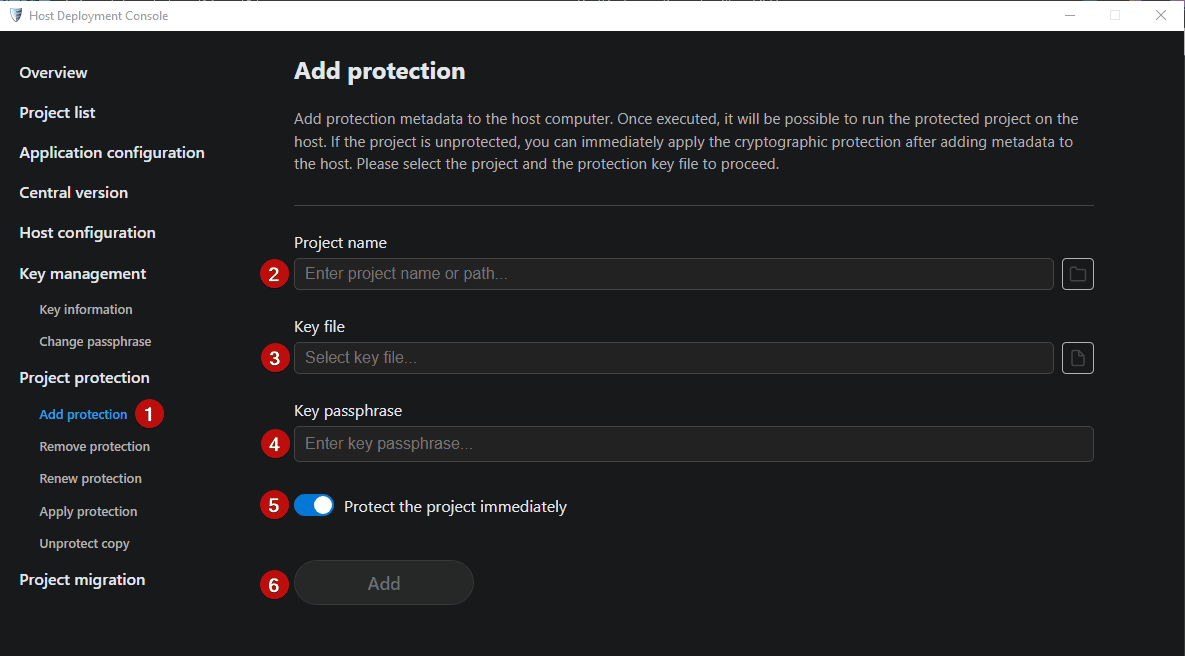
Step 4 imports the key so that PcVue can cipher and decipher data for the project. Because the toggle was enabled, it also deciphers the project with the current default key, rotates the keys, and ciphers the project with your own key.
Or using the svcmd command line
1. Retrieve the identifier of the project, since protection is applied to a project identified by its GUID and not by its name:
svcmd project get-id MyProject
2. Register the key for that project:
svcmd project-protection add <PROJECT-ID> X:\keys\my-project.key --pass MyPassphrase
3. Apply the key to the project:
svcmd project-protection apply <PROJECT-ID> X:\keys\my-project.key C:\Projects\usr\MyProject --pass MyPassphrase
Then back up the key file and its passphrase.
Running add alone does not protect the project: it only registers the key so that PcVue can use it, and leaves the project files untouched. They remain ciphered with the default key until apply is run.
Deploying a protected project on another host
On every other host that runs the project, register the key without applying it again: the project is already ciphered with it.
In the Host Deployment Console, open the Add protection view, select the project and the key file, enter the passphrase, and make sure Apply protection to the project immediately is disabled before clicking Add.
Instead, if you want to use the command line, run the add command only :
svcmd project-protection add <PROJECT-ID> X:\keys\my-project.key --pass MyPassphrase
Renewing the secure key
Renew the key when your security policy requires a rotation, or whenever you suspect that the current key has been compromised.
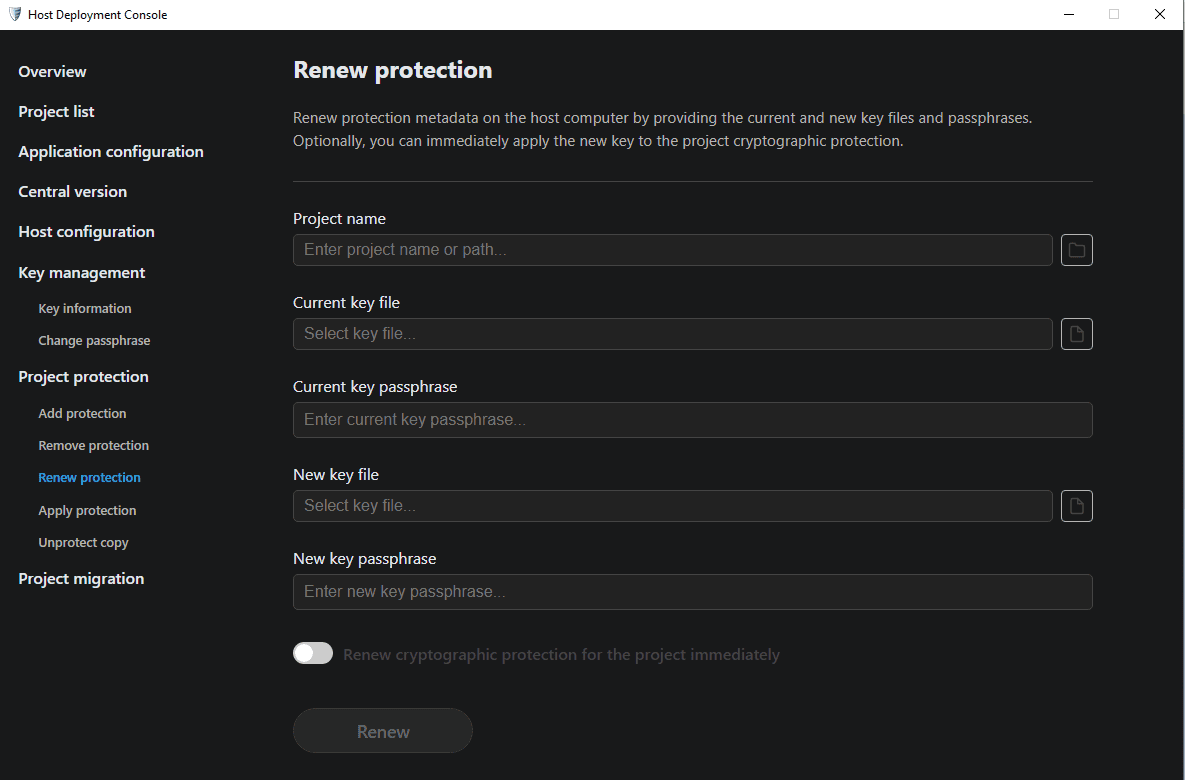
Using the Host Deployment Console
Go to Project protection > Renew protection and fill in every field.
Or using the svcmd command line
svcmd project-protection renew <PROJECT-ID> <Current key file path> <New key file path> --apply <Project folder name>
For example:
svcmd project-protection renew a040230f-575a-449d-8f2f-8077092990dc "F:\Key\ProjectKey.key" "F:\Key\NewProjectKey.key" --apply MyProject
The tool prompts for the passphrase of the current key and for the passphrase of the new key before processing the renewal. See the project-protection renew command line help for the full list of options.
Unprotecting a copy
When a project has to be sent to an external party, for instance to obtain support on a problem, you can produce an unprotected copy of it without removing the protection of the project in use.
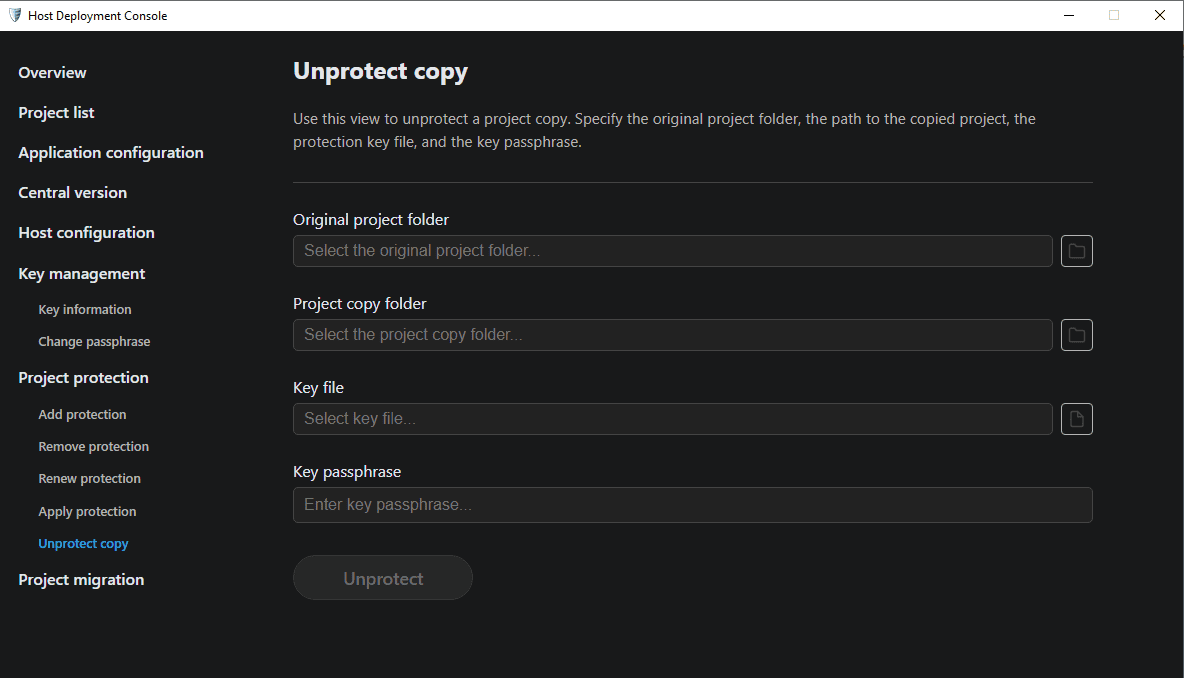
Using the Host Deployment Console
Go to Project protection > Unprotect copy and fill in every field.
Or using the svcmd command line
svcmd project-protection unprotect-copy <PROJECT-ID> <Key file path> <Destination folder>
For example:
svcmd project-protection unprotect-copy a040230f-575a-449d-8f2f-8077092990dc "F:\Key\ProjectKey.key" "E:\ProjectToShare\MyProject"
Write the copy to a folder outside the usr data folder. Storing it inside would unprotect the project currently in use.
Before sending the copy, anonymise it: station IP addresses, user account names and any other data you do not want to disclose.
Related articles
- [KB1272] PcVue 17 – Project Migration Guide
-
[KB1275]PcVue 17 – Project Protection Guide
What changed in PcVue 17
The Central Project Management dialog no longer allows you to define the central folder or to enable the feature. It is now used only to create a project version, update it, or change its state.
Both operations moved to host level: they are performed once per station, with the Host Deployment Console or the svcmd command line, and are written to the AppDeployment.json file located in the <Install Dir>\config folder.
Instead of granting write permissions on the share directly to users or to the PcVue runtime engine, file operations in the central folder are delegated to a dedicated PcVue service. This improves protection, reduces accidental modifications, and simplifies the management of the ACLs on the share.
Before you start
- PcVue must be stopped on the station you are configuring.
- The central folder must already exist and be reachable over the network by every PcVue host. It can reside on any machine acting as a file server.
- The command line method requires a Command Prompt opened with administrative privileges.
- A project created with an earlier version must be migrated to PcVue 17 before it can be published as a version. See [KB1272] PcVue 17 – Project Migration Guide.
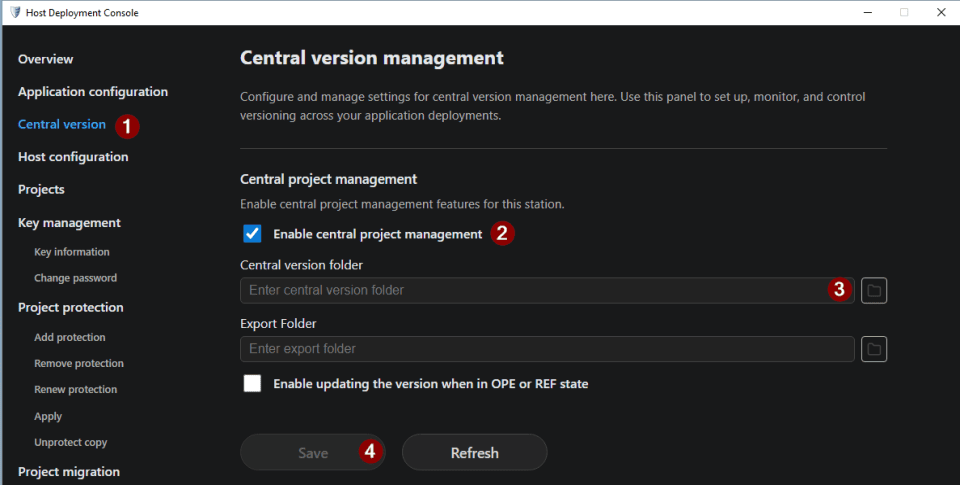
Method 1 – Host Deployment Console
- Stop PcVue if it is running.
- Open the Host Deployment Console.
- Select the Central version tab.
- Check Enable central project management.
- Select the shared folder.
Method 2 – svcmd command line
-
- Stop PcVue if it is running.
- Open a Command Prompt with administrative privileges, and move to the installation folder where
svcmdis located. By default, it is C:\Program Files\ARC Informatique\PcVue 17\Bin . - Register the central folder, where
<Central version folder>is the path to your own shared folder:svcmd central-versions tune --central-folder "<Central version folder>"
For example:
svcmd central-versions tune --central-folder "\\Server\Versions\Projects"
- Enable the feature:
svcmd central-versions enable
Keep the straight double quotes around the path: they are required as soon as it contains a space.
Checking the configuration
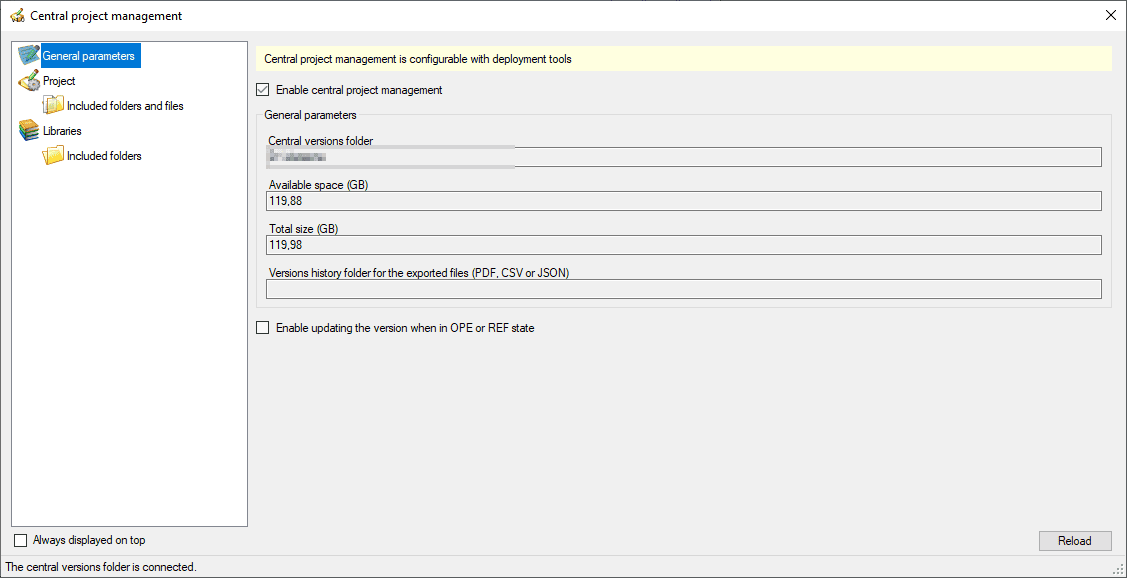
Open the Central project management dialog. A banner recalls that the feature is configured with the deployment tools, and the general parameters are displayed for verification only: Enable central project management is ticked and Central versions folder shows the registered path. Available space (GB) and Total size (GB) are reported for that folder, and the status bar confirms that the central versions folder is connected.
The same path can be read in AppDeployment.json, in the <Install Dir>\config folder.
From this point on, you can create project versions and manage their state, using the “Project” entry.
Permissions on the central folder
All hosts need network access to the shared folder, but they do not need the same rights:
- Runtime stations only read and copy project versions. Read access is sufficient.
- Engineering stations publish new versions, and additionally require the right to create and delete subfolders, and to create, modify and delete files.
Related articles
On a project migrated from 15.2 or 16.3 to 17.0.0, one or more of the following are observed:
– The project does not start, or starts with part of its services unavailable.
– Stations no longer connect to each other (client/server, redundancy).
– Communication protocols that were operational before the migration are blocked.
– Security options that were enabled in the source project are refused or reset to their default value.
A project created natively in 17.0.0 is not affected.
Workaround
Apply this procedure to any project migrated from 15.2 or 16.3 to 17.0.0 that shows one of the symptoms listed above.
- Open the migrated project Application Explorer.
- Connect to a user with administration rights.
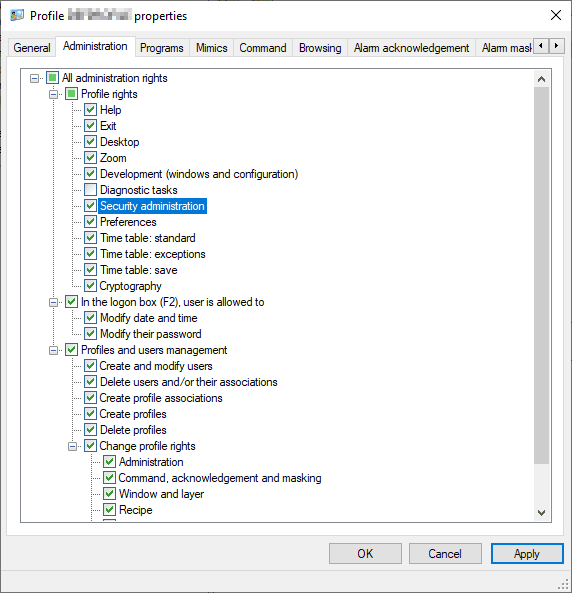
- Add to the current user profile the “Security Administration” right.
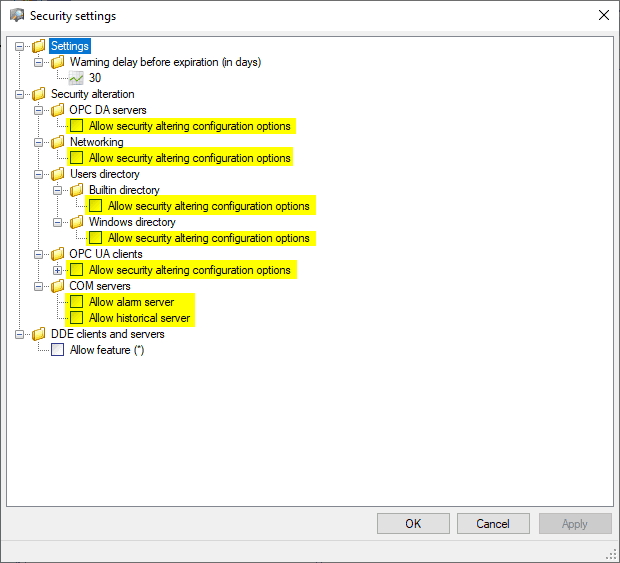
- Select the Security node.
- Run the Settings action.
- Allow security alterations for the areas concerned by the observed symptom.
- Save the project, then close it.
- Reopen the project and test the behavior again.
The procedure applies to migrated projects only. On a project created natively in 17.0.0, strict defaults are normal and must not be relaxed for this reason. This procedure restores the behavior expected after a migration; it does not apply any hardening beyond what the source project was already running with, and the alterations can be locked again at any time.
Resolution
The behavior is corrected in 17.0.1. Once that version is installed, a project migrated from 15.2 or 16.3 keeps the security configuration of its source project and the workaround is no longer required.
Related articles
Why is migration required in PcVue 17?
PcVue 17 strengthens the cryptographic protection of projects and station hosts. As part of this change, the format of the user.dat file (which stores user accounts and other sensitive configuration) has changed. The previous user.dat formats are no longer supported, and PcVue 17 cannot read a project that still uses the old format.
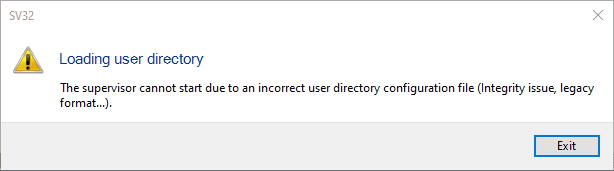
You will have the following message when lauching a non migrated project : Loading User Directory : “The supervisor cannot start due to an incorrect user directory configuration file (Integrity issue, legacy format…).”
To preserve your users and configuration while applying the new secure encryption, ARC Informatique provides a Project migration tool inside the Host Deployment Console. The same operation is also available through the ProjectUtility command-line tool.
Key point: a project that is not migrated with the procedure below will fail to start on PcVue 17 or later.
Before you begin
- PcVue 17 is installed on an engineering or test host (do not migrate directly on production).
- You have Windows Administrative privileges — both methods require them.
- PcVue is stopped. The migration tool cannot run while PcVue is active.
- You keep a safe copy of your original V16 project outside the working folder.
Method 1 — Host Deployment Console (recommended)
The Host Deployment Console provides a guided, graphical migration and is the recommended method for most users.
- Copy the project into a sub-folder of
C:\ProgramData\ARC Informatique\PcVue 17\usr\. - Open the Host Deployment Console as an administrator (shortcut on the desktop and in the Programs menu).
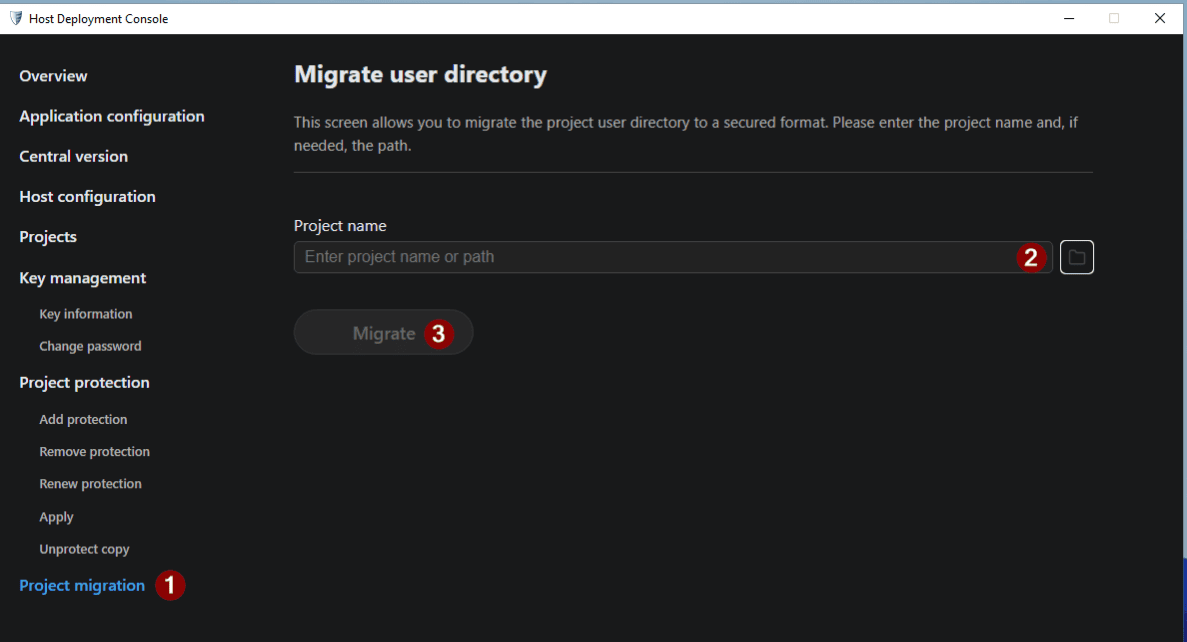
- Click Project migration and select your project.
- After a few seconds a confirmation message appears. On success, the project can start with PcVue 17.
Reference: Host Deployment Console
Method 2 — ProjectUtility CLI
Prefer the command line, or need to script the migration? Use the ProjectUtility tool.
- Open a terminal as Administrator and go to
C:\Program Files\ARC Informatique\PcVue 17\Bin\. - Copy the project into a sub-folder of
C:\ProgramData\ARC Informatique\PcVue 17\usr\. - Run the following command, replacing
MyProjectwith your own project folder name:
ProjectUtility migrate "MyProject" user-directoryIf the command succeeds, the project is migrated and can be started with PcVue 17.
Reference: ProjectUtility CLI
After migration: protect your project
After migration, review security alterations so they match the project’s needs. In Application Explorer, open the Security node → Settings, and verify which alterations are allowed or locked (networking, protocols, and other features in use). Migration keeps the project runnable with a posture close to the source version; once validation is complete, tighten these options as part of hardening. If a feature that worked before migration is blocked, confirm that the related alteration is still allowed, then retest.
A successful migration leaves the project in an unprotected cryptographic state. Some files are encrypted with a default key, exactly like a newly created project. Before you resume test and validation, protect the project so it uses your own keys.
Reference: Protecting and deploying a project — and the Hardening guide.
By following the information below, you can download the latest PcVue 17 feature release.
The feature release – PcVue 17 is available for download on our web site. Please refer to the corresponding PcVue 17 – Release Information for more information. You will find the ReadMe of this version (available in English, Chinese, Russian, French and Japanese).
SHA-256 – 03A9DB569A96AECB135EE8FA394B933AD8DF3DAAEA4507129AF4D96425C202C6
You can also download here below licence utility to check, update or upgrade your PcVue license (dongle or software license)
SHA-256 – caafad7dbca4bc4c6b4d1aea0fe6c0a2484b501f422019b93bd4180e27f9eef6
How to verify the integrity of downloaded files?
Prior to installing the software, it is important to check the integrity of the file(s) you have downloaded. When you received instructions for download from us, we included the file(s) SHA fingerprint. To ensure a file has not been corrupted, it is necessary to calculate the fingerprint of the file(s) you have downloaded in order to make sure it matches the one provided in the download instructions.
- Open the Windows startup menu, type “Powershell” and press Enter to open a Powershell terminal.
- Using the command CD, move to the directory where the downloaded installation media is located.
- Run the following Powershell command where <filename> is the name of the downloaded file to verify and <hash> is the fingerprint provided separately.
(Get-FileHash -Algorithm SHA256 -path “<filename>”).Hash -eq “<hash>”After a few seconds, you obtain an output indicating True if the fingerprint of the downloaded file matches the hash value provided, and False otherwise.For example, the following command to verify the Initial Release 17.0.0 iso file returns True:(Get-FileHash –Algorithm SHA256 -path “.\17.0.0_PcVue.iso”).Hash -eq “3E9432F795026373F2EEC990EA2E87C6B6E29A4976D0E513E310C25C74F064C8”
We advise you to never launch an installation package if the fingerprint of the downloaded file does not match our reference. If they are different, we recommend retrying the download to rule out errors that may be due to network issues. If the fingerprints remain different, please inform us as soon as possible so we can take any necessary actions.